
Manual


Page
7.
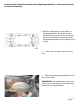
20. Re-use the two (2) hat brackets in the
same front-to-back locations but ush out to
the new edge. Install the brackets with the
eight (8) provided #10-24 screws and nuts.
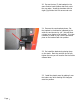
21. Remove the rear brackets shown. Cut
the brackets in the direction indicated by the
white line and shorten by 1/4” (this will allow
a larger inner fender to be inserted). It is then
necessary to weld or pop rivet the shortened
piece on the bracket back into position.
22. Re-install the brackets by placing them
on the studs. Start the nuts but do not fully
tighten them as you will need to ex the fender
outward later.
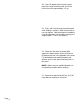
23. Install the plastic panel by placing it over
the brake rotor while working the triangular
area into position.