2019-UP Ford Ranger Radio Replacement User Manual
1
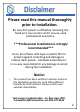
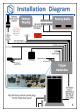
Please read this manual thoroughly prior to installation. Be sure ACC power is off before removing the head unit. Use caution and if unsure, seek professional assistance. ***Professional installation is strongly recommended*** Cover all surfaces with tape or plastic film to protect against scratching and damage to interior dash panels. Linkswell Automotive is in no way responsible for any damage incurred during the installation.
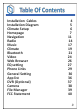
Installation Cables Installation Diagram Climate Setup Homepage Navigation Radio Music Climate Bluetooth Video Web Browser EQ setting Phone Links General Setting App list DVR (Optional) Camera File Manager FCC Statement 4 5 6 7 11 14 17 19 21 24 26 27 29 30 36 37 38 39 40 3
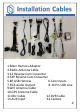
1.Main Harness Adaptor 2.Radio Antenna Cable 3.12 Reverse Cam Converter 4.54P Reverse Cam Converter 5.8P USB Harness 6.Cam Inputs 7.RCA Audio Output 8.10 Pin USB Line 9.Wifi Antenna Cable 10.GPS Antenna Cable 11.Mic Cable 12.DVR Cable 13.AUX Input 14.
5
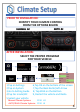
PRIOR TO INSTALLATION: IDENTIFY YOUR CLIMATE CONTROL FROM THE OPTIONS BELOW AFTER INSTALLATION: SELECT THE PROPER PROGRAM FOR YOUR VEHICLE 1,Tap on Settings 2,Tap on System 3,Go to Setting Guide 4,Tap Car model/AC 5,Select your vehicle 6,Tap OK on the bottom of the screen 7,Tap the Back Butto/Left Arrow 8, Tap SAVE on the Bottom 9, Restart the vehicle and Radio Manual Climate Systems: F150 LO AUTO/DUAL Climate Systems: F150 HI 6
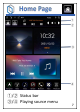
① ② ③ ④ ①/② Status bar ③/④ Playing source menu 7
①/② Status bar 1.[ ]:Tap to turn on/off the Volume. 2.[ ]:Tap to turn on/off the screen. 3.[ ]:Tap to Dimmer Control. 4.[ ]: Bluetooth on/off. 5.[ ]: Tap to turn on Equalizer set up. 6.[ ]:Connection Information. 7.[ ]: USB Connection on. 8.[ ]:Tap to Reveal the Multitasking Screen. 9.[ ]:Volume Control. 10.[ ]:App selection. 11.[ ]:Home Page. 12.[ ]:Return to previous screen.
③ Playing source menu The playing sources are displayed on the front side of the screen. Tap to enter the selected app.
④ Quick Start Playing source menu The quick start playing sources are displayed on the down side of the screen. Tap to quick enter the selected app,swipe left/right to select other functions. Long press to change the icon position customize the menu. Or enter to AC Simple operation bar.
Your new unit comes with the option to use a variety of different navigation systems.
Use your favorite data based navigation systems like Google Maps. Download your preferred application. Go into the settings, on the navigation tab simply double click the preferred navigation listed and the system will becomes your selection.
Or you can purchase the iGO NextGen Satellite Navigation through your local LinksWell retailer.
The radio icon will access the AM/FM radio.
① ⑤ ② ③ ⑥ ④ ⑦ ⑧ ①/④ :Back to last action. ②/③: Tune backward/forward ⑤:Current station,long press to save. ⑥:Long press to search the statations automatically. ⑦:Tap to Numeric keyboard,touch number to input frequency. ⑧:Tap to select one radio band FM / AM.
① ② ③ ④ ⑤ ⑥ ⑦ ⑧ ①:Current station,long press to save. ②:Tap to Stereo/Mono. ③:Tune backward/forward. ④:Tap to Local/DX station search. ⑤:Tap to EQ. ⑥:Tap to RDS radio search. ⑦:Tap to RDS radio programe types selection. ⑧:Tap to AF stations search.
You can play music on your new system by using the USB to play songs from a USB stick, or downloading music from the USB stick onto the hard drive or on board SD.
1.[ ]Tap to EQ. 2.[ ]Tap to Song/Floder repeat. 3.[ ]Music files on the systems SD card,hard drive and removable USB.
You can access the climate controls by pressing any of the climate control icons located at the bottom of the display.
1.[ ] :Close climate controls. 2.[ ]:Driver temp control. 3.[ ]:Auto air on/off. 4.[ ]:Max AC/off. 5.[ ]:Recyle air. 6.[ ]:Front defroster. 7.[ ]:Rear defroster. 8.[ ] :Driver seat heater/cooler. 9.[ ]:Steering wheel heater. 10.[ ]:Dual Climate Control On/Off 11:[ ]:Passenger seat heater/cooler. 12.[ ]:Vent control. 13.[ ]:Fan control. 14.
Use the Bluetooth to stream music from your phone.
Use the Bluetooth source to send and receive phone calls.
1.[ ]:Track Down. 2.[ ]: Track Up. 3.[ ]:Play/Pause. 4.[ ]:Number Dial. 5.[ ]:Call History. 6.[ ]:Contact List. 7.[ ]:Devices Search. 8.[ ]:Pair and disconnect phones. 9.[ ]:List of all pair devices. 10.[ ]:Bluetooth music. 11.[ ]:Bluetooth phone.
You can play videos on your new system by using the USB to play videos from a USB stick,or downloading videos from the USB stick onto the hard drive or on board SD Card.
1.[ ]:Access Video Files (USB / Hard Drive ). 2.[ ]:Repeat progme selection. 3.[ ]:EQ. 4.[ ]:Video down. 5.[ ]:Video up. 6.[ ]:Play pause. 7.[ ]:Picture in Picture,double tap the video playing exit out of pic turn in picture.
By using the hotspot on your cellphone you can use the Web Browser on your tablet just like you would your phone. **Use of your cell phones “hot Spot” feature is subject to data charges.** 26 Check with your cell phone provider for more details.
• • • • • • • • • • EQ Setting: Low Pass filter High Pass filter 27 EQ Setting: Rock Popular Classic Vocal Jazz Normal
EQ Setting: Amplifier area selection election EQ Setting: Delay position arrange 28
PhoneLink will allow you to use your phones application on your new T-Style radio by simply plugging your phones factory cord into the PhoneLink USB input. Connecting your phone is simple. First select the PhoneLink source, then follow the on screen directions. Access your phones text messages, music, podcast and applications. Use your phones navigation system in place of the IGO System or other maps.
In the settings menu, you can adjust the basic settings for the different functions of the device to your requirements.
• Equalizer: View Equalizer Settings (See Next page) • MIC Gain: Change Microphone Gain settings (Echo Reduction) • Radio: Change the FM/AM Radio volume • Music: Change the Music volume • Video: Change the Video volume • BT: Change the Bluetooth Phone Call volume • BT-Music: Change the Bluetooth Music volume • AUX: Ch ge the AUX Input • Navi Volume: Change the Navigation voice volume • Others: Change all other volume options 31
• HDMI Output Type: Change HDMI Output Mode • Video: HDMI OUTPUT will output any video playing on the Radio • Full Screen: HDMI OUTPUT will output the entire screen as a “Screen Mirror. • Video In Motion Control:Video on/off when driving.
You can set up the faourite apps and boot up logo here.
• Setting Guide: Vehicle Setup (See setting guide item) • Network: Connect the Radio to Wi-Fi • GPS: Check GPS Signals • Software Version: View current Software info • Upgrade: Check for System Updates (Wi-Fi Only) • Android Settings: View the internal Android Settings menu • Factory Settings: View Developer/Linkswell settings • Factory Reset: Reset basic radio settings(Only for factory) 34
• Car Model/AC: Setup LO, MID, HI AC Vehicles (See Climate Setup) • Seat & Steering Wheel: Heated/Cooled Seats & Heated Steering Wheel Settings • Camera: FORD 360 Camera ON or OFF • Temperature Display: Display Outside Temperature (If Available) • Factory AMP: Lowers volume power (for Factory Amplifiers) • Reverse Mute: Mute or Lower audio volume when vehicle is in reverse.
Your new T-Style Radio is itself an Android tablet. So when used with WIFI, either while parked in rage of a hot spot or using your phones hot spot you can list the app stores to download a variety of applications.
Tap [ ] ,press [ ] to Sart DVR. The DVR plugs onto one of the units USB inputs.The DVR also come with ADAS drives assist features including lane departure warning,stop and go traffic alert,and collision warning.You can control and playback of the DVR from your T-style radio.
Your new T-Style radio comes with 3 camera inputs.
Use the File Manager to download, delete and move files from the hard drive, on board SD card and or USB drive.
1.This device complies with Part 15 of the FCC Rules. Operation is subject to the following two conditions: (1)This device may not cause harmful interference, and (2)This device must accept any interference received, including interference that may cause undesired operation. 2.Changes or modifcations not expressly approved by the party responsible for compliance could void the user's authority to operate the equipment.
However, there is no guarantee that interference will not occur in a particular installation. If this equipment does cause harmful interference to radio or television reception, which can be determined by turning the equipment off and on, the user is encouraged to try to correct the interference by one or more of the following measures: Reorient or relocate the receiving antenna. Increase the separation between the equipment and receiver.
909-375-0633 www.linkswellinc.com info@linkswellinc.