GEN IV T-Style 2014-2018 Chevy Silverado/GMC Sierra T-Style Radio Replacement User Manual
Disclaimer Please read this manual thoroughly prior to installation. This manual shows the basic controls of a TS-GMPU12-1RR-4 Gen IV Be sure ACC power is off before removing the head unit. Use caution and if unsure, seek professional assistance. ***Professional installation is strongly recommended*** Cover all surfaces with tape or plastic film to protect against scratching and damage to interior dash panels. Linkswell Automotive is in no way responsible for any damage incurred during the installation.
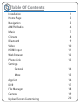
Table Of Contents Installation Home Page Navigation AM/FM Radio Music Climate Bluetooth Video HDMI Input Web Browser Phone Link Settings 1 3 5 6 7 8 9 10 11 12 13 General 14 More 15 App List DVR File Manager Camera Upload Screen Customizing 16 17 18 19 20
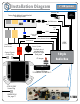
Installation Diagram 7” i0B Systems Bluetooth Mic Factory Radio Module located behind the factory screen GPS Antenna AM/FM Antenna i0B DVR AUX IN USB 2 Factory USB Adaptor Factory Reverse Camera OnStar Audio Factory Radio Power harness Factory Climate Control Plug HDMI In/Out External Speaker CanBus Decoder The Radio box is attached to the rear of the T-Style Dash piece.
Installation Parts 1 T-Style Dash Bezel 1 2 Trim Bezel 3 PhoneLink Dongle (No longer Needed) 4 AC Harness 5 Microphone 6 CD Jumper 7 2018 up Screen Jumper 2 8 Upper Mounting Brackets 4 3 6 9 USB 1/2 5 5 7 8 10 AM/FM Antenna Adaptor 19 11 External Speaker 18 17 12 CAN BOX 13 Main Harness 16 14 ONSTAR Input 15 15 AUX Input 14 16 DVR Input 13 9 17 Camera Input 10 11 12 18 Amp Audio Output 19 NAV Antenna 2/i0B
Installation Diagram IN 4” i03 8” i05/i06 OUT T-Style Radio Box The Radio box is attached to the rear of the T-Style Dash piece.
Installation Parts 1 T-Style Dash Bezel 1 2 Trim Bezel 3 CarPlay Dongle *No longer Required* 4 AC Harness 5 Factory Camera 6 Microphone 7 CD Jumper 2 1 8 7 6 10 11 Upper Mounting Brackets 12 11 12 NAV Antenna 13 AMP Audio Output 13 14 Camera Input 14 15 16 17 9 18 21 20 9 USB 1/2 10 Steering Wheel Control 4 5 3 8 MOST Adaptor 19 15 DVR Input 16 AUX Input 17 ONSTAR Input 18 Main Harness 19 CAN BOX 20 i03 Speaker 21 AM/FM Antenna Adaptor 2
Homepage Dimmer Control Volume Control AM/FM Radio Running Apps List Connection Information Navigation Home Button USB/Videos Factory Settings Bluetooth USB/Music Web Browser System Settings Phone Interface Aux Input DVR Input Navigation Short Cut Access All Downloaded Apps AM/FM Radio Short Cut USB Music Short Cut Climate Control Short Cut Bluetooth Short Cut Phone Interface Short cut USB Video Short cut 3
Homepage Dimmer Control AM/FM Radio Volume Control Running Apps List Connection Information Navigation Home Button USB/Videos Climate Control Bluetooth USB/Music Web Browser System Settings Phone Interface Aux Input DVR Input Web Browser Short Cut Access All Downloaded Apps Aux Short Cut Settings Short Cut Apps List Short Cut HDMI Input Short Cut Camera Screen Short Cut File Manager Short cut 4
Navigation Your new unit comes with the option to use a variety of different navigation systems. You can use your favorite data based navigation systems like Google Maps or Waze. Or you can purchase the iGO NextGen Satellite Navigation through your local LinksWell retailer. Download your preferred application. Go into the settings, on the navigation tab simply double click the preferred navigation listed and your system will now use your selection.
Radio The radio icon will access the AM/FM radio.
Music You can play music on your new system by using the USB to play songs from a USB stick, or downloading music from the USB stick onto the hard drive or on board SD Card.
Climate You will now use your new touch screen to control all your climate controls. You can access the climate controls by pressing any of the climate control icons located at the bottom of the display.
Bluetooth Use the Bluetooth source to send and receive phone calls and to stream music from your phone.
Video You can play videos on your new system by using the USB to play videos from a USB stick, or downloading videos from the USB stick onto the hard drive or on board SD Card.
HDMI Your new T-Style radio has an HDMI video/audio input. This source can be used to view any extra video source that uses standard HDMI connection.
Web Browser By using the hotspot on your cellphone you can use the Web Browser on your tablet just like you would your phone. Shows the strength of your WIFI Signal **Use of your cell phones “hot Spot” feature is subject to data charges.** Check with your cell phone provider for more details.
Phone Link PhoneLink will allow you to use your phones application on your new T-Style radio by simply plugging your phones factory cord into the PhoneLink USB input. Connecting your phone is simple.
General Settings General Setting options: Navigation Change which Application the unit will use for navigation GPS Monitor Check satellite connection status Date/Time Set the date and time Language Change the on screen language Equalizer Access the EQ, balance and fader Dimmer Change the brightness of the screen System Make changes to the systems functions Advanced Advanced features SWC Study Reprogram the steering wheel controls System Version View the systems software version Reset Reset the system Radio
More Settings More Setting options: Network & Internet Turn on/off.
App List Your new T-Style Radio is itself an Android tablet. So when used with WIFI, either while parked in rage of a hot spot or using your phones hot spot you can list the app stores to download a variety of applications. All your downloaded applications will appear here. To open them simply press the app list icon. Then find your desired app located here Once you find your desired app, select it and the system will automatically open the app up.
DVR Your new T-Style radio comes with an included USB DVR. The DVR plugs into one of the units USB inputs. The DVR also comes with ADAS driver assist features including lane departure warning, stop and go traffic alert, and collision warning. You can control and playback of the DVR from your T-Style radio.
File Manager Use the File Manager to download, delete and move files from the hard drive, on board SD card and or USB drive. Select which storage device you want to access files from. Select the folder you want to open, delete, or copy.
Camera Your new T-Style radio comes with 3 camera inputs. Back Right Front The Right camera will automatically turn on when the vehicles right turn signal is activated it. The Back camera will automatically turn on when the vehicle is in reverse.
Customizing Upload Image You can customize your start up screen easily by use of the “Boot Logo Setting” app. This app is available on our website under Support/ T-Style Apps 1.Download your image onto a USB drive and plug it into the USB of the T-Style Unit 2. Open the App List 3. Select “Boot Logo Setting App” 4. Press to select image 5. Select the folder your image is in 6. Select the image you wish to have as your upload screen 7. Turn the vehicle off and back on and your image should be set.
909-375-0633 www.linkswellinc.com info@linkswellinc.