
- LinkSys Wireless-G Broadband Router User Guide
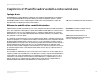
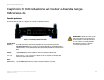
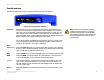
Table Of Contents
- English, User Guide
- Copyright and Trademarks
- Table of Contents
- List of Figures
- Chapter 1: Introduction
- Chapter 2: Planning Your Wireless Network
- Chapter 3: Getting to Know the Wireless-G Broadband Router
- Chapter 4: Connecting the Wireless-G Broadband Router
- Chapter 5: Configuring the Wireless-G Broadband Router
- Appendix A: Troubleshooting
- Appendix B: Wireless Security
- Appendix C: Upgrading Firmware
- Appendix D: Windows Help
- Appendix E: Finding the MAC Address and IP Address for Your Ethernet Adapter
- Appendix F: Glossary
- Appendix G: Specifications
- Appendix H: Warranty Information
- Appendix I: Regulatory Information
- Appendix J: Contact Information
- Dansk, Brugervejledning
- Copyright og varemærker
- Indhold
- Liste over figurer
- Kapitel 1: Introduktion
- Kapitel 2: Planlægning af dit trådløse netværk
- Kapitel 3: Lær den Trådløse-G-bredbåndsrouter at kende
- Kapitel 4: Tilslutning af den Trådløse-G- bredbåndsrouter
- Kapitel 5: Konfigurering af den Trådløse-G- bredbåndsrouter
- Appendiks A: Fejlfinding
- Appendiks B: Trådløs sikkerhed
- Appendiks C: Opgradering af firmware
- Appendiks D: Windows Hjælp
- Appendiks E: Sådan finder du MAC-adressen og IP-adressen på dit Ethernet-kort
- Appendiks F: Ordliste
- Appendiks G: Specifikationer
- Appendiks H: Garantioplysninger
- Appendiks I: Lovmæssige oplysninger
- Appendiks J: Kontaktoplysninger
- Deutsch, Benutzerhandbuch
- Copyright und Marken
- Inhalt
- Liste der Abbildungen
- Kapitel 1: Einführung
- Kapitel 2: Planen des Wireless-Netzwerks
- Kapitel 3: Kennenlernen des Wireless-G Broadband- Routers
- Kapitel 4: Anschließen des Wireless-G Broadband-Routers
- Kapitel 5: Konfigurieren des Wireless-G Broadband- Routers mit SRX400
- Anhang A: Fehlerbehebung
- Anhang B: Wireless-Sicherheit
- Anhang C: Aktualisieren der Firmware
- Anhang D: Windows-Hilfe
- Anhang E: Ermitteln der MAC-Adresse und der IP-Adresse des Ethernet-Adapters
- Anhang F: Glossar
- Anhang G: Spezifikationen
- Anhang H: Garantieinformationen
- Anhang I: Zulassungsinformationen
- Anhang J: Kontaktinformationen
- Español, Guía del usuario
- Copyright y marcas comerciales
- Contenido
- Lista de figuras
- Capítulo 1: Introducción
- Capítulo 2: Planificación de la red inalámbrica
- Capítulo 3: Familiarización con el ruteador de banda ancha Wireless-G
- Capítulo 4: Conexión del ruteador de banda ancha Wireless-G
- Capítulo 5: Configuración del ruteador de banda ancha Wireless-G
- Apéndice A: Resolución de problemas
- Apéndice B: Seguridad inalámbrica
- Apéndice C: Actualización del firmware
- Apéndice D: Ayuda de Windows
- Apéndice E: Búsqueda de la dirección MAC e IP del adaptador Ethernet
- Apéndice F: Glosario
- Apéndice G: Especificaciones
- Apéndice H: Información de garantía
- Apéndice I: Información sobre normativa
- Apéndice J: Información de contacto
- Français, Guide de l’utilisateur
- Copyright et marques commerciales
- Table des matières
- Liste des figures
- Chapitre 1 : Introduction
- Chapitre 2 : Planification de votre réseau sans fil
- Chapitre 3 : Présentation du routeur haut débit sans fil - G
- Chapitre 4 : Connexion du routeur haut débit sans fil - G
- Chapitre 5 : Configuration du routeur haut débit sans fil - G
- Annexe A : Dépannage
- Annexe B : Sécurité sans fil
- Annexe C : Mise à niveau du micrologiciel
- Annexe D : Aide - Windows
- Annexe E : Recherche des adresses MAC et IP de votre adaptateur Ethernet
- Annexe F : Glossaire
- Annexe G : Spécifications
- Annexe H : Informations de garantie
- Annexe I : Réglementation
- Annexe J : Contacts
- Italiano, Guida per l'utente
- Copyright e marchi
- Sommario
- Elenco delle illustrazioni
- Capitolo 1: Introduzione
- Capitolo 2: Pianificazione della rete wireless
- Capitolo 3: Introduzione al router a banda larga Wireless-G
- Capitolo 4: Collegamento del router a banda larga Wireless-G
- Capitolo 5: Configurazione del router a banda larga Wireless-G
- Appendice A: Risoluzione dei problemi
- Appendice B: Protezione wireless
- Appendice C: Aggiornamento del firmware
- Appendice D: Guida in linea di Windows
- Appendice E: Ricerca degli indirizzi MAC e IP per l'adattatore Ethernet
- Appendice F: Glossario
- Appendice G: Specifiche tecniche
- Appendice H: Informazioni sulla garanzia
- Appendice I: Informazioni sulle normative
- Appendice J: Informazioni sui Contatti
- Nederlands, Gebruikershandleiding
- Copyright en handelsmerken
- Inhoudsopgave
- Lijst met afbeeldingen
- Hoofdstuk 1: Inleiding
- Hoofdstuk 2: Het plannen van uw draadloze netwerk
- Hoofdstuk 3: Bekend raken met de Wireless-G- breedbandrouter
- Hoofdstuk 4: Het aansluiten van de Wireless-G- breedbandrouter
- Hoofdstuk 5: De Wireless-G-breedbandrouter configureren
- Bijlage A: Probleemoplossing
- Bijlage B: WLAN-beveiliging
- Bijlage C: Het upgraden van de firmware
- Bijlage D: Windows Help
- Bijlage E: Het achterhalen van het MAC- en IP-adres voor uw Ethernet-adapter
- Bijlage F: Verklarende woordenlijst
- Bijlage G: Specificaties
- Bijlage H: Informatie over garantie
- Bijlage I: Informatie over regelgeving
- Bijlage J: Contactgegevens
- Portuguese, Manual do Utilizador
- Direitos de autor e marcas comerciais
- Índice
- Lista de Figuras
- Capítulo 1: Introdução
- Capítulo 2: Planear a rede sem fios
- Capítulo 3: Conhecer o Router sem fios G de banda larga
- Capítulo 4: Ligar o Router sem fios G de banda larga
- Capítulo 5: Configurar o Router sem fios G de banda larga
- Apêndice A: Resolução de problemas
- Apêndice B: Segurança sem fios
- Apêndice C: Actualizar o firmware
- Apêndice D: Ajuda do Windows
- Apêndice E: Localizar o endereço MAC e o endereço IP da placa Ethernet
- Apêndice F: Glossário
- Apêndice G: Especificações
- Apêndice H: Informações sobre a garantia
- Apêndice I: Informações de regulamentação
- Apêndice J: Informações de contacto
- Svenska, Användarhandbok
- Copyright och varumärken
- Innehåll
- Figurlista
- Kapitel 1: Inledning
- Kapitel 2: Planera ditt trådlösa nätverk
- Kapitel 3: Börja lära känna Wireless-G Bredbandsrouter
- Kapitel 4: Ansluta Wireless-G Bredbandsrouter
- Kapitel 5: Konfigurera Wireless-G Bredbandsrouter
- Bilaga A: Felsökning
- Bilaga B: Trådlös säkerhet
- Bilaga C: Uppgradera fast programvara
- Bilaga D: Windows-hjälpen
- Bilaga E: Hitta MAC-adress och IP-adress för Ethernet- adaptern
- Bilaga F: Ordlista
- Bilaga G: Specifikationer
- Bilaga H: Garantiinformation
- Bilaga I: Information om regler
- Bilaga J: Kontaktinformation
7
Capitolo 3: Introduzione al router a banda larga Wireless-G
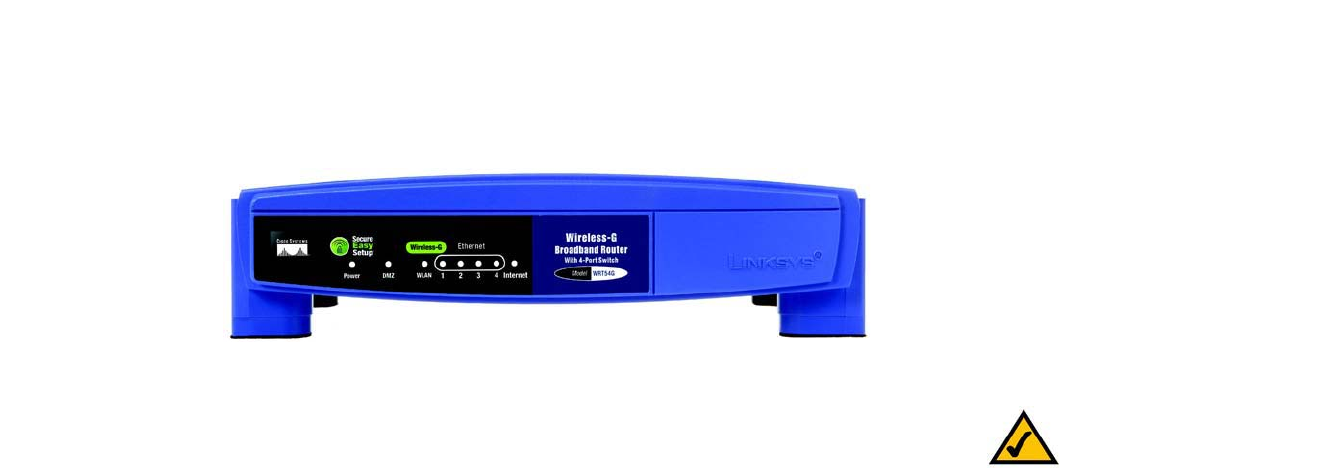
Pannello anteriore
Router a banda larga Wireless-G
Pannello anteriore
Il pulsante SecureEasySetup (logo Cisco) del router e i LED si trovano sul pannello anteriore.
(logo Cisco) Arancione/Bianco. Il logo Cisco è rappresentato dal pulsante SecureEasySetup del router.
Il pulsante si accende e rimane arancione quando il router è alimentato. Il colore arancione
indica che il router non sta utilizzando la funzione SecureEasySetup, al contrario del colore
bianco. Quando il router entra in modalità SecureEasySetup, il logo Cisco diventa bianco e
inizia a lampeggiare. Quando il router ha generato il SSID e la chiave WPA-PSK (definita anche
WPA-Personal), il logo Cisco smette di lampeggiare e rimane bianco.
Per cancellare il SSID e la chiave WPA-PSK, tenere premuto il logo Cisco per cinque secondi.
Il logo Cisco lampeggia lentamente mentre il router viene ripristinato e diventerà arancione
per indicare che il ripristino è stato eseguito correttamente.
Power
(Alimentazione) Verde. Il LED Power (Alimentazione) si accende e rimane bianco quando il router è alimentato.
Quando il router è in modalità autodiagnostica ad ogni avvio, il LED lampeggia. Al termine della
diagnosi, il LED smette di lampeggiare e rimane acceso.
DMZ Verde. Il LED DMZ indica l'uso della funzione DMZ e rimane acceso quando la funzione è attiva.
WLAN Verde. Il LED WLAN si accende per indicare che è stata stabilita una connessione wireless.
Se questo LED lampeggia, il router sta inviando o ricevendo dati sulla rete.
1, 2, 3, 4 Verde. Questi LED numerati, corrispondenti alle porte numerate sul pannello posteriore del
router, svolgono due funzioni. Quando sono accesi indicano che il router è connesso a un
dispositivo mediante la porta corrispondente. Quando lampeggiano indicano attività di rete
sulla porta corrispondente.
Internet Verde. Il LED Internet si accende quando viene stabilita una connessione attraverso la porta
Internet.
Figura 3-2: Pannello anteriore del router
NOTA La funzione SecureEasySetup semplifica la
configurazione della rete wireless. In presenza di
dispositivi SecureEasySetup, eseguire il CD-ROM
per l'installazione guidata del router e attenersi alle
istruzioni visualizzate sullo schermo per l'utilizzo
di questa funzione.