EtherFast® Series Instant RAID Use this guide to install: Linksys EtherFast Instant RAID (EFR240) User Guide
COPYRIGHT & TRADEMARKS Copyright © 2000 Linksys, All Rights Reserved. EtherFast is a registered trademark of Linksys. Microsoft, Windows, and the Windows logo are registered trademarks of Microsoft Corporation. All other trademarks and brand names are the property of their respective proprietors. LIMITED WARRANTY Linksys guarantees that every EtherFast Instant RAID is free from physical defects in material and workmanship under normal use for ONE year from the date of purchase.
Linksys EtherFast® Series Instant RAID Introduction Table of Contents Introduction Package Contents and System Requirements 1 2 Getting to Know the Instant RAID Rear Panel Front Panel Buzzer 3 3 5 6 Basic Installation and Configuration Installing the Instant RAID Configuring the Instant RAID 7 7 8 The Linksys EtherFast Instant RAID The EtherFast Instant RAID from Linksys is the perfect solution for any small business or workgroup that needs extra storage.
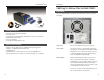
Linksys EtherFast® Series Instant RAID Getting to Know the Instant RAID Rear Panel All of the Instant RAID’s connections and switches are on the rear panel, as seen below. Package Contents • One Linksys EtherFast Instant RAID • AC Power Cord • UTP Category 5 Network Cable with RJ-45 Connectors (not pictured) • Instant RAID Setup Utility • Keys (not pictured) • User Guide and Registration Card System Requirements • Windows 95, 98, 2000, NT 4.
Linksys EtherFast® Series Printer Port The Printer Port is where you can connect the Instant RAID to your printer using a printer cable. Uplink Button When connecting directly to a computer via Ethernet, this button should be depressed. Instant RAID Front Panel The Instant RAID has three LEDs for each disk, and six status LEDs. For normal operation (connecting to a hub or switch), this button should be UP. LAN Port Use this port to connect the Instant RAID to your 10BaseT or 100BaseTX hub or switch.
Linksys EtherFast® Series LAN This LED will flicker when data is being transmitted or received on the LAN. Disk This LED will flicker when the disk sub-system is being accessed. Disk Full This LED is normally off. It will blink when the disk is 98% full, and will illuminate when the disk is completely full. IP This LED is normally off. It will illuminate and blink if the Server is a DHCP Client.
Linksys EtherFast® Series Hardware Installation Use the following procedure to connect the Instant RAID to your LAN. Instant RAID 4. In the left section of the Utility window, highlight the Instant RAID you are configuring and click the Quick Setup button on the far left of the tool bar. The Setup RAID screen will appear. 1. Connect one end of the Network Cable to the Instant RAID’s LAN Port, then connect the other end of the Network Cable to your hub. 2.
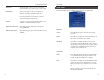
Linksys EtherFast® Series Fixed IP Address: Select this option to enter a fixed IP Address. IP Address: Enter a free IP Address from the address range used by PCs on your LAN. The default IP Address is 192.168.0.2. Subnet Mask: Use the same value as PCs on your LAN. The default Subnet Mask value is 255.255.255.0. Gateway: Enable DHCP Server: Start IP Address: Finish IP Address: Use the same value as the PCs on your LAN. If you don’t have a router or Internet Gateway, leave this field blank.
Linksys EtherFast® Series Administration Overview of Administrative Options The Instant RAID administrator can control Instant RAID usage by creating and managing Users, Groups, and Shares. Users: Each user is identified by his User Name and Password. The administrator creates users, and can also limit the amount of disk space available to a user. Groups: Users are organized into user groups. Groups are created in order to allocate which users have access to which shares.
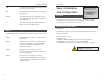
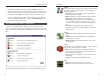
Linksys EtherFast® Series 2. You will be prompted for the Password. Enter “admin” for the User Name. By default, there is no password. Unless you have already changed the password for admin in the Instant RAID Utility, leave the Password field blank and click OK. You will be brought to the Welcome screen. If you have multiple Instant RAIDs, you can use the Connect button to switch to another RAID. Otherwise, click the Administration button to proceed to the Administrative Menu.
Linksys EtherFast® Series The Administrative Menu: Storage Management Managing Shares, Groups, and Users Use the Storage Management options manage the Instant RAID’s Shares, Users, and Groups. This section is only meant as a brief introduction. Refer to the Managing Shares, Groups and Users section Note: We recommend on page 17 for more detailed instructions.
Linksys EtherFast® Series Groups everyone All users are automatically members of the everyone group. No user can ever be removed from the everyone group unless the user is entirely deleted. By default, this group has Read/Write access to the public share. This can be changed, and access to other shares can be granted or revoked. This group can never be deleted. administrator The administrator group always has Read/Write access to every share.
Linksys EtherFast® Series Common Administrative Tasks Create Users Click the Users icon in the Administration Menu. When the Users Administration screen appears, click the New User button. Enter the new user’s name, their password (twice for confirmation), whether or not you wish to limit their RAID storage space, and which groups you would like to add them to. Click Save. Your new user is now created. Edit User Details Click the User icon in the Administration Menu.
Linksys EtherFast® Series Windows Client Setup Introduction This section will help you configure Windows so that you will be able to access your network and the Instant RAID from your PC. The following items will be checked or configured. Instant RAID 3. With the TCP/IP entry highlighted, click on the Properties button. The IP Address tab should be selected. If it isn’t, choose it now. You should then see a screen resembling the following.
Linksys EtherFast® Series Network Logon Instant RAID 5. Click Save, and then close your browser. Your password has been changed. To access the Instant RAID, you must correctly log on to the network. Password Management 1. Check your Windows logon using Start - Settings - Control Panel Network. Ensure that the Primary Network Logon is set to Client for Microsoft Networks, as shown below. If this is already set, there is no need to make a change.
Linksys EtherFast® Series 2. Locate the Instant RAID, as shown above. If it is not listed, double-click Entire Network. Then double-click the Workgroup that the RAID is in. (By default, the RAID is in Workgroup.) 3. Double-click the Instant RAID icon. Instant RAID TCP/IP Setup for Windows 2000 1. Select the Start button and go to Settings. From here, select Network and Dial-Up Connections. Click the Local Area Connections # and select Properties. 4.
Linksys EtherFast® Series To act as a DHCP Client Select Obtain an IP Address Automatically, as shown above. If you have enabled the Instant RAID to act as a DHCP Server, it will now provide IP Addresses (and related data) to your PC when it boots. To use “Specify an IP address” (fixed IP Address) • If your PC is already configured, no changes are required.
Linksys EtherFast® Series Instant RAID Using the Instant RAID’s Storage To use the Instant RAID’s storage, you must map a drive letter to each RAID folder you wish to access. The drive will then be available to all Windows programs. 1. Double-click the Network Neighborhood icon on the desktop. In Windows 2000, double-click on My Network Places, then Entire Network, then Microsoft Network. 5. Select a drive letter for this folder, and check the Reconnect at Logon checkbox.
Linksys EtherFast® Series Using the Instant RAID’s Print Server Overview The EtherFast Instant RAID comes with a built-in print server. Configuring your Instant RAID’s printer is easy, and by networking a printer through your Instant RAID you save space, money, and the hassles of dealing with a standalone PrintServer. Any printer connected to the Instant RAID is available to any network user, provided that user has access to the Instant RAID itself.
Linksys EtherFast® Series Troubleshooting 1. The RAID Utility doesn’t list any Instant RAIDs. • Check that the Instant RAID is properly installed, that the LAN connections are OK, and that the RAID is powered ON. • If you are using a router, ensure that your PC and the Instant RAID are on the same network segment. • Ensure that your PC has the TCP/IP network protocol loaded. This is done by checking the Network option of the Control Panel.
Linksys EtherFast® Series Specifications Model Number Standards Protocol Network Protocol Ports Speed Cabling Type Topology LEDs Instant RAID Customer Support EFR240 IEEE 802.3 (10BaseT), IEEE 802.
www.linksys.com © Copyright 2000 Linksys, All Rights Reserved.