
Owner's Manual


Instant RAID
7
Basic Installation
and Configuration
The following section will instruct you on how to physically connect the
Instant RAID to the network, and how to configure the Instant RAID for
basic operation in your Windows environment.
Requirements
The following conditions are required to begin the installation of the Instant
RAID to your system.
• Windows OS (95 or later)
• TCP/IP protocol.
• 10BaseT or 100BaseTX Ethernet Network or a Network-ready PC
• CD-ROM Drive or a PC with access to a shared CD-ROM
• Internet Explorer (4.0 or higher), or Netscape Navigator (4.7 or higher)
Linksys EtherFast
®
Series
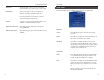
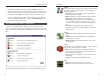
LAN This LED will flicker when data is being transmit-
ted or received on the LAN.
Disk This LED will flicker when the disk sub-system is
being accessed.
Disk Full This LED is normally off. It will blink when the
disk is 98% full, and will illuminate when the disk
is completely full.
IP This LED is normally off. It will illuminate and
blink if the Server is a DHCP Client.
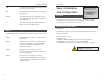
The Instant RAID has an internal buzzer that beeps to indicate certain events.
1 Beep Indicates that the reset button or power switch has
been pressed.
2 Beeps Repeated every 5 seconds for 1 minute. Indicates
that the Instant RAID is configured as a DHCP
client, but no DHCP Server responded to the
DHCP client request.
3 Beeps Repeated every 15 seconds for 3 minutes.
Indicates that the Instant RAID’s hard disk usage
exceeds 98% capacity.
5 Beeps Repeated every 15 seconds for 3 minutes.
Indicates that the Instant RAID is overheating. An
automatic shutdown will be performed 3 minutes
after the 1st beep.
6
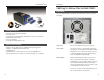
Installing the Instant RAID
Buzzer
Overview
NNoottee
: If you are a network
administrator, please follow
the Basic Installation and
Setup process, then proceed
to the
AAddmmiinniissttrraattiioonn
section
for instructions regarding all
available administrator
options.
WWaarrnniinngg
: Never shut down the Instant RAID
by unplugging the power cable.