
Owner's Manual


Instant RAID
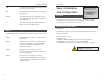
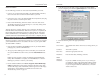
5. Click OK to save the current setting and exit. The Instant RAID is now
operational, with the following limitations:
• All Windows users will be given “guest” access rights. This allows
access to the Public folder.
To overcome these limitations, use the browser-based administration
interface, by clicking on the Administration icon on the Instant RAID
Utility’s main screen.
11
Linksys EtherFast
®
Series
10
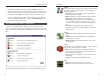
Fixed IP
Address: Select this option to enter a fixed IP Address.
IP Address: Enter a free IP Address from the address range used by PCs
on your LAN. The default IP Address is 192.168.0.2.
Subnet Mask: Use the same value as PCs on your LAN. The default
Subnet Mask value is 255.255.255.0.
Gateway: Use the same value as the PCs on your LAN. If you don’t
have a router or Internet Gateway, leave this field blank.
Enable
DHCP Server: If checked, the RAID will provide an IP Address and relat-
ed data to PCs upon request. PCs will only request an IP
Address if they are set up to act as DHCP Clients.
Start IP
Address: The first value for the range of IP Addresses to be allocated
by the DHCP Server.
Finish IP
Address: The last value for the range of IP Addresses to be allocated
by the DHCP Server. Ensure that the range is large enough
for the number of DHCP clients.
Microsoft Networking
Workgroup
Name: This name should match the workgroup name used by PCs
on your LAN.
Enable WINS: Check this box if your LAN has a WINS Server.
WINS Server: Enter the IP Address of the WINS Server. This is normally
a system running Windows NT Server.
Zone: The default value is “*”, giving all zones access to the
Instant RAID. If a zone name is shown, only Mac users in
that zone can access the Instant RAID.
NNoottee
: If you plan to install two or more Instant
RAIDs on the same network, you must connect
and set them up one at a time. Setting them up
concurrently will cause network problems.