
User Guide

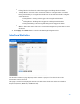


Table Of Contents
- Chapter 1 – Getting Started
- Chapter 2 – System Status
- Chapter 3 – Quick Start
- Chapter 4 – System Management
- Chapter 5 – Port Management
- Chapter 6 – VLAN Management
- Chapter 7 - Spanning Tree Management
- Chapter 8 - MAC Address Management
- Chapter 9 – Multicast
- Chapter 10 - IP Interface
- Chapter 11 - IP Network Operations
- Chapter 12 – Security
- Chapter 13 - Access Control List
- Chapter 14 - Quality of Service
- Chapter 15 - Maintenance
- Chapter - 16 Support

12
•
Frames of 256 to 511 Bytes—Number of frames, containing 256-511 bytes that were
received.
•
Frames of 512 to 1023 Bytes—Number of frames, containing 512-1023 bytes that
were received.
•
Packets of 1024 and More Bytes—Number of frames, containing 1024- 2000 bytes,
and Jumbo Frames, that were received.
To clear or view statistics counters:
•
Click Refresh to refresh the counters on the page.
•
Click Clear to clear the selected interfaces counters.
•
Click View All to see all ports on a single page.
RMON History
The RMON feature enables monitoring statistics per interface.
The History Control Table page defines the sampling frequency, amount of samples to store and
the port from which to gather the data.
After the data is sampled and stored, it appears in the History Table page that can be viewed by
clicking the History button.
To enter RMON control information:
1.
Click
System Status > RMON > History
.
2.
Click Add.
3.
Enter the parameters.
•
New History Control Entry Index—Displays the number of the new History table
entry.
•
Source Interface—Select the type of interface from which the history samples are
to be taken.
•
Maximum Samples—Enter the number of samples to store.
•
Samples Collected—RMON is allowed by the standard to not grant all requested
samples, but rather to limit the number of samples per request. Therefore, this
field represents the sample number actually granted to the request that is equal or
less than the requested maximum sample.