
User Guide
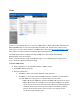
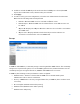


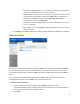

Table Of Contents
- Chapter 1 – Getting Started
- Chapter 2 – System Status
- Chapter 3 – Quick Start
- Chapter 4 – System Management
- Chapter 5 – Port Management
- Chapter 6 – VLAN Management
- Chapter 7 - Spanning Tree Management
- Chapter 8 - MAC Address Management
- Chapter 9 – Multicast
- Chapter 10 - IP Interface
- Chapter 11 - IP Network Operations
- Chapter 12 – Security
- Chapter 13 - Access Control List
- Chapter 14 - Quality of Service
- Chapter 15 - Maintenance
- Chapter - 16 Support

39
o
Read Write—Management access is read-write. Changes can be made to
the device configuration, but not to the community.
o
SNMP Admin—User has access to all device configuration options, as well
as permissions to modify the community. SNMP Admin is equivalent to
Read Write for all MIBs except for the SNMP MIBs. SNMP Admin is
required for access to the SNMP MIBs.
o
View Name—Select an SNMP view (a collection of MIB subtrees to which
access is granted).
o
Group Name—Select an SNMP group that determines the access rights in
Advanced mode.
4.
Click Apply. The SNMP Community is defined, and the Running Configuration is updated.
Notification Filters
The Notification Filter page enables configuring SNMP notification filters and Object IDs (OIDs)
that are checked. After creating a notification filter, it is possible to attach it to a notification
recipient in the Notification Recipients SNMPv1/v2 page, and Notification Recipients SNMPv3
page.
The notification filter enables filtering the type of SNMP notifications that are sent to the
management station based on the OID of the notification to be sent.
To define a notification filter:
1.
Click
Configuration > System Management>SNMP > Notification Filter
.
The Notification Filter page contains notification information for each filter. The table is
able to filter notification entries by Filter Name.
2.
Click Add.