user guide
/ Table of Contents Contents Chapter 1: Product Overview . . . . . . . . . . . . . . . . . . . . . . . . . . . . . . . . . . . . . . . . . 1 Chapter 2: Cisco Connect . . . . . . . . . . . . . . . . . . . . . . . . . . . . . . . . . . . . . . . . . . . . . 3 Chapter 3: Advanced Configuration. . . . . . . . . . . . . . . . . . . . . . . . . . . . . . . . . .13 Appendix A: Troubleshooting . . . . . . . . . . . . . . . . . . . . . . . . . . . . . . . . . . . . . . .36 Appendix B: Specifications . . . . . . .
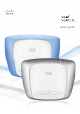
/ Chapter 1: Product Overview Chapter 1: Product Overview Wi-Fi Protected Setup Button If you have client devices, such as wireless adapters, that support Wi-Fi Protected Setup™, then you can use the Wi-Fi Protected Setup button to automatically configure wireless security for your wireless network(s). Thank you for choosing a Cisco Valet wireless hotspot. This User Guide covers both the Valet (M10) and Valet Plus (M20) models.
/ Chapter 1: Product Overview Horizontal Placement Follow these instructions: The Valet has four rubber feet on its bottom panel. Place the Valet on a level surface near an electrical outlet. 1. Determine where you want to mount the Valet. Make sure that the wall you use is smooth, flat, dry, and sturdy. Also make sure the location is within reach of an electrical outlet. 2. Drill two holes into the wall. Make sure the holes are 152 mm apart. 3.
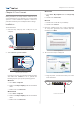
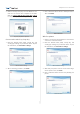
/ Chapter 2: Cisco Connect Chapter 2: Cisco Connect During installation, the setup software installs the Cisco Connect software on your computer. Cisco Connect offers options to connect additional computers or devices to your Valet and allows you to modify the Valet’s settings. Installation Windows XP a. Go to Start > My Computer and select Easy Setup Key. b. Double-click Connect.exe. Mac OS X a. Double-click on the CD on your desktop. b. Double-click Connect. To install the Valet: 1.
/ Chapter 2: Cisco Connect b. Plug the power adapter into an electrical outlet. 6. When you see the Congratulations screen, your computer is connected to the Internet. Remove your Easy Setup Key and keep it in a safe place. You can use it to connect additional computers to your Valet’s local network. Click OK. Connect to Electrical Outlet c. Unplug the existing network cable from your computer and plug it into the yellow port labeled Internet on the back of the Valet. Click Next.
/ Chapter 2: Cisco Connect Guest Access allows you to provide guests visiting your home with Internet access. Your guests will not have access to your other computers or personal data. Provide your guest with the Guest Network name and password. Guest computers must connect to your network using a wireless network connection. Refer to Main Menu – Guest Access, page 5 and Guest Access Settings, page 10 for more information.
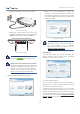
/ Chapter 2: Cisco Connect Wireless printer Click this option to connect a wireless printer. Go to Wireless printer, page 7. Other devices Click this option to connect a device that is not a computer, such as a smartphone or game console. Go to Device, page 8. 4. Return to the original computer running the Cisco Connect software and enter a name that will be used to identify the device. Click Finish. Computer Your Cisco Valet came with an Easy Setup Key.
/ Chapter 2: Cisco Connect 3. Remove the Easy Setup Key and click Close. You can now use it to connect other computers to the Valet. Refer to Connect with the Easy Setup Key, page 6 to complete the process of adding another computer. 3. Enter a name that will be used to identify this device. Then click Finish. Name Your Device Easy Setup Key Has Been Updated Wireless printer Connect without the Easy Setup Key 1. Refer to your printer’s documentation to learn how to connect it to a wireless network.
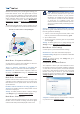
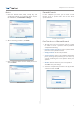
/ Chapter 2: Cisco Connect Device Parental Controls 1. Enter the Network name (SSID), Security Key, and Security Type settings on your wireless device. To print this information, click Print these settings. For the computers you select, you can block or limit Internet access to specific times. You can also block specific websites. Wireless Network Settings Parental Controls Password 2. After connecting your device, click Next. First-Time Access of Parental Controls 1.
/ Chapter 2: Cisco Connect 3. The Parental controls main screen appears. Select the computer whose parental controls you want to set up. Then click OK. Remove If there is a computer that should not have parental controls applied, select the computer and click Remove. Rename To give a computer a new name, select the computer and click Rename. If you clicked Rename, the Rename the device screen appears.
/ Chapter 2: Cisco Connect Never To always allow Internet access, keep the default, Never. • New password Enter a new password of 4-32 characters. 3. The Block sites inappropriate for option allows you to block websites based on content. The following options are available: • Don’t Block Does not block any websites. • Verify password Re-enter the new password. • • Teen Blocks websites that inappropriate for teenagers. contain content • Child Blocks websites that inappropriate for children.
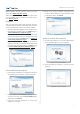
/ Chapter 2: Cisco Connect Easy Setup Key Update or create key The Easy Setup Key is a USB flash drive that holds the settings for the Valet. To create or update the Easy Setup Key, click Create or update key. For more information, refer to Update or create an Easy Setup Key, page 6. Safe Web Surfing Change Guest Password • Enter a new guest password Enter a password of 4-32 characters. • Click Change to save your setting.
/ • Chapter 2: Cisco Connect Click Change to save your settings. Password Enter this browser-based utility. password to access the Copy password To copy the password to the Clipboard, click this option. Changing Valet Name and Password Valet Details Advanced Settings The Valet details screen appears, displaying the Model name, Model number, Serial number, Firmware version, Operating system, Software version, Connection type (WAN), IP address (LAN), IP address (WAN), and Computer IP address.