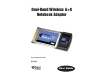
Dual-Band Wireless A+G Notebook Adapter Use this guide to install: WPC55AG User Guide
COPYRIGHT & TRADEMARKS Specifications are subject to change without notice. Linksys is a registered trademark or trademark of Cisco Systems, Inc. and/or its affiliates in the U.S. and certain other countries. Copyright © 2003 Cisco Systems, Inc. All rights reserved. Other brands and product names are trademarks or registered trademarks of their respective holders. LIMITED WARRANTY Linksys warrants to the original end user purchaser ("You") that, for a period of three years.
Note: Combinations of power levels and antennas resulting in a radiated power level of above 100 mW equivalent isotropic radiated power (EIRP) are considered as not compliant with the above mentioned directive and are not allowed for use within the European community and countries that have adopted the European R&TTE directive 1999/5/EC and/or the CEPT recommendation Rec 70.03. For more details on legal combinations of power levels and antennas, contact Linksys Corporate Compliance.
Chapter 1: Introduction The Dual-Band Wireless A+G Notebook Adapter Chapter 6: Using the WLAN Monitor for Windows 98, Me, and 2000 15 Overview 15 Starting the WLAN Monitor 15 Link Information 16 Site Survey 18 Profiles 20 Creating a New Profile 22 Appendix A: Troubleshooting 30 Common Problems and Solutions 30 Frequently Asked Questions 31 Appendix B: Glossary Appendix C: Specifications Environmental Appendix D: Warranty Information Appendix E: Contact Information 34 42 43 The Linksys
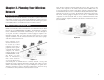
Chapter 2: Planning Your Wireless Network Network Topology A wireless local area network (WLAN) is exactly like a regular local area network (LAN), except that each computer in the WLAN uses a wireless device to connect to the network. Computers in a WLAN share the same frequency channel and SSID, which is an identification name for wireless devices.
Chapter 3: The Dual-Band Wireless A+G Notebook Adapter’s LEDs Chapter 4: Installation and Configuration for Windows XP Important for Windows 98, Me, and 2000 users: Go to “Chapter 5: Installation and Configuration for Windows 98, Me, and 2000.” Overview The Adapter has two LEDs to let you know how the card is functioning. Here is a description of those LEDs: Power Link Green. The Power LED lights up when the Adapter is powered on. Green.
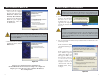
Driver Installation for Windows XP Windows XP Wireless Zero Configuration 1. Windows XP will automatically detect the Adapter. Click the radio button next to Install the software automatically (Recommended). Insert the Setup Wizard CDROM into your computer’s CD-ROM drive. Then click the Next button. Important for Windows XP users: Windows XP has a built-in configuration tool. Use the Windows XP Wireless Zero Configuration (in the system tray at the bottom of your screen) to configure the Adapter. 1.
Chapter 5: Installation and Configuration for Windows 98, Me, and 2000 3. If WEP is enabled, the screen in Figure 4-7 will appear. Enter the WEP key of your wireless network in the Network key field, and re-enter it in the Confirm network key field. Then click Connect, and go to Step 4. Important for Windows XP users: Go to “Chapter 4: Installation and Configuration for Windows XP.
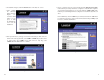
2. To install the Adapter, click the Install button on the Welcome screen. 3. After reading the Warranty Policy, shown in Figure 5-2, click the Next button if you agree, or click the Cancel button to end the installation. 5. Choose a wireless mode for your network. Click the Infrastructure Mode radio button if you want your wireless computers to network with computers on your wired network using an access point.
6. If you chose Infrastructure Mode, go to Step 7 now. If you chose Ad-Hoc Mode, the Ad-Hoc Mode Setting screen will appear for the type of network you’re using (see Figures 5-5 and 5-6). Note: If you chose 5GHz + 2.4GHz in Step 4 for connection to both 802.11a and 54g networks, then go to Step 6. The Adapter will automatically select the best channel for you. For the Channel setting, the channel you choose should match the channel set on the other devices in your wireless network.
Chapter 6: Using the WLAN Monitor for Windows 98, Me, and 2000 Hardware Installation 1. Turn off your notebook PC. 2. Locate an available CardBus slot on your notebook PC. Overview 3. With the Adapter’s label facing up, as shown in Figure 5-9, slide it completely into the CardBus slot. Use the WLAN Monitor to check the link information, search for available wireless networks, or make additional configuration changes. Important for Windows XP users: Windows XP has a built-in configuration tool.
Wireless Status Link Information The Link Information screen, shown in Figure 6-2, displays the Adapter’s signal strength and link quality information. Click the More information button for further information about your wireless connection (see Figure 6-3). Network Status- The status of the wireless network connection. SSID - The SSID of the wireless network. Network Mode - The wireless mode currently in use, ad-hoc or infrastructure.
Site Survey The Site Survey screen, shown in Figure 6-5, displays a list of infrastructure and ad-hoc networks available for connection. If the wireless network has WEP encryption enabled for security, you will see the screen shown in Figure 6-6. If the wireless network has LEAP authentication enabled for security, you will see the screen shown in Figure 6-7. If the wireless network employs an Externally Managed 802.1x type of security, Figure 6-6 choose this selection.
When manually, the encryption key must consist of the letters “A” through “F” and the numbers “0” through “9” and should be 10 characters in length for 64bit encryption, 26 characters in length for 128-bit encryption, or 32 characters in length for 152-bit encryption.) All points in your wireless network must use the same WEP key to utilize WEP encryption. Profiles The Profiles screen, shown in Figure 6-9, lets you save different configuration profiles for different network setups.
Import - Click the Import button to import a profile that has been saved in another location. Select the appropriate file, as shown in Figure 6-10, and click the Open button. Creating a New Profile 1. On the Profiles screen, shown in Figure 6-12, click the New button to create a new profile. Figure 6-10 Export - Select the profile you want to save in a different location, and click the Export button. Select the appropriate folder, as shown in Figure 611, and click the Save button. Figure 6-12 2.
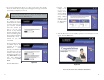
4. The Network Settings screen, shown in Figure 6-15, will appear. If your network has a DHCP server, click the radio button next to Obtain an IP address automatically (DHCP). Click the Next button to continue, and go to step 4. If your network does not have a DHCP server, click the radio button next to Specify the IP address. Enter an IP Address, Subnet Mask, Default Gateway, and DNS appropriate for your network. You must specify the IP Address and Subnet Mask on this screen.
6. If you chose Infrastructure mode, proceed to Step 6. Depending upon the Ad-Hoc mode you chose, one or both Ad-Hoc Mode Setting screens, shown in Figure 6-17 and 6-18, will appear. Note: If you chose 5GHz + 2.4GHz in Step 2 for connection to both 802.11a and 54g networks, then go to Step 6. The Adapter will automatically select the best channel for you. From the drop-down menu, select the channel you plan to use for your network.
When manually, the encryption key must consist of the letters “A” through “F” and the numbers “0” through “9” and should be 10 characters in length for 64-bit encryption, 26 characters in length for 128-bit encryption, or 32 characters in length for 152-bit encryption.) All points in your wireless network must use the same WEP key to utilize WEP encryption. If you wish to have the encryption key generated through a Passphrase, it can be a maximum of 16 alphanumeric characters.
Appendix A: Troubleshooting This chapter provides solutions to problems that may occur during the installation and operation of the Dual-Band Wireless A+G Notebook Adapter. Read the descriptions below to solve your problems. If you can’t find an answer here, check the Linksys website at www.linksys.com. Common Problems and Solutions 1. My computer does not recognize the Adapter. Make sure that the Adapter is properly inserted into the PCMCIA slot.
What IEEE 802.11b features are supported? The product supports the following IEEE 802.11b functions: • CSMA/CA plus Acknowledge protocol • Multi-Channel Roaming • Automatic Rate Selection • RTS/CTS feature • Fragmentation • Power Management What is ad-hoc mode? When a wireless network is set to ad-hoc mode, the wireless-equipped computers are configured to communicate directly with each other. The ad-hoc wireless network will not communicate with any wired network.
Appendix B: Glossary Cardbus - A high-speed peripherals interface for notebook PCs that delivers 32-bit performance based on PCI bus architecture. 802.11a - One of the IEEE standards for wireless networking hardware. Products that adhere to a specific IEEE standard will work with each other, even if they are manufactured by different companies. It specifies a maximum data transfer rate of 54Mbps and an operating frequency of 5GHz. The 802.
Domain - A subnetwork comprised of a group of clients and servers under the control of one security database. Dividing LANs into domains improves performance and security. Driver - A workstation or server software module that provides an interface between a network interface card and the protocol software running in the computer; it is designed for a specific device, and is installed during the initial installation of a network-compatible client or server operating system.
the e-mail address you're sending a note to. At the other end, the recipient can see the IP address of the Web page requestor or the e-mail sender and can respond by sending another message using the IP address it received. IRQ (Interrupt ReQuest) - A hardware interrupt on a PC. There are 16 IRQ lines used to signal the CPU that a peripheral event has started or terminated. Except for PCI devices, two devices cannot use the same line. ISM band - The FCC and their counterparts outside of the U.S.
Roaming - In an infrastructure mode wireless network, this refers to the ability to move out of one access point's range and into another and transparently reassociate and reauthenticate to the new access point. This reassociation and reauthentication should occur without user intervention and ideally without interruption to network connectivity. A typical scenario would be a location with multiple access points, where users can physically relocate from one area to another and easily maintain connectivity.
Appendix C: Specifications 42 Environmental Dimensions 4.72" x 0.51" x 2.13" (120 mm x 13 mm x 54 mm) CardBus Unit Weight 1.48 oz. (0.04 kg) LEDs Power, Link Power 3.3V Bus Powered Transmit Power 11 dBm to 17 dBm Certifications FCC, CE, IC-03, Wi-Fi (802.11a, 802.11b), CCX WHQL: XP, 2000, Me Modulation 802.11a and draft 802.11g: OFDM; 802.11b: CCK, DQPSK, DBPSK Operating Temp. 0°C to 55°C Security Features WEP, LEAP, CKIP Storage Temp.
Appendix D: Warranty Information Appendix E: Contact Information BE SURE TO HAVE YOUR PROOF OF PURCHASE AND A BARCODE FROM THE PRODUCT’S PACKAGING ON HAND WHEN CALLING. RETURN REQUESTS CANNOT BE PROCESSED WITHOUT PROOF OF PURCHASE. For help with the installation or operation of the Dual-Band Wireless A+G Notebook Adapter, contact Linksys Technical Support at one of the phone numbers or Internet addresses below.
http://www.linksys.com © Copyright 2003 Cisco Systems, Inc. All Rights Reserved.