COPYRIGHT & TRADEMARKS Copyright © 2002 Network Everywhere, All Rights Reserved. Network Everywhere and Linksys are registered trademarks of Linksys. Microsoft, Windows, and the Windows logo are registered trademarks of Microsoft Corporation. All other trademarks and brand names are the property of their respective proprietors.
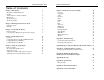
Network Everywhere® Series Wireless Cable/DSL Router Table of Contents Chapter 1: Introduction The Wireless Cable/DSL Router Features An Introduction to LANs and WANs IP Addresses The Router’s Ports The Router’s LEDs 1 1 1 2 2 4 5 Chapter 2: Planning Your Wireless Network Network Topology Roaming 7 7 7 Chapter 3: Connecting the Router Before You Start Connecting Your Hardware Together and Booting Up 8 8 8 Chapter 4: Configuring the PCs Overview Configuring Windows 98 SE and Millennium PCs Configurin
Network Everywhere® Series Chapter 1: Introduction The Wireless Cable/DSL Router Think of the Network Everywhere Wireless Cable/DSL Router as a kind of "splitter" for your Internet connection. Just connect your DSL or Cable Modem to the Router, and all the computers in your household can share the Internet -- all at the same time.
Network Everywhere® Series Note: Since the Router is a device that connects two networks, it needs two IP addresses—one for the LAN side, and one for the Internet side. In this User Guide, you’ll see references to the “Internet IP address” and the “LAN IP address.” Wireless Cable/DSL Router The Router’s Ports Since the Router has firewall security (NAT), only the Router’s Internet IP address can be seen from the Internet.
Network Everywhere® Series The Reset Button Wireless Cable/DSL Router Full/Col Green. This LED also serves two purposes. When this LED is lit continuously, the connection made through the corresponding port is running in Full Duplex mode. A blinking LED indicates that the connection is experiencing collisions. Infrequent collisions are normal. If this LED blinks too often, there may be a problem with your connection. Refer to the Troubleshooting Appendix if you think there is a problem. 100 Orange.
Network Everywhere® Series Wireless Cable/DSL Router Chapter 2: Planning Your Wireless Network Chapter 3: Connecting the Router Network Topology Before You Start A wireless LAN is exactly like a regular LAN, except that each computer in the LAN uses a wireless adapter to connect to the network through a wireless connection. Computers in a wireless LAN must be configured to share the same radio channel.
Network Everywhere® Series 4. Connect the Power Adapter (included) to the Router’s Power port and plug the other end into a power outlet. • The Power LED will illuminate green as soon as the power adapter is connected. • The Diag LED will illuminate red for a few seconds while the Router goes through its internal diagnostic test. The LED will turn off when the self-test is complete. 5. Power on the cable or DSL modem.
Network Everywhere® Series 2. Select the Configuration tab and highlight the TCP/IP line for the applicable Ethernet adapter (as shown in Figure 4-1). If the word TCP/IP appears by itself, select that line. (Note: If there is no TCP/IP line listed, refer to your Ethernet adapter’s documentation to install TCP/IP now.) Then, click the Properties button. Wireless Cable/DSL Router 5. Click the OK button again. Windows may ask you for the original Windows installation disk or additional files.
Network Everywhere® Series 4. Select Internet Protocol (TCP/IP) (as shown in Figure 4-4) and click the Properties button. Wireless Cable/DSL Router Configuring Windows XP PCs The following instructions assume you are running Windows XP’s default interface. If you are using the Classic interface (where the icons and menus look like previous Windows versions), please follow the instructions for Windows 2000. 1. Click the Start button, open the Control Panel.
Network Everywhere® Series 4. Select Internet Protocol (TCP/IP) (as shown in Figure 4-7) and click the Properties button. Wireless Cable/DSL Router Chapter 5: Using the Setup Wizard Before You Start The Network Everywhere Wireless Cable/DSL Router comes with an automated software installation procedure for Windows 98 SE, Me, 2000, and XP. This will configure the Router when connecting it for the first time. Thereafter, configuration can be set through the Web Utility.
Network Everywhere® Series Set Up Additional Computer(s) This option should only be used to configure DHCP settings on any additional computers. For setting up a computer’s wireless settings to use with the Router, configure your wireless devices with the same network settings as the Router. Download User Guide This User Guide is available on the Setup Wizard CD, so you won’t need Internet access to download this.
Network Everywhere® Series Wireless Cable/DSL Router When the screen shown in Figure 5-6 appears, connect the power for the Router and modem, using a surge protector. Some of the Router’s lights should come on as shown on the screen. Verify that your connection is working properly before clicking the Next button to continue. If you wish to step back in the setup process, click the Back button. To print this screen, click the Print button.
Network Everywhere® Series Wireless Cable/DSL Router Configuration is complete and the Router is set up when you see the final screen, shown in Figure 59. Click the Finish button to close the Setup Wizard. To set up any further computers to connect to the Router, run the Setup Wizard again and choose Set Up Additional Computer(s). To fine-tune Figure 5-9 the Router’s performance, you can continue to Chapter 6: The Router’s Web-based Utility.
Network Everywhere® Series Wireless Cable/DSL Router On the next screen that appears, shown in Figure 5-14, you will configure the Router’s wireless settings. As this is a wireless router, it can be used with your wireless devices. However, all settings must be the same for the wireless devices to be able to communicate with each other. Verify that the following settings are the same as your other wireless devices: Figure 5-12 SSID Think of this as the wireless network’s name.
Network Everywhere® Series The following screen will detect your modem’s IP settings and configure the Router with these settings. (The screen shown in Figure 5-15 is what you would see if you see if you had a PPPoE connection.) Click the Next button to continue. If you wish to step back in the setup process, click the Back button. Wireless Cable/DSL Router Chapter 6: The Router’s Web-based Utility Overview Use the Router’s web-based utility to administer it.
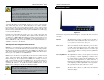
Network Everywhere® Series Wireless Cable/DSL Router Upon entering the address into the web browser, a password request page will pop up, as shown in Figure 6-2a. (Windows XP users will see a “Connect to 192.168.1.1” window, shown in Figure 6-2b.) Figure 6-2a Figure 6-2b Leave the User Name field empty, and enter admin (the default password) in lowercase letters in the Password field. Then, click the OK button.
Network Everywhere® Series Wireless (Enable/Disable). In order to utilize the Router’s wireless functions, select Enable. If you do not wish to utilize any wireless functions, make sure Disable is selected. (Note: No other wireless functions will be available unless you enable this setting.) SSID: The SSID is a unique name for your wireless network. It is case sensitive and must not exceed 32 characters. The default SSID is "wireless " but you should change this to a personal wireless network name.
Network Everywhere® Series Wireless Cable/DSL Router PPPoE Password Some DSL-based ISPs use PPPoE (Point-toPoint Protocol over Ethernet) to establish Internet connections. If you are connected to the Internet through a DSL line, check with your ISP to see if they use PPPoE. If they do, you will have to enable PPPoE, shown in Figure 6-5. The Password screen, shown in Figure 6-6, allows you to set up a password and UPnP Services. You can also restore default settings on the Router.
Network Everywhere® Series Wireless Cable/DSL Router WAN These fields display the Router’s current MAC Address, IP Address, Subnet Mask, and Default Gateway IP Address, as seen by external users on the Internet. The DNS (Domain Name System) IP Address fields show the IP address(es) of the DNS server(s) currently used by the Router. Multiple DNS IP settings are common. In most cases, the first available DNS entry is used.
Network Everywhere® Series Wireless Cable/DSL Router Starting IP Address Enter a value for the DHCP server to start with when issuing IP addresses. This value must be 192.168.1.2 or greater, because the Router’s default IP address is 192.168.1.1. Number of DHCP Users (Optional) Enter the maximum number of PCs for the DHCP server to assign IP addresses. This number cannot be greater than 253.
Network Everywhere® Series Online manual in PDF format and Adobe Website Clicking the Online manual in PDF format link will take you to the latest version of the user guide for this Router. The guide will be in Adobe Acrobat Portable Document File (.pdf) format. You will need the Adobe Acrobat Reader to view this pdf. If you do not have the Acrobat Reader, click the Adobe Website link to download it. These links work only if you are connected to the Internet.
Network Everywhere® Series Wireless Cable/DSL Router Block WAN Requests By enabling the Block WAN Request feature, you can prevent your network from being “pinged,” or detected, by other Internet users. The Block WAN Request feature also reinforces your network security by hiding your network ports. Both functions of the Block WAN Request feature make it more difficult for outside users to work their way into your network. This feature is enabled by default.
Network Everywhere® Series To apply any of the settings you’ve changed on this page, click the Apply button, and then click the Continue button. To cancel any values you’ve entered on this page, click the Cancel button. If you should need any further information about anything on this screen, click the Help button. Wireless Cable/DSL Router The Preset Applications at the top of the list are among the most widely used Internet applications.
Network Everywhere® Series • NNTP (Network News Transfer Protocol) The protocol used to connect to Usenet groups on the Internet. • SNMP (Simple Network Management Protocol) A widely used network monitoring and control protocol. Data is passed from SNMP agents, which are hardware and/or software processes reporting activity in each network device (switch, router, bridge, etc.) to the workstation console used to oversee the network.
Network Everywhere® Series Port Range Forwarding sets up public services on your network, such as web servers, ftp servers, e-mail servers, or other specialized Internet applications. (Specialized Internet applications are any applications that use Internet access to perform functions such as videoconferencing or online gaming. Some Internet applications may not require any forwarding.
Network Everywhere® Series Dynamic Routing Wireless Cable/DSL Router To apply any of the settings you’ve changed on this page, click the Apply button, and then click the Continue button. To cancel any values you’ve entered on this page, click the Cancel button. If you should need any further information about anything on this screen, click the Help button.
Network Everywhere® Series To delete a Static Routing entry, select an entry, and click the Delete this entry button. Wireless Cable/DSL Router DMZ Host 2. Enter the following data to create a new static route. Destination LAN IP: The Destination LAN IP is the address of the remote network or host to which you want to assign a static route. Enter the IP address of the host for which you wish to create a static route here.
Network Everywhere® Series MAC Address Clone Wireless Cable/DSL Router Wireless Figure 6-18 The Router’s MAC address is a 12-digit code assigned to a unique piece of hardware for identification, like a social security number. If your ISP requires MAC address registration, find your adapter’s MAC address by following the instructions in “Appendix D: Finding the MAC Address and IP Address for Your Ethernet Adapter.” Enter the 12 digits of your adapter’s MAC address in the on-screen fields (see Figure 6-18).
Network Everywhere® Series • RTS Threshold. This value should remain at its default setting of 2,346. Should you encounter inconsistent data flow, only minor modifications are recommended. • Fragmentation Threshold. This value indicates how much of the Router’s resources are devoted to recovering packet errors. The value should remain at its default setting of 2,346.
Network Everywhere® Series Appendix A: Troubleshooting Common Problems and Solutions This appendix consists of two parts: “Common Problems and Solutions” and “Frequently Asked Questions.” Provided are possible solutions to problems regarding the installation and operation of the Router. If your situation is described here, the problem should be solved by applying the corresponding solution. If you can’t find an answer here, check the Linksys website at www.linksys.com. 1.
Network Everywhere® Series I. Click the OK button in the Internet Protocol (TCP/IP) Properties window. Click the OK button in the Local Area Connection Properties window. 2. I want to test my Internet connection. A. Check your TCP/IP settings. For Windows 98 SE and Me: Refer to your Ethernet adapter’s documentation for details. Make sure Obtain IP address automatically is selected in the settings. For Windows 2000: • Click Start, Settings, and Control Panel. Double-click Network and Dial-Up Connections.
Network Everywhere® Series C. Make sure you are using the right Internet settings. Contact your ISP to see if your Internet connection type is DHCP, Static IP Address, or PPPoE (commonly used by DSL consumers). Please refer to the Setup section of “Chapter 6: The Router’s Web-based Utility” for details on Internet settings. D. Make sure you have the right cable. Check to see if the Internet column has a solidly lit Link LED. E.
Network Everywhere® Series Wireless Cable/DSL Router F. Check the Enable option for the port services you want to use. Consider the example below: F. Check the Enable option for the port services you want to use. Consider the example below: Customized Ext. Port Application Web server 80 to 80 FTP server 21 to 21 SMTP (outgoing)25 to 25 POP3 (incoming) 110 to 110 Customized Application UT Halflife PC Anywhere VPN IPSEC TCP UDP IP Address Enable X X X X X 192.168.1.100 192.168.1.101 192.168.1.
Network Everywhere® Series 9. I forgot my password, or the password prompt always appears when saving settings to the Router. Reset the Router to factory default by pressing the Reset button for 30 seconds and then releasing it. If you are still getting prompted for a password when saving settings, then perform the following steps: A. Access the Router’s web interface by going to http://192.168.1.1 or the IP address of the Router. Enter the default password admin, and click the Password tab. B.
Network Everywhere® Series F. You may see the login status display as Connecting. Press the F5 key to refresh the screen, until you see the login status display as Connected. G. Click the Apply button to continue. If the connection is lost again, follow steps E to G to re-establish connection. 15. I can't access my email, web, or VPN, or I am getting corrupted data from the Internet. The Maximum Transmission Unit (MTU) setting may need to be adjusted. By default, the MTU is set at 1500.
Network Everywhere® Series Frequently Asked Questions What is the maximum number of IP addresses that the Router will support? The Router will support up to 253 IP addresses. Is IPSec Pass-Through supported by the Router? Yes, it is a built-in feature that the Router automatically enables. Where is the Router installed on the network? In a typical environment, the Router is installed between the cable/DSL modem and the LAN. Plug the Router into the cable/DSL modem’s Ethernet port.
Network Everywhere® Series How will I be notified of new Router firmware upgrades? All Network Everywhere firmware upgrades are posted on the Linksys website at www.networkeverywhere.com, where they can be downloaded for free. The Router’s firmware can be upgraded with TFTP programs. If the Router’s Internet connection is working well, there is no need to download a newer firmware version, unless that version contains new features that you would like to use.
Network Everywhere® Series What IEEE 802.11 features are supported? The product supports the following IEEE 802.11 functions: • CSMA/CA plus Acknowledge protocol • Multi-Channel Roaming • Automatic Rate Selection • RTS/CTS feature • Fragmentation • Power Management What is BSS ID? A specific Ad-hoc LAN is called a Basic Service Set (BSS). Computers in a BSS must be configured with the same BSS ID. What is SSID? An Infrastructure configuration could also support roaming capability for mobile workers.
Network Everywhere® Series Appendix B: How to Ping Your ISP’s E-mail and Web Addresses 3. At the DOS command prompt, type “ping mail” (assuming that the location for which you’re trying to find an IP address is configured as “mail”). Press Enter. Information such as the following data, taken from a ping of Microsoft Network’s e-mail server, will be displayed. C:\>ping mail Virtually all Internet addresses are configured with words or characters (i.e., www.networkeverywhere.com, www.yahoo.com, etc.
Network Everywhere® Series C:\>ping -a 24.53.32.4 Pinging mail.msnv3.occa.home.com [24.53.32.4] with 32 bytes of data: Reply Reply Reply Reply from from from from 24.53.32.4: 24.53.32.4: 24.53.32.4: 24.53.32.4: bytes=32 bytes=32 bytes=32 bytes=32 time<10ms time<10ms time<10ms time<10ms TTL=127 TTL=127 TTL=127 TTL=127 Ping statistics for 24.53.32.4: Packets: Sent = 4, Received = 4, Lost = 0 (0% loss), Approximate round trip times in milli-seconds: Minimum = 0ms, Maximum = 0ms, Average = 0ms 2.
Network Everywhere® Series The following steps will show you how to utilize WEP encryption 1. From the Web-based Utility’s Setup tab, select Mandatory under the WEP section. 2. Press the WEP Key Setting button to set the WEP Encryption type and level. Wireless Cable/DSL Router • WEP (64Bit or 128B) Select the level of encryption from the drop-down box. 128-bit WEP encryption is unique to Network Everywhere and may conflict with other vendors’ WEP encryption.
Network Everywhere® Series Configuring Wireless Security in Windows XP Wireless Cable/DSL Router 2. In the “Control Panel” window, click the Network and Internet Connections icon, shown in Figure C-4. As Windows XP does not allow for the use of the Network Everywhere Passphrase feature with the wireless PC adapters, you will need to manually enter the key generated in the previous section.
Network Everywhere® Series If a “Connect to Wireless Network” window appears, in the Available Networks section, click the desired wireless network, specified by the Router’s SSID. Then, double-click the Wireless Network Connection icon. Wireless Cable/DSL Router 6. When the “Wireless Network Connection Properties” window appears, as in Figure C8, click the Wireless Networks Tab. Figure C-6 5. When the “Wireless Network Connection Status” window appears, as in Figure C-7, click the Properties button.
Network Everywhere® Series 8. The “Wireless Network Properties” window (shown in Figure C-10) will appear. Click the check box for the Data encryption (WEP enabled) option. Remove the check from the Network Authentication (Shared mode) and The key is provided for me automatically fields. In the "Network key" field, enter the exact Key (all 10 or 26 digits, depending on the level of encryption) generated by the Router.
Network Everywhere® Series 3. Write down the Adapter Address as shown on your computer screen (see Figure D-3). This is the MAC address for your Ethernet adapter and will be shown as a series of numbers and letters. Wireless Cable/DSL Router 2. In the command prompt, enter ipconfig /all. Then press the Enter key. The MAC address/Adapter Address is what you will use for MAC Address Cloning or MAC Filtering. Figure D-3 The example in Figure F-3 shows the IP address of your Ethernet adapter as 192.168.1.
Network Everywhere® Series When entering the information using the Router’s web-based utility, you will type the 12-digit MAC address in this format, XXXXXXXXXXXX without the hyphens for MAC Filtering. See Figure D-6. Wireless Cable/DSL Router Appendix E: Glossary 10BaseT - An Ethernet standard that uses twisted wire pairs. 100BaseTX - IEEE physical layer specification for 100 Mbps over two pairs of Category 5 cable.
Network Everywhere® Series asymmetric transfer rates: around 36 Mbps downstream (from the Internet to the computer), and from 200 Kbps to 2 Mbps upstream (from the computer to the Internet).
Network Everywhere® Series Firmware - Code that is written onto read-only memory (ROM) or programmable read-only memory (PROM). Once firmware has been written onto the ROM or PROM, it is retained even when the device is turned off. ing the development and application of electrotechnology and allied sciences for the benefit of humanity, the advancement of the profession, and the wellbeing of our members.
Network Everywhere® Series Mbps (MegaBits Per Second) - One million bits per second; unit of measurement for data transmission. mIRC - mIRC runs under Windows and provides a graphical interface for logging onto IRC servers and listing, joining, and leaving channels. NAT - NAT (Network Address Translation) is the translation of an Internet Protocol address (IP address) used within one network to a different IP address known within another network.
Network Everywhere® Series Subnet Mask - The method used for splitting IP networks into a series of subgroups, or subnets. The mask is a binary pattern that is matched up with the IP address to turn part of the host ID address field into a field for subnets. Switch – 1. A data switch connects computing devices to host computers, allowing a large number of devices to share a limited number of ports. 2. A device for making, breaking, or changing the connections in an electrical circuit.
Network Everywhere® Series Appendix F: Specifications Standards Ports Buttons Cabling Type LED Indicators Transmit Power UPnP able/cert Security Features 802.11b, 802.3, 802.3u Four 10/100 switch ports, One Internet Port Uplink Ethernet Category 5 or better 10/100 WLAN(Act, Link) Power, Ethernet(Link/Act, Full/Col, 100), Internet(Link, Act, Diag) TX:16 dBm (40mW). RX: 11Mbps (-78dBm), 2Mbps (-82dBm) Gain: 2dBi UPnP compatible MAC, IP, time and port filtering. DoS prevention.
Network Everywhere® Series Appendix H: Contact Information For help with the installation or operation of the Wireless Cable/DSL Router, contact Network Everywhere Technical Support at one of the phone numbers or Internet addresses below. Technical Support Fax Email Web site 949-271-5470, M-F, 8:00 am to 5:00 pm (PST) 949-265-6655 support@NetworkEverywhere.com http://www.NetworkEverywhere.com h t t p : / / w w w. N e t wo r k E v e r y w h e r e . c o m Copyright © 2002 Network Everywhere.