
User's Manual Part 1

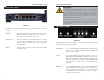
Table Of Contents

Wireless-B Broadband Router
9
Network Everywhere
®
Series
8
4. Connect the Power Adapter (included) to the Router’s Power port and plug
the other end into a power outlet.
• The Power LED will blink green as soon as the power adapter is con-
nected.
5. Power on the cable or DSL modem. Verify that the power is on by checking
the Internet LED in the Internet column on the front of the Router. The
Link LED will be illuminated if the power is on and the modem is ready.
6. Press the Reset button on the back of the Router. Hold the button in for three
seconds. This restores the Router’s default settings.
7. Power on your PC.
The Router is now connected.
Continue to the next chapter to configure your PCs.
For Wireless Connections: In addition to accessing the Router through an
Ethernet connection, a wireless connection can be used to access the Router.
After powering on the Router and connecting it to your modem, enter the
Router’s IP Address in the Address field of your wireless PC’s web-browser as
follows: http://192.168.1.1 and press Enter.
IImmppoorrttaanntt::
The Router is configured by default to work out of the box with
all Network Everywhere Wireless Adapters. If you have changed the
defaults on your Network Everywhere Wireless Adapters, or are using
other wireless adapters, you must temporarily change your wireless
adapter settings to: (SSID = wireless) in order to initially access the Router
wirelessly. After you have accessed the Router with the default settings,
you can change the Router’s settings to coincide with your Network set-
tings and reset your adapters.
IImmppoorrttaanntt::
Some ISPs—most notably some cable providers—configure
their networks so that you do not have to enter a full Internet address into
your web browser or e-mail application to reach your home page or
receive your e-mail. If your Internet home page address is something very
simple, such as “www”, rather than “www.networkeverywhere.com”, or
your e-mail server’s address is something similar to “e-mail” or “pop3”,
rather than “pop.mail.networkeverywhere.com”, you won’t be able to
properly configure the Router until you determine the actual Internet
addresses of your Web and e-mail connections.
You
mmuusstt
obtain this information prior to connecting the Router to your net-
work. You can obtain this information by contacting your ISP.
Chapter 3: Connecting the Router
Before plugging everything together, it’s always a good idea to have everything
you’ll need to get the Router up and running. Depending upon how you con-
figure the Router in Chapter 5: The Router’s Web-based Utility, you may need
some of the following values from your ISP:
When connecting through a Static IP connection, be sure to have 1) Your
broadband-configured PC’s fixed Internet IP Address, 2) Your broadband-
configured PC’s Computer Name and Workgroup Name, 3) Your Subnet
Mask, 4) Your Default Gateway, and 5) Your Primary DNS IP address.
When connecting through a PPPoE connection, be sure to have 1) Your
PPPoE User Name and 2) Your PPPoE Password.
The installation technician from your ISP should have left this information with
you after installing your broadband connection. If not, you can call your ISP to
request the data.
Once you have the above values, you can begin the Router’s installation and
setup.
Once you are sure that you have the above values on hand, you can begin the
Installation and Setup of the Router.
1. Power everything down, including your PCs, your cable or DSL modem and
the Router.
2. Connect an Ethernet cable from one of your PC’s Ethernet ports to one of the
Router’s Ethernet ports. Do the same with all the PCs you wish to connect to
the Router.
In addition to accessing the Router through an Ethernet connection, a wire-
less connection can be used to access the Router. See the “For Wireless
Connections” note that follows these connection instructions.
3. Connect another Ethernet cable from your cable or DSL modem to the
Router’s Internet port.
Before You Start
Connecting Your Hardware Together and Booting Up