Steps to configure Linksys - PAP2 Analog Telephone Adaptor Configuration Guide
Overview This guide shows how to configure Linksys PAP2 Analog Telephone Adaptor (ATA) so you can use the Owtalk service. But first you must be an Owtalk subscriber. Linksys ATA can be available in preconfigured mode, labeled as Owtalk Preconfigured on the surface of the packaging box. Under the preconfigured mode, all Owtalk SIP account information are pre-programmed, you don’t need to go through the following procedures. Please refer to Appendix A on how to activate an Owtalk preconfigured device.
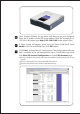
5 Open Internet Explorer (or any other) web browser on your computer. Enter the IP address of the ATA in the address field. For example, if it is 192.168.0.109, please type http://192.168.0.109 in the address field. 6 A login screen will appear. Leave the User Name Field blank. Enter admin in the Password field. Then click OK button. 7 Click Line 1 to enter the SIP Configuration.
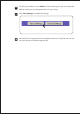
8 The SIP port number is set at 6060. For the remaining tabs, you can accept the default settings, or you change them to suit your setup. 9 Click Save Settings to enable the settings. 10 After the ATA set up procedure is complete, the device is ready for use and you can now receive and make outgoing calls.
Appendix A Owtalk Preconfigured Linksys ATA To activate your Owtalk preconfigured device, you need to obtain an activation number. Go to My Account after sign-up for Owtalk at http://www.owtalk.com. Press Port to Preconfigured and click Next to get the activation number. Simply dial the activation number after connecting your ATA to your cable/ADSL modem, router, or broadband Internet connection. Your ATA is then all set and ready for use.