Instant EtherFast® Series EtherFast® 10/100 PC Cards Use this guide to install: EtherFast 10/100 PC Card (PCMPC100 v3) EtherFast 10/100 Integrated PC Card (PCM100 v2) User Guide
COPYRIGHT & TRADEMARKS Copyright © 2001 Linksys, All Rights Reserved. EtherFast is a registered trademark of Linksys. Microsoft, Windows, and the Windows logo are registered trademarks of Microsoft Corporation. All other trademarks and brand names are the property of their respective proprietors. LIMITED WARRANTY Linksys guarantees that every EtherFast 10/100 PC Card is free from physical defects in material and workmanship under normal use for FIVE years from the date of purchase.
Instant EtherFast® Series Table of Contents EtherFast® 10/100 PC Cards Introduction Introduction The Linksys EtherFast 10/100 Cards About Fast Ethernet Package Contents 1 1 2 3 Getting to Know the EtherFast 10/100 PC Cards LEDS / The RJ-45 Port 4 4 Installing the EtherFast 10/100 PC Cards Getting the Right Cable / Installing the PC Card and Cabling About the Software / Choosing I/O and IRQ Values Socket and Card Services How to Use the 10/100 PC Card’s Enabler for DOS-Based Network Network Driver Se
Instant EtherFast® Series About Fast Ethernet EtherFast® 10/100 PC Cards Package Contents for the EtherFast 10/100 Integrated PC Card (PCM100 V2) In recent years, Fast Ethernet has emerged as the fastest growing network topology around. Operating at an incredible 100 million bits per second (100Mbps), and sometimes referred to as 100BaseTX, Fast Ethernet is more than fast enough to handle the latest speed-dependent applications like video, multimedia, and Internet connectivity.
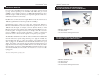
Instant EtherFast® Series EtherFast® 10/100 PC Cards Getting to Know the EtherFast 10/100 PC Cards Installing the EtherFast 10/100 PC Cards LEDs Getting the Right Cable Link The LED will illuminate when the card is sucessfully connected to a network. Act The Activity LED will flicker when data is being transmit ted or received over the network. 10/100 This LED will be illuminated when the card is operating at 100Mbps; dormant when operating at 10Mbps.
Instant EtherFast® Series EtherFast® 10/100 PC Cards About the Software The EtherFast 10/100 PC Card requires two different kinds of software in order to work: Socket and card services are special software drivers that allow a PC card to communicate with your computer. Your computer might have services that were installed by the manufacturer, making your PC compatible with a wide range of CardBus and PCMCIA cards.
Instant EtherFast® Series How to Use the 10/100 PC Card’s Enabler for DOS-Based Network Operating Systems The software disk provided with the EtherFast 10/100 PC Card includes generic socket and card services built into the driver that can be used to enable the EtherFast 10/100 PC Card. The card's hardware-specific client enabler will only enable the EtherFast 10/100 PC Card.
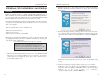
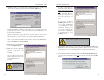
Instant EtherFast® Series Windows 95 Installation and Setup Overview EtherFast® 10/100 PC Cards 2. While the Update Device Driver Wizard window is visible, put the Linksys EtherFast 10/100 PC Card Driver Disk into the floppy drive and click the Next button. Follow the instructions below to install your EtherFast 10/100 PC Card on Microsoft Windows 95.
Instant EtherFast® Series If Windows asks you to supply a file containing the letters “pc100”, type “a:\” in the box that pops up as shown below. Click the OK button. During the installation, Windows may ask you for a computer and workgroup name. If so, refer to steps 9 and 10 in this section. Otherwise, continue with the installation. Windows will finish copying all of the necessary files to your system. When asked if you want to restart your computer, click the No button.
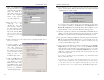
Instant EtherFast® Series 9. Click on the Identification tab. Type the name of your computer in the “Computer name” box. Make up a name that is unique from all the other computers' names on the network. (e.g., Dino, Alpha, etc.) 10. Type the name of your workgroup in the “Workgroup” box. The name you type should be the same workgroup name in use by all of the other PCs on the network. Make sure to use the same case that is used on your other computers. 14.
Instant EtherFast® Series Windows 98 Installation and Setup EtherFast® 10/100 PC Cards 2. While the Update Device Driver Wizard window is visible, put the EtherFast 10/100 PC Card Driver Disk into the floppy drive and click the Next button. A window will appear and ask What do you want Windows to do? Overview After installing the EtherFast 10/100 PC Card hardware in your computer, follow these instructions to install the EtherFast 10/100 PC Card's Windows 98 network driver from the card's driver disk.
Instant EtherFast® Series 5. Windows will begin searching your drives for the correct device drivers. Once Windows has located the driver, the window below will appear indicating that it located the Linksys EtherFast 10/100 PC Card v3 (PCMPC100 v3). Click Next. ‘ Note: DO NOT press Skip or Cancel at any time during the installation. Doing so will prevent your driver from being properly installed on your PC. If Windows cannot find the driver for the card, refer to the Troubleshooting section. 6.
Instant EtherFast® Series 11. Click on the Identification tab. Type the name of your computer in the “Computer name” box. Make up a name that is unique from all the other computers' names on the network (e.g., Dino, Titus, etc.). 12. Type the name of your workgroup in the “Workgroup” box. The name you type should be the same workgroup name in use by all of the other PCs on the network. Make sure that the case and spelling of the workgroup matches what is used on your other computers. 13.
Instant EtherFast® Series Windows Millennium Installation and Setup EtherFast® 10/100 PC Cards 4. If you are asked to supply a path for the driver, type A:\WINME in the drop-down box that appears and click Next. 5. Once Windows has located the driver, a message will appear that reads Windows is now ready to install the Linksys EtherFast 10/100 PC Card V3 driver. Click Next.
Instant EtherFast® Series 6. When the following window appears, click Finish. When you are asked if you want to restart your computer, remove any Driver Disks from the floppy disk drive, click Yes, and allow your system to restart. EtherFast® 10/100 PC Cards Windows NT 4.0 Installation and Setup Overview The following instructions will set up an NT 4.0 server/workstation on your PC. You should have your original Windows NT CD-ROM handy during the installation, as you might be asked to supply it. 7.
Instant EtherFast® Series 3. Click on the Select from list... button to select a network adapter. 4. Select the EtherFast 10/100 PC Card, click on the Have Disk button. Insert the Driver Disk into the floppy drive. Type “A:\” into the box on your screen and click the OK button. EtherFast® 10/100 PC Cards 6. The adapter will be added to the list of installed Network Adapters. Click Next. 7. Place check marks beside each listed network protocol that you wish to install.
Instant EtherFast® Series 8. A list of services will appear. Click Next to approve these services, followed by Next again. 9. NT will probably ask you to supply your original Windows NT CD-ROM or setup disks. If so, place your Windows NT CD-ROM in your CD drive. If the CD-ROM loads a pop-up window, close it. Type “D:\I386” (or the appropriate CD-ROM drive letter) in the box and click Continue. EtherFast® 10/100 PC Cards 11. Windows NT will copy the necessary network drivers to your PC.
Instant EtherFast® Series 13. When asked if you want to restart your computer, remove the Driver Disk and click Yes. EtherFast® 10/100 PC Cards Installing the EtherFast Network Driver if Networking is Already Installed The following steps will install the EtherFast Card’s driver software on your PC, enabling your PC to properly communicate with the card. Remember that you must be logged on as a network administrator to continue. 1.
Instant EtherFast® Series 3. When the list of available network adapters appears, select Linksys EtherFast 10/100 PC Card. Click the Have Disk button. EtherFast® 10/100 PC Cards 5. When the following window appears, select Linksys EtherFast 10/100 PC Card (PCMPC100 v3), click the OK button. 6. NT will then display a window containing several setting types. Keep the default settings unless you know that you need to change them. 4. Put the EtherFast Card Driver Disk into drive A.
Instant EtherFast® Series 8. Click on the Protocols tab. Add any protocols you require by clicking the Add button. Note: If you install the TCP/IP protocol, refer to your system administrator or your Windows NT documentation when installation steps that aren’t listed in this User Guide appear. Linksys does not provide technical support for the configuration or troubleshooting of the TCP/IP protocol.
Instant EtherFast® Series 3. Windows will display the installation screen next. Make sure that the radio button next to Search for a suitable driver for my device (Recommended) is filled in. Click Next. 4. When the Locate Driver Files box is displayed, put a check in the box next to Floppy disk drives. Place your driver disk into the floppy drive and click Next. 36 EtherFast® 10/100 PC Cards 5. Windows should display the Driver Files Search Results box.
Instant EtherFast® Series 7. After copying all the files, Windows will display the following screen. This screen means that the device driver has been properly installed. Click theFinish button. Your installation is complete. If you want to share files or printers, refer to the Windows 2000 documentation. EtherFast® 10/100 PC Cards Troubleshooting 1. Windows doesn’t detect new hardware with the EtherFast Card hardware installed, or it continues to detect the card each time you restart your PC.
Instant EtherFast® Series 5. On the Access Control Tab, User Level Access is selected, but Shared Level Access is grayed out and not accessible. • You previously had your primary network logon set to Client for NetWare Networks. On the Configuration tab of the Network Properties window, ensure that your primary network logon is set to Client for Microsoft Networks. • Your personal web server PC or Microsoft Front Page may require you to choose a user level for security reasons. 6.
Instant EtherFast® Series Appendix 6. If you want to assign access passwords, type the passwords into the Password boxes. Sharing Your Files and Printers 7. When you're done, click on the Apply button, followed by OK. Repeat steps 1-7 for any drive or folder you desire to share on the network. Overview By sharing your files and printers, other PCs on your network will be able to access the resources on your PC.
Instant EtherFast® Series EtherFast® 10/100 PC Cards Novell NetWare 3.x Client Setup for windows 98 or 95 Windows 98 or 95 Client for windows NT The instructions below explain how to set up the regular Novell NetWare 3.x client for use on a Windows 98 or 95 PC. If you are installing the EtherFast 10/100 PC Card in a Windows 95 or 98 PC that you plan on logging into a NT domain server, follow the directions below. 1. Follow the Windows 95 setup instructions or the Windows 98 setup instructions. 2.
Instant EtherFast® Series Starting Over in Windows 95 and 98 If you experience installation difficulties, you may need to re-install all of the Windows networking components from scratch. The instructions below explain how to give your PC a clean sweep so that you can start the EtherFast Card’s software installation over. EtherFast® 10/100 PC Cards 4. Remove any instance of the name Linksys in the box. This includes IPS/SPX…Linksys, NetBEUI…Linksys, and TCP/IP…Linksys.
Instant EtherFast® Series 7. Return to the Windows Control Panel. Double-click on the System Icon. The System Properties window will appear. Click on the Device Manager Tab. EtherFast® 10/100 PC Cards Starting Over in Windows 2000 1. Click the Start button, choose Settings, choose Control Panel, then double-click the System icon.The System Properties window will open. 2. Choose the Hardware tab. 3. Click the Device Manager button. The Device Manager window will open. 8.
Instant EtherFast® Series 8. Right-click on the Linksys EtherFast 10/100 PC Card again. This time, select Uninstall. The following screen will appear. Click the OK button. EtherFast® 10/100 PC Cards Manually Installing Network Components in Windows 95 and 98 There may be times when you might need to manually install missing Windows networking components. 1. Click on Start, Settings, then Control Panel. 2. Double-click the Network icon. The Network window appears. 3. Click on the Configuration tab.
Instant EtherFast® Series EtherFast® 10/100 PC Cards Linux, Open Source and Beta Operating Systems Twisted-Pair Cabling Linksys does not provide technical support for Linux, BSD, or other freeware, Beta, or open source operating systems. Although many Linksys products have been proven to perform well under Linux and other freeware Operating Systems, technical support for setup and troubleshooting is not provided.
Instant EtherFast® Series Crimping Your Own Network Cables Straight-Through Cabling EtherFast® 10/100 PC Cards 10/100 PC Card Specifications Model Number: System: Standards: Ports: Speed Half Duplex: Full Duplex: Cabling: Topology: LED Status Lights: PCMPC100 v3 PCMCIA-compliant PC IEEE 802.3, IEEE 802.
Instant EtherFast® Series EtherFast® 10/100 PC Cards 10/100 Integrated PC Card Specifications Linksys Warranty Customer SupportInformation Model Number: System: Standards: Ports: Speed Half Duplex: Full Duplex: Cabling: Topology: LED Status Lights: Linksys guarantees that every EtherFast 10/100 PC Card is free from physical defects in material and workmanship under normal use for FIVE years from the date of purchase.
http://www. l i n k s y s . c o m © Copyright 2001 Linksys, All Rights Reserved.