Linksys SPA400 Trixbox Integration Guide Access Point – Connecting You & Your Customers. Contact : support@voipshop.com.
Overview: The Linksys SPA400 is a 4 Line FXO gateway capable of connecting 4 PSTN lines to your asterisk system to make and receive calls. This guide is a step by step on how to configure Trixbox to utilize the features of the SPA400. Limitations: * The voicemail function of the SPA400 cannot be used. * You cannot select which line of the SPA400 to use. They are treated as a single group of 1-4 lines. The SPA400 will know which lines are available by the line voltage when plugged in.
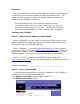
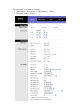
Step 3 – Set the SPA400 to a Fixed IP address Asterisk needs to access your SPA400, so it needs to be set to a fixed ip address. To do this: Under Setup -> Basic Setup • Select Fixed IP address and enter a valid fixed IP address for your network. • Be sure to enter a DNS server, if you do not know enter the Telstra DNS server 139.130.4.5 – You can leave the secondary blank • Set your time zone.
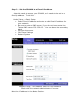
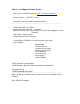
Step 4 – Setup the SPA400 Voice Configuration. Open the SPA400 in your web browser using the new IP address. Select Setup->SPA9000 Interface.
For Australia you need to change:• Impedance : 220 Ohms + (820 Ohms || 120nF) • On-Hook speed : 26ms
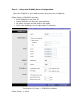
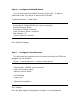
Step 5 – Configure Trixbox Trunk. Open your FreePBX interface: http://trixbox.
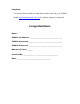
Step 6 – Configure Outbound Route. You can now treat the SPA400 like any other trunk. To add an outbound router (eg, dial 9 to dial out the SPA400) Outbound Routes -> Add Route Route Name: SPA400PSTN (this can be anything) Route Password: Blank Emergency Dialing: Unticked Intra Company Route: Unticked Dial Patterns: 9|. Trunk Sequence: SPA400 Click Submit Changes Step 7 – Configure Inbound Route. This will setup an inbound route for people who call the PSTN lines plugged into the SPA400.
Complete: You should now be able to make and receive calls via your SPA400. Email support@voipshop.com.au for further support if required.