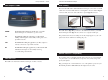
HomeLink™ Series Phoneline 10M USB Network Adapter Model No.
COPYRIGHT & TRADEMARKS Copyright © 2000 Linksys, All Rights Reserved. Phoneline 10M USB Network Adapter is a registered trademark of Linksys. Microsoft, Windows, and the Windows logo are registered trademarks of Microsoft Corporation. All other trademarks and brand names are the property of their respective proprietors.
Linksys HomeLink™ Series Table of Contents Phoneline 10M USB Network Adapter Introduction Introduction Package Contents Windows & Computer Compatibility 1 2 2 Getting to Know the Phoneline 10M USB Network Adapter The Adapter’s Ports The Adapter’s LEDs The USB Icon USB Cabling Modem and Fax Compatibility 3 Installing the Phoneline 10M USB Network Adapter Installing the USB Network Adapter & Cabling Connecting to a Phoneline Network Connecting to an Ethernet or Fast Ethernet Network 6 Windows 98 Ins
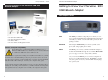
Linksys HomeLink™ Series Package Contents for the Phoneline 10M USB Network Adapter Phoneline 10M USB Network Adapter Getting to Know Your Phoneline 10M USB Network Adapter The Adapter’s Ports • One HomeLink Phoneline 10Mbps USB Network Adapter • One Standard USB Cable • One Standard Telephone Cable • One Driver Disk • One User Guide and Registration Card Windows & Computer Compatibility To use this device, you must have Microsoft Windows 98 or Windows 2000 installed on your PC.
Linksys HomeLink™ Series The Adapter’s LEDs Phoneline 10M USB Network Adapter USB Cabling The HomeLink Phoneline 10M USB Network Adapter comes with one USB cable. One end of the USB cable has a rectangular connector called a Type A connector. The other end of the cable has a square Type B connector. Type A POWER The Power LED will light up green when your USB Network Adapter is connected to a power source.
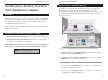
Linksys HomeLink™ Series Installing the HomeLink Phoneline 10M USB Network Adapter Overview Phoneline 10M USB Network Adapter Connecting to a Phoneline Network Computers on a HomeLink network can be connected in one of two ways. They can be daisy chained through their HomeLink port to another HomeLink PC in a string, or they can be connected directly to a phone jack. The diagram below shows a HomeLink phoneline network that uses both types of connections.
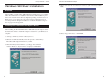
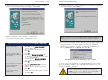
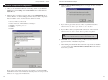
Linksys HomeLink™ Series Windows 98 Driver Installation Phoneline 10M USB Network Adapter 4. Select “Search for the best driver for your device (Recommended).” Click Next. Overview After installing your Phoneline 10M USB Network Adapter in your computer, follow these instructions to install the network driver. The installation procedure for the network driver will vary slightly depending on which version of Windows 98 you are using and your current system configuration.
Linksys HomeLink™ Series 6. Windows will display a window announcing that it is ready to install the Linksys Phoneline 10M USB Network Adapter. Click Next. 7. Windows will start copying the files to your hard drive. See the chart below to guide you through the process. Under no circumstance are you to click Cancel or Skip File! • If your PC asks for the Linksys Setup or Driver Disk... 1. Click OK. 2. Make sure that the Linksys Driver Disk is in your PC’s floppy drive. 3.
Linksys HomeLink™ Series Network Component Configuration Phoneline 10M USB Network Adapter 3. Click the File and Print Sharing button to bring up the File and Print Sharing window. 1. Once you are back at the Windows 98 Desktop, click on your Taskbar's Start button, then Settings, then Control Panel, then double-click the Network icon. 2. When the Network window appears, click on the Configuration tab. A window like the one below will appear.
Linksys HomeLink™ Series 8. Click on the Identification tab. Type your Computer Name in the Computer Name field. Make sure you choose a name that is unique from the other computer names on the network, e.g., Dad, Upstairs_PC, etc. Note: Your Computer Name and Workgroup Name must both be less than 15 characters, and must only consist of numbers and letters. Every Computer Name for each PC on the network must be different from all the other PCs’ Computer Names on the network.
Linksys HomeLink™ Series Phoneline 10M USB Network Adapter 14. A Logon window will appear, requiring you to enter a User Name and Password. Choose a user name and password if you haven’t already and click OK. Do not click the Cancel button or Escape [ESC] key. Clicking either of these buttons will prevent you from logging onto the network. If the Logon window does not appear or if it does not allow you to log on, see problem 3 in the Troubleshooting section on page 22.
Linksys HomeLink™ Series 6. If you want to assign access passwords, type the passwords into the Password fields. 7. When you're done, click on the Apply button, followed by OK. Repeat steps 1-7 for any drive or folder you want to share on the network. You have successfully enabled File Sharing on your PC. Your selected drives or folders can now be accessed by other network users.
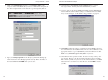
Linksys HomeLink™ Series 3. The Install Hardware Device Drivers window will appear. When Linksys USB Adapter is displayed, select “Search for a suitable driver for my device (Recommended).” Click Next. 4. The Locate Driver Files window will appear. Select the “Floppy disk drives” option and insert the driver disk into your floppy drive. Click Next. Phoneline 10M USB Network Adapter 5. The Driver File Search Results window will appear. Click Next. 6.
Linksys HomeLink™ Series Troubleshooting 1. Windows doesn't detect new hardware when the HomeLink Adapter hardware is installed, or it continues to detect the adapter each time I restart the PC. • You may not have installed the adapter correctly or securely into the appropriate port of your PC. Check that the adapter is securely inserted into the appropriate port.
Linksys HomeLink™ Series click on Start, Settings, Control Panel, then open Network and click on the Configuration tab. Highlight IPX/SPX-compatible Protocol (only one of them) and click on Properties. • Click on the NetBIOS tab. Put a check next to I want to enable NetBIOS over IPX/SPX and click OK. Click OK again. • After Windows finishes copying the appropriate files, restart your computer.
Linksys HomeLink™ Series Phoneline 10M USB Network Adapter Novell NetWare 3.x Client Setup for Windows 98 Starting Over in Windows 98 The instructions below explain how to set up the regular Novell NetWare 3.x client for use on a Windows 98 PC. If you experience installation difficulties, you may need to reinstall all of the Windows networking components from scratch.
Linksys HomeLink™ Series 4. Remove any instance of the name Linksys in the field, including IPX/SPX…Linksys, NetBEUI…Linksys, and TCP/IP…Linksys. Also remove Client for Microsoft Networks, Client for NetWare Networks, and File and Printer Sharing for Microsoft Networks. Phoneline 10M USB Network Adapter 5. For PCs with Dial-Up Networking and/or an AOL adapter, remove any instance of the name Linksys, all IPX/SPX protocols, all NetBEUI, all Clients, and File and Printer Sharing for Microsoft Networks.
Linksys HomeLink™ Series 8. If Network adapters is listed, then expand it by clicking on the plus [+] sign and remove all devices with the name Linksys in its description. If at any point you are asked to restart the computer, click No. Phoneline 10M USB Network Adapter Starting Over in Windows 2000 1. Click the Start button, choose Settings, choose Control Panel, then double-click the System icon. The System Properties window will open. 2. Choose the Hardware tab. 3. Click the Device Manager button.
Linksys HomeLink™ Series 5. Right-click on Linksys Phoneline 10M USB Network Adapter to bring up a context menu like the one shown below. Phoneline 10M USB Network Adapter Manually Installing Network Components in Windows 98 Sometimes, you may have to manually install missing Windows networking components. For manually installing network components in Windows 2000, see your network adminstrator or your Microsoft documentation. 1. Click on Start, Settings, then Control Panel. 2.
Linksys HomeLink™ Series IPX/SPX-compatible protocol Click the Add button. Choose Protocol and click the Add button. Select Manufacturer and choose Microsoft. Under the Network Protocol box, highlight IPX/SPX-compatible protocol. Click OK. Click OK again. The computer will begin copying files to your system. When the installation is complete, you will be asked if you want to reboot. Click Yes. NetBEUI Click the Add button. Select Protocol, then click Add. Under Manufacturer, highlight Microsoft.
Linksys HomeLink™ Series Customer Support Specifications Model Number Standards Protocol Ports Speed Cabling Topology Bus Speed LEDs Phoneline 10M USB Network Adapter USB200HA HomePNA Version 2.0-Compatible, USB Version 1.
http://www.linksys.com © Copyright 2000 Linksys, All Rights Reserved.