
User Manual
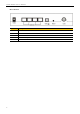
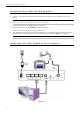


Table Of Contents

Chapter 2: Installation
C
C
h
h
a
a
p
p
t
t
e
e
r
r
2
2
:
:
I
I
n
n
s
s
t
t
a
a
l
l
l
l
a
a
t
t
i
i
o
o
n
n
This cable modem equips USB, wireless and Ethernet interfaces. You can choose either one to connect to the cable
modem. Go to the section “Installation Procedure for Ethernet Interface”, if your computer has installed TCP/IP and
Ethernet card with 10/100BaseT capability. Go to the section “Installation Procedure for USB Interface”, if your PC
has USB port and the operating system is Microsoft Windows 98/ME/XP or Windows 2000.
Note: You don’t need to do installation for wireless interface.
Installation Procedure for Ethernet Interface
Follow the steps below for proper installation:
1. Connect a coaxial cable (supplied by the local Cable Television Company) to the CABLE connector on the
modem.
Note: To speed up the registration process of cable modem, the coaxial cable should be
connected to the modem prior to the power connector.
2. Connect the RJ-45 Ethernet cable to one of the ETHERNET connector on the modem, connect the other end
with the 10/100BaseT Ethernet port on your computer.
3. Plug the power adapter into the POWER connector of the modem.
4. Plug the other end of the power adapter into a power outlet.
5. The cable modem will look for the proper cable modem signal in the Cable Television network and process the
initial registration. The cable modem is ready for data transfer after the LED “CABLE” is in solid green.
Note: The Reset button at the rear panel is for maintenance purpose only.
3