
Owner's Manual


13
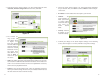
2. From the next screen, shown in Figure 5-11, select a radio button next to the
Advanced | Manual Configuration selection. Then, click Next.
3. The wireless set-
tings screen will
now appear, shown
in Figure 5-12.
Enter your wireless
network’s SSID and
select the channel at
which the network
broadcasts its wire-
less signal. Then,
click Next to con-
tinue or Back to
return to the previ-
ous screen.
• SSID - The SSID is the unique name shared among all devices in your wire-
less network. The SSID must be identical for all devices in the wireless net-
work. It is case-sensitive and must not exceed 32 alphanumeric characters,
which can be any keyboard character.
• Channel - From the drop-down menu, select the appropriate channel to
match your network settings. All devices in your wireless network must use
the same channel in order to function correctly.
12
4. On the next screen, shown in Figure 5-13, enter the IP settings appropriate
for your network. Then, click Next to continue or Back to return to the pre-
vious screen.
• IP Address - This IP address must be unique to your network.
• IP Mask - The
Game Adapter’s IP
Mask (also known
as Subnet Mask)
must be the same as
your wired net-
work’s Subnet
Mask.
• Gateway - Enter the
IP address of your
network’s Gateway.
5. Confirm your changes to the Game Adapter’s settings on the following
screen, shown in Figure 5-14. Then, click Ye s to accept these settings.
Figure 5-12
Figure 5-13
Figure 5-11
Figure 5-14