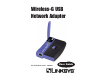
Wireless-G USB Network Adapter Use this Guide to install: WUSB54G User Guide
COPYRIGHT & TRADEMARKS Specifications are subject to change without notice. Linksys is a registered trademark or trademark of Cisco Systems, Inc. and/or its affiliates in the U.S. and certain other countries. Copyright © 2003 Cisco Systems, Inc. All rights reserved. Other brands and product names are trademarks or registered trademarks of their respective holders.
Note: Combinations of power levels and antennas resulting in a radiated power level of above 100 mW equivalent isotropic radiated power (EIRP) are considered as not compliant with the above mentioned directive and are not allowed for use within the European community and countries that have adopted the European R&TTE directive 1999/5/EC and/or the CEPT recommendation Rec 70.03. For more details on legal combinations of power levels and antennas, contact Linksys Corporate Compliance.
Chapter 1: Introduction The Wireless-G USB Network Adapter Appendix A: Troubleshooting Common Problems and Solutions Frequently Asked Questions 26 26 27 Appendix B: Glossary 30 Appendix C: Specifications Environmental 38 39 Appendix D: Warranty Information 40 Appendix E: Contact Information 41 Connect your USB-equipped desktop or notebook computer to a wireless network at incredible speeds with the Linksys Wireless-G USB Network Adapter.
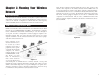
Chapter 2: Planning Your Wireless Network Network Topology A wireless local area network (WLAN) is exactly like a regular local area network (LAN), except that each computer in the WLAN uses a wireless device to connect to the network. Computers in a WLAN share the same frequency channel and SSID, which is an identification name for wireless devices.
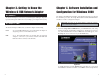
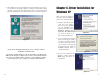
Chapter 3: Getting to Know the Wireless-G USB Network Adapter Chapter 4: Software Installation and Configuration for Windows 2000 The USB Port The Network Adapter is connected to your PC through its USB port. All power is provided through the USB connection, making a power adapter unnecessary. The Adapter’s LEDs The Wireless-G USB Network Adapter Setup Wizard will guide you through the installation procedure. The Setup Wizard will install the WLAN Monitor and driver, as well as configure the Adapter.
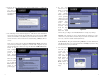
2. Read the License Agreement and click the Next button to continue the installation. If you click the Cancel button, you will end the installation. Figure 4-2 3. The following screen, shown in Figure 4-3, will ask for some information about your wireless network. In the SSID field, enter your network’s SSID (Service Set Identifier). The SSID is your network name and must be identical for all devices in the network. The default setting is linksys (all lowercase). Next, choose a wireless mode.
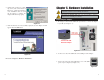
Chapter 5: Hardware Installation 6. At this point, you may see a warning screen, such as that shown in Figure 4-6 , asking if you’d like to cease installation. You can click the Yes button to continue; the Adapter will function properly. Important for Windows 2000 users: You must run the Setup Wizard to install the software before installing the hardware. Important for Windows XP users: You must install the Adapter’s hardware before installing the software. Connecting the Adapter Figure 4-6 1.
4. When Windows 2000 begins installing the Network Adapter’s driver file, a screen similar to that shown in Figure 5-3 will appear, stating that a digital signature was not found. This software has been tested and found to work properly with Windows 2000. Click the Yes button to continue installation. Chapter 6: Driver Installation for Windows XP After connecting the Adapter to your PC, as shown in Chapter 5, you’ll need to install the driver. 1. Windows XP will automatically detect the Adapter.
Windows XP Wireless Zero Configuration Note for Windows XP users: Windows XP has a built-in configuration tool. Use Windows XP Wireless Zero Configuration (in the system tray at the bottom of your screen) to configure the Adapter. 1. After installing the Adapter, the Windows XP Wireless Zero Configuration icon will appear in your computer’s system tray (see Figure 6-4). Double-click the icon. 3. If WEP is enabled, the screen in Figure 6-6 will appear.
Chapter 7: Using the WLAN Monitor Overview Use the WLAN Monitor to check the link information, search for available wireless networks, or create profiles that hold different configuration settings. Link Information The Link Information screen, shown again in Figure 7-3, displays the signal strength and link quality information about the current connection and provides a button to click for additional status information.
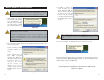
Site Survey The Site Survey screen, shown in Figure 7-5, displays a list of infrastructure and ad-hoc networks available for connection. Figure 7-4 Wireless Network Status Status - The status of the wireless network connection. SSID - The unique name of the wireless network. Wireless Mode - The mode of the wireless network currently in use. Transfer Rate - The data transfer rate of the current connection. Channel - The channel to which the wireless network devices are set.
Profiles The Profiles screen, shown in Figure 7-6, lets you save different configuration profiles for different network setups. You can also import or export profiles. The default profile holds the initial configuration saved when you ran the Setup Wizard. Import - Click the Import button to import a profile that has been saved in another location. Select the appropriate file, as shown in Figure 7-7, and click the Open button.
3. The Network Setting screen, shown in Figure 7-11, will appear. Creating a New Profile 1. On the Profiles screen, shown again in Figure 7-9, click the New button to create a new profile. If your network has a DHCP server (or Router), click the radio button next to Obtain an IP address automatically (DHCP) and click the Next button to continue. If your network does not have a DHCP server (or router), click the radio button next to Specify the IP address.
4. The Wireless Mode screen, shown in Figure 7-12, shows a choice of two wireless modes. Click the Infrastructure Mode radio button if you want your wireless computers to communicate with computers on your wired network via a wireless access point. Click the Ad-Hoc Mode radio button if you want multiple wireless computers to communicate directly with each other. Click the Next button to continue or the Back button to return to the previous screen.
WEP (Disabled/64-bit WEP/128-bit WEP) - If you do not want to use WEP encryption, choose Disabled. To use WEP encryption (recommended to increase network security), select 64-bit or 128-bit WEP from the dropdown menu, and enter either a Passphrase or WEP key. Passphrase - Instead of manually entering WEP keys, you can enter a Passphrase, so that a WEP key is automatically generated. It is case-sensitive and should not be longer than 16 alphanumeric characters.
Appendix A: Troubleshooting Common Problems and Solutions This chapter provides solutions to problems that may occur during the installation and operation of the Wireless-G USB Network Adapter. Read the descriptions below to solve your problems. If you can’t find an answer here, check the Linksys website at www.linksys.com. 1. My computer does not recognize the USB Network Adapter. • Make sure that the USB Network Adapter is properly inserted into the USB port.
To achieve true seamless connectivity, the wireless LAN must incorporate a number of different functions. Each node and access point, for example, must always acknowledge receipt of each message. Each node must maintain contact with the wireless network even when not actually transmitting data. Achieving these functions simultaneously requires a dynamic RF networking technology that links access points and nodes.
Appendix B: Glossary Bit - A binary digit. The value - 0 or 1-used in the binary numbering system. Also, the smallest form of data. 802.11b - One of the IEEE standards for wireless networking hardware. Products that adhere to a specific IEEE standard will work with each other, even if they are manufactured by different companies. The 802.11b standard specifies a maximum data transfer rate of 11Mbps, an operating frequency of 2.4GHz, and WEP encryption for security. 802.
DHCP supports static addresses for computers containing Web servers that need a permanent IP address. Fragmentation - Breaking a packet into smaller units when transmitting over a network medium that cannot support the original size of the packet. DNS - The domain name system (DNS) is the way that Internet domain name are located and translated into Internet Protocol (IP) addresses. A domain name is a meaningful and easy-to-remember "handle" for an Internet address.
request an HTML page or send e-mail, the Internet Protocol part of TCP/IP includes your IP address in the message (actually, in each of the packets if more than one is required) and sends it to the IP address that is obtained by looking up the domain name in the Uniform Resource Locator you requested or in the e-mail address you're sending a note to.
Server - Any computer whose function in a network is to provide user access to files, printing, communications, and other services. Software - Instructions for the computer. A series of instructions that performs a particular task is called a "program." The two major categories of software are "system software" and "application software." System software is made up of control programs such as the operating system and database management system (DBMS).
Appendix C: Specifications Environmental Dimensions 3.58" x 2.8" x 0.91" (91 mm x 71 mm x 23 mm) Standards IEEE 802.11b, IEEE 802.11g, USB 1.1, USB 2.0 Ports USB Port Unit Weight .18 lbs. (.08 kg) Channels 802.11b/ 802.11g 11 Channels (US, Canada) 13 Channels (Europe) 14 Channels (Japan) Certifications FCC Operating Temp. 32ºF to 104ºF (0ºC to 40ºC) Storage Temp.
Appendix D: Warranty Information BE SURE TO HAVE YOUR PROOF OF PURCHASE AND A BARCODE FROM THE PRODUCT’S PACKAGING ON HAND WHEN CALLING. RETURN REQUESTS CANNOT BE PROCESSED WITHOUT PROOF OF PURCHASE. IN NO EVENT SHALL LINKSYS’ LIABILITY EXCEED THE PRICE PAID FOR THE PRODUCT FROM DIRECT, INDIRECT, SPECIAL, INCIDENTAL, OR CONSEQUENTIAL DAMAGES RESULTING FROM THE USE OF THE PRODUCT, ITS ACCOMPANYING SOFTWARE, OR ITS DOCUMENTATION. LINKSYS DOES NOT OFFER REFUNDS FOR ANY PRODUCT.
http://www.linksys.com © Copyright 2003 Linksys, All Rights Reserved.