Instant Wireless™ Series Wireless PrintServer Use this guide to install: Model No.: WPS11 ver.
COPYRIGHT & TRADEMARKS Copyright © 2002 Linksys, All Rights Reserved. Instant Wireless is a trademark of Linksys. Microsoft, Windows, and the Windows logo are registered trademarks of Microsoft Corporation. All other trademarks and brand names are the property of their respective proprietors.
Instant Wireless™ Series Wireless PrintServer Table of Contents Chapter 1: Introduction The Instant Wireless PrintServer Features Package Contents 1 1 1 2 Chapter 2: Getting to Know the Wireless PrintServer 3 The Wireless PrintServer’s LEDs 3 The Wireless PrintServer’s Ports 4 Chapter 3: Hardware Installation Overview Finding the Wireless PrintServer’s Default Name Connecting the Wireless PrintServer to Your Network 5 5 5 5 Chapter 4: Windows Driver Setup Overview The Autorun Bi-Admin Management Utili
Instant Wireless™ Series Chapter 1: Introduction Wireless PrintServer Package Contents The Instant Wireless™ PrintServer Congratulations on your purchase of the Instant Wireless™ PrintServer, the fastest and easiest way to network your printers. Now you can share your printing resources without tying up your workstation performance with pending print jobs.
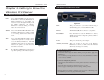
Instant Wireless™ Series Chapter 2: Getting to Know the Wireless PrintServer Wireless PrintServer The Wireless PrintServer’s Ports The Wireless PrintServer’s LEDs LAN WLAN ACT Err Green. The LAN LED serves two purposes. If the LED is continuously illuminated, the Wireless PrintServer is successfully connected to a device through the LAN port. If the LED is flickering, the Wireless PrintServer is actively sending or receiving data to the wired network. Figure 2-2 Amber.
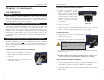
Instant Wireless™ Series Wireless PrintServer Connecting a Printer to the Wireless PrintServer Chapter 3: Hardware Installation Overview Before starting the physical installation, be sure to find the Wireless PrintServer’s Default Name first. The information for the Default Name may be hard to access after the Wireless PrintServer is completely installed in your network and surrounded by wires and computers.
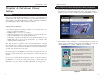
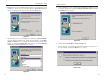
Instant Wireless™ Series Chapter 4: Windows Driver Setup Wireless PrintServer The Autorun Bi-Admin Management Utility Installation 1. Insert the Setup Utility CD. A built-in autorun will begin the installation of the PrintServer’s Bi-Admin Management Utility, and display Figure 4-1. Click the product you wish to install, followed by the Install tab to continue.
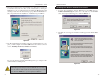
Instant Wireless™ Series 3. The next screen that appears, shown in Figure 4-3, will request you to choose a destination folder. You can either use the default folder by clicking the Next button or choose an alternate folder by clicking the Browse button and selecting a folder from the window that pops up. Click the Back button to take a step backward in the installation, or Cancel to forgo installation. Wireless PrintServer Installing the Wireless PrintServer’s Drivers 1.
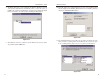
Instant Wireless™ Series 3. Click Next to accept the default Destination Directory (recommended), shown in Figure 4-7. If you choose to use another directory, click the Browse button and choose the appropriate directory. Then, click the Next button. Wireless PrintServer 5. Driver installation is now completed but the Print Driver still needs to be configured. Check the box beside Configure Print Driver Now and click the Finish button to continue. Figure 4-7 4.
Instant Wireless™ Series 8. The Printer Port Setup screen will display the Wireless PrintServer and all of the printers with which it communicates. Here, you have the option of installing the printer by highlighting its description and clicking the Next button. You can also close this screen by clicking the Close button. Wireless PrintServer 10. This will display the Configure Printer Port screen. Any installed printers will be displayed in the Existing Printers field.
Instant Wireless™ Series 12. After your printer(s) have been added, you will return to the Configure Printer Port screen. Click the Connect button to connect the printer(s). Wireless PrintServer Chapter 5: Bi-Admin: PrintServer Management Overview The Wireless PrintServer is managed by a utility program called Bi-Admin on the Wireless PrintServer’s Setup CD.
Instant Wireless™ Series Wireless PrintServer Using Bi-Admin Obtaining Device Information: The Device Information Icon To access information about the Wireless PrintServer, either click on it in the Device List window (on the right side of the Bi-Admin window) or highlight the Wireless PrintServer and click on the Device Information icon, shown in Figure 5-2. You can also highlight the Wireless Figure 5-2 PrintServer and then click on Status to select Backup/Restore Device Information.
Instant Wireless™ Series Wireless PrintServer Checking the Status of a Printer Port: Printer Status Icon Logical Port Configuration: Logical Port Configuration Icon The numbered Printer Port icons let you check the name, status, and printing details of each printer attached to the Wireless PrintServer. A password may be required to access this information. You may be able to configure some printers’ settings within the Printer Status window.
Instant Wireless™ Series Setting the Wireless PrintServer’s IP Address The Wireless PrintServer’s IP address can be easily changed at any time. Click once on the Device Name of the Wireless PrintServer whose address you want to change, and then click on InitDevice and Set IP Address. This will bring up the Set IP Address window. By default, the PrintServer has DHCP enabled. Wireless PrintServer Important: Always leave at least one protocol enabled on the Wireless PrintServer.
Instant Wireless™ Series Chapter 6: Configuring the Wireless PrintServer Using the Web-based Utility Accessing the Web-based Utility You can use the Wireless PrintServer’s built-in Web-based Utility to configure the Wireless PrintServer. In order to open the Utility, follow the instructions below. Open your web browser and type http:// followed by the Wireless PrintServer’s IP address in the browser’s Address box. Use the Bi-Admin software to find the IP address. Press Enter.
Instant Wireless™ Series The TCP/IP Page Wireless PrintServer The Wireless Page Figure 6-5 Click the TCP/IP tab to view or change the TCP/IP values of the Wireless PrintServer. If you are using DHCP to assign IP addresses, select DHCP Client. By default, DHCP is enabled. If you need to assign the Wireless PrintServer a Fixed IP Address (also known as Static IP Address), select this option, and enter the appropriate values under Device IP Address, Subnet Mask, and Gateway IP Address.
Instant Wireless™ Series Wireless PrintServer Chapter 7: Advanced Properties The Status Page The Advanced Properties section of the Web-based Utility is for users who have a thorough understanding of networks and network settings. Changing these settings can cause interruption of network communication and make the Wireless PrintServer cease to function properly. To access the Advanced Properties, click the Advanced tab in the Web-based Utility.
Instant Wireless™ Series The Internet Printing Page Wireless PrintServer The Logical Printers Page Click the Internet Printing tab to view or change the Internet Printing values of the Wireless PrintServer. Internet Printing allows you to automatically print any e-mails that are sent to a specific email account on your network. This is especially useful for printing information when you are not connected to the network. You can print from anywhere that you can access email.
Instant Wireless™ Series The NetBEUI Page Wireless PrintServer The SNMP Page Click the NetBEUI tab to view or change the NetBEUI connection settings of the Wireless PrintServer. Enter the name of the domain that you want the Wireless PrintServer associated with in the Domain Name box. Figure 7-4 If you are unsure of the Domain Name, you can find it out by looking on any computer already on the network. In Windows 95, 98 and NT, right-click Network Neighborhood and select Properties.
Instant Wireless™ Series General SysContact Text Field - Name of the contact person. SysLocation Text Field - Location of the contact person. Management Stations Station No. Select the Management station number (1..4), and click the Get Data button to update the display for the selected item. IP Address Enter the IP Address of the management station, which has the SNMP program installed. Community This is a text field. Enter the name of the community, normally “public” or “private”.
Instant Wireless™ Series IPP Client Configuration for Windows 95/98/Millennium/NT 4.0/2000/XP Wireless PrintServer 4. Click Save to create the IPP port on your system. You will see a message confirming that the port has been created, then Figure 8-2: 1. Run the Add IPP Port program entry created by the installation. A screen like the one shown in Figure 8-1 will be displayed. If you do not see the Add IPP Port program entry, then click Start. Select Programs and then IPP Port Monitor.
Instant Wireless™ Series 3. Click the Port Settings or Configure Port button (Details or Port tab, depending on your version of Windows). The Configure IPP Port screen (shown in Figure 8-3) will appear. Wireless PrintServer 2. Select Network Printer and click Next to see the Locate your Printer screen, as shown in Figure 8-4. Figure 8-4 Figure 8-3 There are two settings—Retry Interval and Retry Count—which can be adjusted if you have problems connecting to the IPP Server.
Instant Wireless™ Series 5. Select the printer manufacturer and model to match the printer connected to the port on the IPP Server. 6. Click Next and complete the Wizard. Wireless PrintServer Chapter 9: DHCP Support for the Wireless PrintServer The IPP printer is now ready for use. Using IPP Printers The IPP Printer can be selected and used like any other Windows printer. If the IPP Server is not on your network, your Internet connection needs to be active.
Instant Wireless™ Series Appendix A: Troubleshooting If the Wireless PrintServer is not working correctly, follow the advice in this chapter. If you have trouble printing, see Chapter 3 first, and then go to Chapter 5. Hardware Issues 1. All the LEDs on the front of the Wireless PrintServer are off. • Check the power supply and the power connection. 2. The Wireless PrintServer's Status LED stays lit continuously.
Instant Wireless™ Series Wireless PrintServer your printer came with special bi-directional software allowing you to monitor printer status, do not use it with the Wireless PrintServer—the software is most likely not network-capable.
Instant Wireless™ Series DHCP (Dynamic Host Configuration Protocol) - A protocol that lets network administrators manage centrally and automate the assignment of Internet Protocol (IP) addresses in an organization's network. Using the Internet's set of protocol (TCP/IP), each machine that can connect to the Internet needs a unique IP address. When an organization sets up its computer users with a connection to the Internet, an IP address must be assigned to each machine.
Instant Wireless™ Series IEEE - The Institute of Electrical and Electronics Engineers. The IEEE describes itself as “the world’s largest technical professional society—promoting the development and application of electrotechnology and allied sciences for the benefit of humanity, the advancement of the profession, and the wellbeing of our members.” The IEEE fosters the development of standards that often become national and international standards.
Instant Wireless™ Series Software - Instructions for the computer. A series of instructions that performs a particular task is called a “program.” The two major categories of software are “system software” and “application software.” System software is made up of control programs such as the operating system and database management system (DBMS). Application software is any program that processes data for the user. A common misconception is that software is data. It is not.
Instant Wireless™ Series Wireless PrintServer Appendix E: Specifications Appendix F: Environmental Standards: IEEE 802.3, IEEE 802.3u, IEEE 802.11b, IEEE1284 Dimensions: 4.76" x 3.74" x 1.18" (121 mm x 95 mm x 30 mm) Unit Weight: 5.6 oz. (0.16 kg) Protocol: CSMA/CD Power: External, 12V DC, 800 mA Ports: One 10/100 RJ-45 Port One DB-25 Bidirectional Parallel Port Certifications: FCC Class B, CE Mark Operating Temp.: 0ºC to 40ºC (32ºF to 104ºF) Storage Temp.
Instant Wireless™ Series Wireless PrintServer Appendix G: Warranty Information Appendix H: Contact Information BE SURE TO HAVE YOUR PROOF OF PURCHASE AND A BARCODE FROM THE PRODUCT'S PACKAGING ON HAND WHEN CALLING. RETURN REQUESTS CANNOT BE PROCESSED WITHOUT PROOF OF PURCHASE. For help with the installation or operation of this product, contact Linksys Technical Support at one of the phone numbers or Internet addresses below.
http://www.linksys.com © Copyright 2002 Linksys, All Rights Reserved.