
User's Manual

Wireless-G Notebook Adapter
19
Instant Wireless
®
Series
18
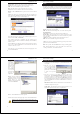
The Profiles screen (Figure 7-6) lets you save different configuration profiles
for different network setups. You can also import or export profiles. The default
profile holds the initial configuration saved when you ran the Setup Wizard.
Profile - Name of the connection profile.
SSID - The wireless network’s unique name, as set in the connection profile.
Profile Information
Network Type - The mode of the wireless network currently in use.
Transfer Rate - The data transfer rate of the current connection. (In Auto
mode, the Adapter dynamically shifts to the fastest data transfer rate possible
at any given time.)
Channel - The channel to which the wireless network devices are set.
WEP - The status of the WEP encryption security feature.
Connect - To connect to a wireless network using a specific profile, select the
profile, and click the Connect button.
Edit - Select a profile, and click the Edit button to change an existing profile.
New - Click the New button to create a new profile. See the next section,
“Creating a New Profile,” for detailed instructions.
Figure 7-6
Profiles
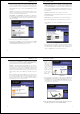
Site Information
Wireless Mode - The mode of the wireless network currently in use.
Channel - The channel to which the wireless network devices are set.
WEP - The status of the WEP encryption security feature.
MAC - The MAC address of the wireless network’s access point.
Surveyed at - The time at which the wireless network was scanned.
Refresh - Click the Refresh button to perform a new search for wireless
devices.
Connect - To connect to one of the networks on the list, select the wireless net-
work, and click the Connect button. If the wireless network has WEP encryp-
tion enabled, you will see the screen shown in Figure 7-5.
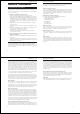
In the WEP drop-down box, select the type of WEP encryption used by the
wireless network: 64-bit, or 128-bit WEP.
If the wireless network uses a passphrase, enter the passphrase in the
Passphrase field. If the wireless network uses a WEP key, enter the WEP key
in the Key 1 field.
Click the OK button to complete the network connection and return to the Site
Survey screen, or click the Cancel button to cancel the network connection and
return to the Site Survey screen.
On the Site Survey screen, click the X (Close) button in the upper right corner
to exit the WLAN Monitor.
Figure 7-5
Wireless-G Notebook Adapter
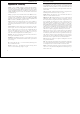
1. On the Profiles screen, shown in Figure 7-6, click the New button to create
a new profile.
2. When the Create connection
profile screen appears (Figure
7-9), enter a name for the new
profile. Click OK to save the
profile name or click Cancel
to return to the previous
screen.
3. The Choose a network type screen (Figure 7-10) shows a choice of two
wireless modes. Click the Infrastructure Mode radio button if you want
your wireless computers to communicate with computers on your wired
network via a wireless access point. Click the Ad-Hoc Mode radio button
if you want multiple wireless computers to communicate directly with each
other. Click the Next button to continue or the Back button to return to the
previous screen.
Infrastructure Mode - This mode allows wireless and wired networks to
communicate through an access point.
Ad-Hoc Mode - This mode allows wireless-equipped computers to com-
municate directly with each other. No access point is used.
21
Instant Wireless
®
Series
20
Figure 7-10
Figure 7-9
Creating a New Profile
Import - Click
the Import but-
ton to import a
profile that has
been saved in
another location.
From the screen
that appears
(shown in Figure
7-7), select the
appropriate file,
and click the
Open button.
Export - To save the profile(s) in
a different location, click the
Export button. On the screen that
appears (Figure 7-8), direct
Windows to the appropriate fold-
er and click the OK button.
Delete - Click the Delete button to delete a profile.
Click the X (Close) button in the upper right corner to exit the WLAN Monitor.
Figure 7-7
Figure 7-8
Note: If you have more than one profile, all profiles will be auto-
matically selected and exported to the same folder.