
User's Manual


Wireless-G Notebook Adapter
15
Instant Wireless
®
Series
Chapter 6: Hardware Installation for
Windows 98SE, Me, and 2000
1. Turn off your desktop PC.
2. Open your PC case and locate an available PCI slot on the motherboard.
Check with your computer manufacturer for instructions.
3. Slide the PCI Adapter into the PCI slot. Make sure that all of its pins are
touching the slot's contacts. You may have to apply a bit of pressure to slide
the adapter all the way in. After the adapter is firmly in place, secure its fas-
tening tab to your PC's chassis with a mounting screw. Then, close your PC.
4. Attach the external antenna to the adapter’s antenna port.
5. Power on your desktop PC.
You have now completed the hardware installation for
the Adapter.
If you want to check the link information, search for available wireless
networks, or make additional configuration changes, proceed to
“Chapter 7: Using the WLAN Monitor for Windows 98SE, Me, and
2000.”
14
Chapter 7: Using the WLAN Monitor
for Windows 98SE, Me, and 2000
Use the WLAN Monitor to check the link information, search for available
wireless networks, or create profiles that hold different configuration settings.
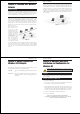
After installing the Adapter, the WLAN Monitor icon will appear
in your system tray. Double-click the icon (see Figure 7-1).
The Link Information screen (Figure 7-2) will appear. From this screen, you can
find out how strong the current wireless signal is and how good the connec-
tion’s quality is. You can also click the More Information button to view addi-
tional status information about the current wireless connection. To search for
available wireless networks, click the Site Survey tab. To perform configura-
tion changes, click the Profiles tab.
Figure 7-1
Figure 7-2
Accessing the WLAN Monitor
Overview
Make sure that you do Chapter 5 and install the software with the
Setup Wizard before you install the hardware.
Wireless-G Notebook Adapter
17
Instant Wireless
®
Series
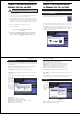
The Link Information screen displays signal strength and link quality informa-
tion about the current connection and provides a button to click for additional
status information.
Ad-Hoc Mode or Infrastructure Mode - The screen indicates whether the
Adapter is currently working in ad-hoc or infrastructure mode.
Signal Strength - The Signal Strength bar indicates signal strength.
Link Quality - The Link Quality bar indicates the quality of the wireless net-
work connection.
Click the X (Close) button in the upper right corner to exit the WLAN Monitor.
Click the More
Information
button to view
more informa-
tion about the
wireless net-
work connec-
tion. A screen
similar to that
shown in Figure
7-3 will appear.
TCP/IP Setting
IP Address - The IP Address of the Adapter.
Subnet Mask - The Subnet Mask of the Adapter.
Default Gateway - The Default Gateway address of the Adapter.
DHCP - The status of the DHCP client.
DNS - The DNS address of the Adapter.
16
Wireless Network Status
State - The status of the wireless network connection.
SSID - The unique name of the wireless network.
Wireless Mode - The mode of the wireless network currently in use.
Transfer Rate - The data transfer rate of the current connection.
Channel - The channel to which the wireless network devices are set.
WEP - The status of the WEP encryption security feature.
MAC - The MAC address of the wireless network’s access point.
Signal Strength - The Signal Strength bar indicates signal strength.
Link Quality - The Link Quality bar indicates the quality of the wireless net-
work connection.
Click the Back button to return to the initial Link Information screen. Click the
X (Close) button in the upper right corner to exit the WLAN Monitor.
The Site Survey
screen, Figure
7-4, displays a
list of infra-
structure and
ad-hoc networks
available for
connection.
SSID - The SSID or unique name of the wireless network.
Signal - The percentage of signal strength.
Site Survey
Figure 7-4
Link Information
Figure 7-3