USER GUIDE Simultaneous Dual-N Band Wireless Router Model: WRT610N
About This Guide About This Guide Icon Descriptions While reading through the User Guide you may see various icons that call attention to specific items. Below is a description of these icons: NOTE: This check mark indicates that there is a note of interest and is something that you should pay special attention to while using the product. WARNING: This exclamation point indicates that there is a caution or warning and it is something that could damage your property or product.
Table of Contents Chapter 1: Product Overview 3 Front Panel . . . . . . . . . . . . . . . . . . . . . . . . . . . . . . . . . . . . . . . . . . . . . . . . . . 3 Back Panel . . . . . . . . . . . . . . . . . . . . . . . . . . . . . . . . . . . . . . . . . . . . . . . . . . . 3 Chapter 2: Wireless Security Checklist 5 General Network Security Guidelines . . . . . . . . . . . . . . . . . .
Table of Contents Appendix C: Specifications 41 Appendix D: Warranty Information 42 Limited Warranty . . . . . . . . . . . . . . . . . . . . . . . . . . . . . . . . . . . . . . . . . . . . . 42 Exclusions and Limitations . . . . . . . . . . . . . . . . . . . . . . . . . . . . . . . . . . . . . . . 42 Obtaining Warranty Service . . . . . . . . . . . . . . . . . . . . . . . . . . . . . . . .
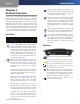
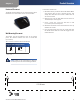
Product Overview Chapter 1 Chapter 1: Product Overview Thank you for choosing the Dual-Band Wireless-N Gigabit Router with Storage Link. The Router lets you access the Internet via a wireless connection or through one of its four switched ports. With the built-in storage link, you can easily add gigabytes of storage space onto your network using USB 2.0 hard drives, or plug in a USB flash disk to access your portable data files.
Product Overview Chapter 1 Horizontal Placement Follow these instructions: The Router has four rubber feet on its bottom panel. Place the Router on a level surface near an electrical outlet. 1. Determine where you want to mount the Router. Make sure that the wall you use is smooth, flat, dry, and sturdy. Also make sure the location is within reach of an electrical outlet. 2. Drill two holes into the wall. Make sure the holes are 175.56 mm (6.91 inches) apart. 3.
Wireless Security Checklist Chapter 2 Chapter 2: Wireless Security Checklist Wireless networks are convenient and easy to install, so homes with high-speed Internet access are adopting them at a rapid pace. Because wireless networking operates by sending information over radio waves, it can be more vulnerable to intruders than a traditional wired network. Like signals from your cellular or cordless phones, signals from your wireless network can also be intercepted.
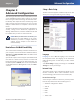
Advanced Configuration Chapter 3 Chapter 3: Advanced Configuration Setup > Basic Setup The first screen that appears is the Basic Setup screen. This allows you to change the Router’s general settings. After setting up the Router with the Setup Wizard (located on the CD-ROM), the Router will be ready for use. If you’d like to change its advanced settings, use the Router’s webbased utility. This chapter describes each web page of the utility and each page’s key functions.
Advanced Configuration Chapter 3 Automatic Configuration - DHCP By default, the Router’s Internet Connection Type is set to Automatic Configuration - DHCP, which should be kept only if your ISP supports DHCP or you are connecting through a dynamic IP address. (This option usually applies to cable connections.) Internet Connection Type > Automatic Configuration - DHCP Static IP If you are required to use a permanent IP address to connect to the Internet, select Static IP.
Advanced Configuration Chapter 3 User Name and Password Enter the User Name and Password provided by your ISP. Connect on Demand: Max Idle Time You can configure the Router to cut the Internet connection after it has been inactive for a specified period of time (Max Idle Time). If your Internet connection has been terminated due to inactivity, Connect on Demand enables the Router to automatically re-establish your connection as soon as you attempt to access the Internet again.
Advanced Configuration Chapter 3 Network Setup The Network Setup section changes the settings on the network connected to the Router’s Ethernet ports. Wireless Setup is performed through the Wireless tab. Router Address This presents both the Router’s IP Address, Subnet Mask, and URL Address as seen by your network. The default Router IP address is 192.168.1.1 and URL address is http://WRT610N.com.
Advanced Configuration Chapter 3 When you finish your changes, click Save Settings to save your changes. Click Cancel Changes to cancel your changes. To view the most up-to-date information, click Refresh. To exit this screen, click Close. Time Setting Select the time zone in which your network functions from this drop-down menu. (You can even automatically adjust for daylight saving time.) Password Enter the Password for your DDNS account. Host Name The is the DDNS URL assigned by the DDNS service.
Advanced Configuration Chapter 3 Setup > MAC Address Clone Setup > Advanced Routing Every computere hardware device, including the network adapter of your computer has a unique code called a MAC address. Some Internet Service Providers (ISPs) require you to register this address with them in order to access the Internet.
Advanced Configuration Chapter 3 Gateway This is the IP address of the gateway device that allows for contact between the Router and the remote network or host. Interface This interface tells you whether the Destination IP Address is on the LAN & Wireless (Ethernet and wireless networks) or the WAN (Internet). Click Show Routing Table to view the Static Routes you have already set up. Routing Table Click Save Settings to apply your changes, or click Cancel Changes to cancel your changes.
Advanced Configuration Chapter 3 Standard Channel (2.4 GHz) Select the channel for Wireless-B, Wireless-G and Wireless-N (2.4GHz) networking. If you selected Wide – 40MHz Channel for the Radio Band setting, then the Standard Channel will be a secondary channel for Wireless-N (2.4GHz). If you are not sure which channel to select, keep the default, Auto.
Advanced Configuration Chapter 3 Wireless > Wireless Security The Wireless Security settings configure the security of your wireless network. There are six wireless security mode options supported by the Router: WPA Personal, WPA Enterprise, WPA2 Personal, WPA2 Enterprise, RADIUS, and WEP. (WPA stands for Wi-Fi Protected Access, which is a security standard stronger than WEP encryption. WEP stands for Wired Equivalent Privacy, while RADIUS stands for Remote Authentication Dial-In User Service.
Advanced Configuration Chapter 3 Encryption WPA2 supports two encryption methods with dynamic encryption keys; AES or WPA-TKIP/WPA2AES. You must select WPA-TKIP or WPA2-AES to connect to the Router. Passphrase Enter a passphrase of 8-63 characters. RADIUS This option features WEP used in coordination with a RADIUS server. (This should only be used when a RADIUS server is connected to the Router.
Advanced Configuration Chapter 3 WEP WEP is a basic encryption method that is not as secure as WPA. Wireless > Wireless MAC Filter Wireless access can be filtered by using the MAC addresses of the wireless devices transmitting within your network’s radius. WEP Encryption Select a level of WEP encryption, 64 bits 10 hex digits or 128 bits 26 hex digits. The default is 64 bits 10 hex digits. Passphrase Enter a Passphrase to automatically generate WEP keys. Then click Generate.
Advanced Configuration Chapter 3 Frame Burst Enabling this option should provide your network with greater performance, depending on the manufacturer of your wireless products. To use the Frame Burst option, select Enabled. The default is Disabled. Wireless Client List MAC XX Enter the MAC addresses of the devices whose wireless access you want to control. Click Save Settings to apply your changes, or click Cancel Changes to cancel your changes.
Advanced Configuration Chapter 3 Fragmentation Threshold This value specifies the maximum size for a packet before data is fragmented into multiple packets. If you experience a high packet error rate, you may slightly increase the Fragmentation Threshold. Setting the Fragmentation Threshold too low may result in poor network performance. Only minor reduction of the default value is recommended. In most cases, it should remain at its default value of 2346.
Advanced Configuration Chapter 3 Storage > Disk An external USB hard drive or USB disk must be connected to the USB Port of the Router to use the storage feature. The Disk screen describes the disk currently attached to the Router. Using this screen, you can format a blank disk, safely remove a disk, or erase a disk.
Advanced Configuration Chapter 3 Shared Folder Database Each Display Name you created on the Shared Folder screen will be listed with its partition and shared folder, which you can edit or delete. Select Edit to edit an item or Delete to delete the item. This section lets you select content to add to the database of the Router’s media server. Click Specify Folder to Scan to add a media folder to the Database table. If you click the Edit, the Shared Folder screen appears.
Advanced Configuration Chapter 3 Storage > FTP Server An external USB hard drive or USB disk must be connected to the USB Port of the Router to use the storage feature. The FTP Server tab creates an FTP Server that can be accessed from the Internet or your local network. Storage> FTP Server Setup Server Name The name of the Router’s FTP server is displayed here. It can be changed on the Storage > Administration screen.
Advanced Configuration Chapter 3 If you click Edit, the FTP Folder screen appears. Refer to the “FTP Folder Screen” section above. Click Save Settings to apply your changes, or click Cancel Changes to cancel your changes. For more information, click Help. Storage > Administration The Administration screen allows you to manage the users and groups of users that can access the shares. User Management The available users are listed in the User Management table.
Advanced Configuration Chapter 3 Group Management Access Restrictions > Internet Access The groups are listed in the Group Management table. There are two default groups, Admin and Guest; these cannot be deleted. Click Create New Group to create a new group. The Access Restrictions > Internet Access screen allows you to deny or allow specific kinds of Internet usage and traffic, such as Internet access, designated services, and websites during specific days and times.
Advanced Configuration Chapter 3 4. Click Edit List of PCs to select which PCs will be affected by the policy. The List of PCs screen appears. You can select a PC by MAC Address or IP Address. You can also enter a range of IP Addresses if you want this policy to affect a group of PCs. After making your changes, click Save Settings to apply your changes or Cancel Changes to cancel your changes. Then click Close. Click Save Settings to apply your changes, or click Cancel Changes to cancel your changes.
Advanced Configuration Chapter 3 Applications and Gaming > Port Range Forwarding The Applications & Gaming > Port Range Forwarding screen allows you to set up public services on your network, such as web servers, ftp servers, e-mail servers, or other specialized Internet applications. (Specialized Internet applications are any applications that use Internet access to perform functions such as videoconferencing or online gaming. Some Internet applications may not require any forwarding.