Wireless-B USB Network Adapter Use this guide to install: WUSB11 User Guide
COPYRIGHT & TRADEMARKS Specifications are subject to change without notice. Linksys is a registered trademark or trademark of Cisco Systems, Inc. and/or its affiliates in the U.S. and certain other countries. Copyright © 2003 Cisco Systems, Inc. All rights reserved. Other brands and product names are trademarks or registered trademarks of their respective holders. LIMITED WARRANTY Linksys warrants to the original end user purchaser ("You") that, for a period of one year, (the "Warranty Period”).
• • • • • • • • • • • Linksys Group vakuuttaa täten että USB Network Adapter tyyppinen laite on direktiivin 1999/5/EY, direktiivin 89/336/EEC ja direktiivin 73/23/EEC oleellisten vaatimusten ja sitä koskevien näiden direktiivien muiden ehtojen mukainen. Linksys Group déclare que l’adaptateur réseau USB est conforme aux conditions essentielles et aux dispositions relatives à la directive 1999/5/EC, la directive 89/336/EEC, et à la directive 73/23/EEC.
Chapter 1: Introduction Appendix A: Troubleshooting Common Problems and Solutions Frequently Asked Questions 30 30 30 Appendix B: Glossary 34 Appendix C: Specifications Environmental 39 39 Appendix D: Warranty Information 41 Appendix E: Contact Information 42 The Wireless-B USB Network Adapter Connect your USB-equipped desktop or notebook computer to a wireless network with the Linksys Wireless-B USB Network Adapter, without the trouble of opening up the case of your desktop computer.
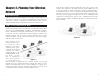
Chapter 2: Planning Your Wireless Network Network Topology A wireless local area network (WLAN) is exactly like a regular local area network (LAN), except that each computer in the WLAN uses a wireless device to connect to the network. Computers in a WLAN share the same frequency channel and SSID, which is an identification name for wireless devices.
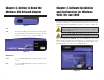
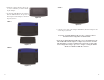
Chapter 3: Getting to Know the Wireless USB Network Adapter The Wireless USB Network Adapter’s Port and LEDs Chapter 4: Software Installation and Configuration for Windows 98SE, Me, and 2000 Overview Figure 3-1 Port USB The Adapter’s USB port is located on the side of the Adapter. You will attach the included USB cable to this port. The other end of the cable will connect to your PC’s USB port.
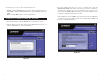
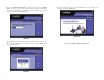
On the Welcome screen, you have the following choices: • Install - Click the Install button to begin the software installation process. • User Guide - Click the User Guide button to open the PDF file of this User Guide. • Exit - Click the Exit button to exit the Setup Wizard. Instructions for Windows 98SE, Me, and 2000 3. The Setup Wizard will ask you to choose a network mode.
4. If you chose Infrastructure Mode, go to Step 5 now. If you chose Ad-Hoc Mode, select the correct operating channel for your network. The channel you choose should match the channel set on the other devices in your wireless network. Then click the Next button. 6. After the software has been successfully installed, the screen in Figure 4-6 will appear. Click the Exit button. Figure 4-6 Figure 4-4 5. The Setup Wizard will ask you to review your settings before it starts to copy files.
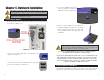
Chapter 5: Hardware Installation Important for Windows 98SE, Me, and 2000 users: You must run the Setup Wizard to install the software before installing the hardware. 2. The Power LED should light up when the Adapter is plugged in. (Make sure your PC is powered on.) Important for Windows XP users: You must install the Adapter’s hardware before installing the software. Connecting the Adapter 1. The Adapter comes with the USB cable you will use to connect the Adapter to your PC. (See Figure 5-1.
1. Attach the separate adhesive strip of velcro to the wall where you will be mounting the Adapter. 2. To attach the Wall Mount to the Adapter, slide the Wall Mount into the grooves on the back panel of the Adapter, as shown in Steps A, B, and C. STEP C Figure 5-6 STEP A Figure 5-9 3. Using the velcro strip on the Adapter’s Wall Mount, attach the Adapter to the velcro strip on your wall. If your PC is running Windows XP, proceed to “Chapter 6: Driver Installation and Configuration for Windows XP.