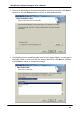
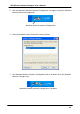
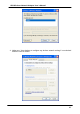
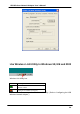
USB Wireless Network Adapter User’s Manual 2. The screen will show you the default destination chosen by the utility. Click Next to continue or click the Browse button to select an alternate destination. 3. The following screen will add program icons to the Program Folder. You may type a new folder name or select one from the existing folders list. Click Next to continue or click Back to review or change any settings.
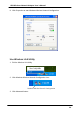
USB Wireless Network Adapter User’s Manual 4. The following screen will start to copy the program files. Click Next to continue or click Back to review or change any settings. 5. The Setup Wizard has finished the installation of Wireless LAN Utility. Click Finish to exit. After you have installed the utility, you will see the wireless utility icon in the Windows taskbar.
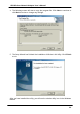
USB Wireless Network Adapter User’s Manual Using Wireless Utility In Windows XP Wireless LAN Utility There are two ways to configure USB Wireless Network Adapter. One is Wireless LAN Utility; the other one is Windows Wireless Network Configuration. Use Windows Wireless Network Configuration 1. Click the right key of the mouse and Exit Wireless LAN Utility. 2. Click Windows Wireless Network Configuration icon. Windows Wireless Network Configuration 3. Click Advanced button.
USB Wireless Network Adapter User’s Manual 4. Make sure “Use Windows to configure my wireless network settings” is checked and click OK.
USB Wireless Network Adapter User’s Manual 5. Click the Windows Wireless Network Configuration icon again to open the Windows Wireless Network Configuration. Windows Wireless Network Configuration 6. Select an available network and click Connect button. 7. The Windows Wireless Network Configuration will be enabled. Click the Windows Wireless Configure icon.
USB Wireless Network Adapter User’s Manual 8. Click Properties to start Windows Wireless Network Configuration. Use Wireless LAN Utility 1. Exit the Wireless LAN Utility. 2. Click Windows Wireless Network Configuration icon. Windows Wireless Network Configuration 3. Click Advanced button.
USB Wireless Network Adapter User’s Manual 4. Make sure “Use windows to configure my wireless network settings” is unchecked and then click OK button.
USB Wireless Network Adapter User’s Manual 5. Click Start -> All Programs -> IEEE802.11b WLAN USB Adapter v3.0 then click IEEE802.11b WLAN USB Adapter Utility to restart Wireless LAN Utility. 6. The Wireless LAN Utility will appear, Double-click the icon to open the configuration utility. Wireless LAN Utility 7. Click Re-Scan button to start Wireless LAN Utility. (Refer to Configuring the USB Wireless Network Adapter.
USB Wireless Network Adapter User’s Manual Use Wireless LAN Utility In Windows 98, ME and 2000 Wireless LAN Utility icon Icon Meaning Green: indicates a connection is linked to a wireless network. Red: indicates that the wireless LAN card is looking for an available access point. Double-click the icon to open the Wireless LAN Utility. (Refer to Configuring the USB Wireless Network Adapter.
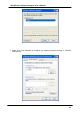
USB Wireless Network Adapter User’s Manual Configuring the USB Wireless Network Adapter 1. This screen shows you the status of your current connection. Click Re-Scan to search for wireless connection (the adapter will search for the connection automatically when it is activated). 2. Select the “Configuration” tab. The profile setting allows you to save configurations in different profiles for different working environments.
USB Wireless Network Adapter User’s Manual 3. Select the “Site Survey” tab. The list on the adjacent screen shows you available Access Points and their features. Click on the desired Access Point, then click Connect to connect or Search to search for more Access Points. Click OK when you are finished.
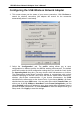
USB Wireless Network Adapter User’s Manual 4. Click on the “Encryption” tab. Under the drop-box, you can choose to have WEP encryption Disabled, 64-Bit, or 128-Bit. Wired Equivalent Privacy (WEP) is an encryption scheme used to protect wireless data communication. The Disabled setting prevents the sharing of data with other computers on the WEP network. For data sharing to be enabled, select the level of encryption desired, either 64 or 128bit. 5. Select the “Advanced” tab.
USB Wireless Network Adapter User’s Manual 6. The “About” tab shows you copyright and version information about the driver, the configuration utility, and the firmware. Click OK to complete the configuration.
USB Wireless Network Adapter User’s Manual Chapter 5 – Installing Network Protocols Protocols are necessary for computers to be recognized on your network. Windows 2000/XP users need to check their Windows User Guides for protocol installation. Installing the Network Protocols for Windows 98 and ME 1. From the Start Menu, select Settings and bring up the Control Panel. From the Control Panel, double-click on the Network icon.
USB Wireless Network Adapter User’s Manual 2. Select IEEE802.11b WLAN USB Adapter v3.0 from the list and click the Add button. 3. Highlight Protocol and click the Add button.
USB Wireless Network Adapter User’s Manual 4. Select Microsoft from the list of “Manufacturers” and TCP/IP from the list of “Network Protocols” and click the OK button to finish the installation.
USB Wireless Network Adapter User’s Manual Appendix A – FAQ 1. What is IEEE 802.11 standard? Ø 2. What is WEP? Ø 3. Ø Right click on My Computer and select Properties. Click on the Device Manager tab and select the Universal Serial Bus Controllers. Click on Properties button. In the General tab, check under “Device status” that the USB controller is working properly. The Adapter does not work properly. Ø 6.
USB Wireless Network Adapter User’s Manual Appendix B – Specifications Standards: IEEE 802.11b USB 1.0, 1.1 Channels: 11 Channels (US, Canada) 13 Channels (Europe) 14 Channels (Japan) Antenna: Dipole Antenna inside Frequency: 2.412 to 2.4835GHz (Industrial Scientific Medical Band) Data Rate: up to 11Mbps Operating Ranges: Indoor (varies depends on the environment): Up to 50M @ 11Mbps Up to 80M @ 5.5Mbps Outdoor (varies depends on the environment): Up to 150M @ 11Mbps Up to 300M @ 5.