Klimax Kontrol O w n e r ’s M a n u a l English
Copyright and Acknowledgments Copyright © Linn Products Limited. First edition September 2002. Linn Products Limited, Floors Road, Waterfoot, Glasgow, G76 0EP, Scotland, United Kingdom. All rights reserved. No part of this publication may be reproduced, stored in a retrieval system, or transmitted, in any form or by any means, electronic, mechanical, photocopying, recording, or otherwise, without the prior written consent of the publisher. Printed in the United Kingdom.
Contents Introduction 3 Unpacking Voltage selection Cleaning 4 4 4 Back Panel 5 Front Panel 6 Handset 7 Source Setup 8 Operation 12 Product Lock 13 User Options 14 Technical Specification 17 Guarantee and Service 18 Important Safety Information 20 General safety instructions UK users...
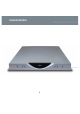
KLIMAX KONTROL 2
Introduction Dear Customer, Linn’s KLIMAX KONTROL is a two-channel preamplifier designed for use in high performance multi-amplifier and multi-channel audio and audio/video systems. The KLIMAX KONTROL follows Linn’s KLIMAX SOLO and KLIMAX TWIN power amplifiers and, in partnership with them, positions KLIMAX as a family of products that are without parallel in terms of sound performance and engineering quality. Each KLIMAX KONTROL preamplifier is unique in its manufacture.
Introduction Unpacking The KLIMAX KONTROL is supplied with the following accessories: ■ mains lead ■ handset ■ silver interconnects ■ warranty card ■ this manual We recommend that you retain all packaging in case you need to transport the unit at a later date. Voltage Selection The KLIMAX KONTROL contains an automatic internal mains voltage switch. This switch operates on all worldwide mains voltages from 100V to 240V. Manual adjustment on the product for setting the input mains voltage is not possible.
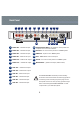
Back Panel RIGHT IN 4 3 RIGHT IN 3 WARNING RIGHT IN 2 THIS APPARATUS MUST BE EARTHED 4 5 6 7 RIGHT OUT BALANCED RIGHT IN 1 RIGHT OUT 8 LEFT OUT LEFT OUT 9 10 11 12 BALANCED LEFT IN 1 LEFT IN 2 LEFT IN 3 LEFT IN 4 RC5 OUT PUSH 2 SEE UNDERSIDE FOR SAFETY DETAILS RS232 IN RS232 OUT 13 RC5 IN PUSH 1 VOLTAGE RANGE 100-240V~50/60Hz FUSE TYPE: T800mA KNEKT IN MAINS INPUT RCU 14 15 16 17 18 1 RIGHT IN 4 – unbalanced input 13 2 RIGHT IN 3 – unbalanced input 14 RS232 OUTPUT/
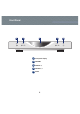
Front Panel 2 STANDBY 3 -- SOURCE 1 4 + -- L I N N K L I M A X K O N T R O L 1 Front panel display 2 STANDBY 3 SOURCE -/+ 4 VOLUME -/+ 5 MUTE 6 VOLUME 5 + MUTE
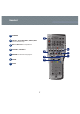
Handset 1 STANDBY 1 2 CD, PH 1, PH 2, TUN, TAPE 1, TAPE 2, AUX 1 Source selection keys 3 BAL L / BAL R Balance adjustment 4 VOLUME - / VOLUME + 5 RECORD See Product Lock, page 13.
Source Setup 4 Change the source type Select the source type to match the name of the key on the handset you wish to use. You can select a source type more than once if you have more than one device of the same type (e.g. two CD players) connected to the KLIMAX KONTROL. To display the next / previous source type: ■ Press VOLUME + / VOLUME -. Possible source types for setups 1 to 4 are: CD, PH1, PH2, TUN, TAPE 1, TAPE 2, AUX1, NONE.* Possible source types for setup 5 are: KNEKT, NONE.
Source Setup 6 Change the volume offset for the source Volume offset is for adjusting the volume of a source in comparison to other sources. You may want to adjust the volume offset for a source if, for example, your tuner sounds quieter than your CD player when played at the same volume setting. Press SOURCE – or BAL L again. The display shows the volume offset for the source. To increase / decrease the volume offset for this source: ■ Repeatedly press or hold VOLUME +/VOLUME -.
Source Setup 8 Change the unity gain for the source The unity gain setting lets you use the KLIMAX KONTROL in a multi-channel AV system. If you are setting up an AV processor as one of your sources and the front speakers are going to be channelled through the KLIMAX KONTROL, set unity gain to Yes. In all other cases, set to No. If unity gain is set to Yes for a source other than an AV processor, the volume level from your KLIMAX KONTROL will be very high, non-adjustable and could damage your loudspeakers.
Operation This section provides general operating instructions for the KLIMAX KONTROL. Standby mode To exit or enter standby mode: ■ Press STANDBY. Source selection Handset To switch source: ■ Press the key for the appropriate source (e.g. CD). Note: If you have used a source type more than once (see Source Setup, page 9), repeatedly press the appropriate source key to cycle through the available sources.
Product Lock The product lock prevents any changes being made to the KLIMAX KONTROL (entering standby, changing the volume or source etc) while it is powered up (i.e. when it is not in standby mode). Note: To turn the product lock on, the unit must be powered up. To turn the product lock on: ■ Hold MUTE on the front panel or handset until the display shows LOCK ? ■ While LOCK ? is displayed, press RECORD on the handset. The display changes to KEY LOCKED. The product lock is now on.
User Options This section explains how you can configure certain features of the KLIMAX KONTROL to suit your requirements. Note: The unit must be in standby mode. To enter user options mode: ■ Hold STANDBY until the front panel display shows SLEEP DISPLAY. To cycle through the user options: ■ Repeatedly press or hold SOURCE +/SOURCE - on the front panel or BAL R / BAL L on the handset. To adjust the setting of an option: ■ Repeatedly press VOLUME +/VOLUME -.
User Options User Option Description Possible settings MAX VOLUME Upper limit on the volume control. 100/(+10dB), 0/(100/(+10dB) BINDING If set to GLOBAL, the same volume and balance settings are used for each source. If set to PER SOURCE, separate volume and balance settings are allowed for each source. GLOBAL, PER SOURCE PRODUCT IR Enables or disables the infra-red receiver on the front of the unit.
16
Technical Specification General Audio inputs Gain range Dimensions 60mm (H) x 350mm (W) x 355mm (D) Weight 9kg Power consumption 15W Mains supply fuse 100V to 240V AC T800mA anti-surge Mains supply range 100V to 240V AC nominal Impedance (unbalanced) 10kΩ Signal (unbalanced) 0dBV (nominal) +15dBV (maximum) Impedance (balanced) 7.8kΩ Signal (balanced) +6dBV (nominal) +20dBV (maximum) Common mode rejection ratio 70dB (1kHz @ 0dBV) Minimum to maximum -95.5dB to +9.5dB in 0.
Guarantee and Service This product is guaranteed under the conditions which apply in the country of purchase and your statutory rights are not limited. In addition to any statutory rights you may have, Linn undertake to replace any parts which have failed due to faulty manufacture. To help us, please ask your Linn retailer about the Linn warranty scheme in operation in your country.
Guarantee and Service Linn Products Limited Floors Road Waterfoot Glasgow G76 0EP Scotland, UK Phone: +44 (0)141 307 7777 Fax: +44 (0)141 644 4262 Helpline: 0500 888909 Email: helpline@linn.co.uk Website: http://www.linn.co.uk Linn Incorporated 8787 Perimeter Park Boulevard Jacksonville FL 32216 USA Phone: +1 (904) 645 5242 Fax: +1 (904) 645 7275 Helpline: 888-671-LINN Email: helpline@linninc.com Website: http://www.linninc.
Important Safety Information Explanation of symbols used in this manual and on the product: This symbol is intended to alert the user to the presence of uninsulated dangerous voltages within the enclosure of sufficient magnitude to cause electric shock. This symbol is intended to alert the user to the presence of important maintenance and servicing information in the instruction and service manuals. CAUTION TO REDUCE THE RISK OF ELECTRIC SHOCK DO NOT REMOVE THE COVER. NO USER SERVICEABLE PARTS INSIDE.
Important Safety Information General Safety Instructions 1. 2. 3. 4. 5. 6. 6a. 7. 8. 9. 10. 11. 12. 13. 14. 15. 16. 17. 18. 19. 20. Read instructions. Read the safety and operating instructions before operating the appliance. Retain instructions. Retain the safety and operating instructions for future reference. Heed warnings. Observe all warnings on the appliance and in the operating instructions. Follow instructions. Follow all operating and use instructions. Water and moisture.
Important Safety Information UK users please read this important safety information Replacing the fuse in the mains plug This appliance is fitted with a non-rewireable 13 Amp mains plug. The plug contains a 5 Amp fuse. If the fuse has blown it can be replaced as follows: a) Pull out the red fuse cover/carrier. b) Remove and dispose of the blown fuse. c) Fit a new 5 Amp BS1362 approved fuse into the carrier and push the carrier back into the plug. Always ensure the fuse cover is fitted.
CE Declaration of Conformity & FCC Notice CE Declaration of Conformity Linn Products Ltd declare that this product is in conformance with the Low Voltage Directive 73/23/EEC and Electromagnetic Compatibility 89/336/EEC as amended by 92/31/EEC and 93/68/EEC.