Installers & User guide Smart Deadbolt
Due to app updates, there may be changes to this manual. Please contact Linnea for help at help@linnea-home.com.
Table of Contents 04 In The Box 05 Specifications 06 Requirements 07 Lock Anatomy 08 Preparing Door for Installation 10 Prepare Lock for Installation 11 Installation Instructions 16 Test Lock 17 Preparing the Door Frame 18 Pairing 19 Features 20 Unlocking 21 Locking 22 Lock Tutorial 25 Lock Behavior 26 Troubleshoot
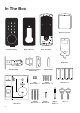
In The Box Battery Case Lid LR Front Assembly Rubber Gasket Back Assembly Back Plate Bolt Assembly Strike Plate Housing & Strike Plate 5mm Bolt Screw x 2 Drill Sheet 04 40mm Bolt Screw x 3 Screw Holder 25mm Wood Screw x 4 22mm Bolt Screw 80mm Tailpiece Batteries x 4 Keys x 2
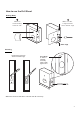
Specifications Model Linnea SDB-110BT Material Zinc Alloy Current Rating (Standby) ≤ 30uA Current Rating (Active) ≤ 200mA Batteries 4 x AA Alkaline (Non-Rechargeable) Unlock Mechanism Bluetooth, Passcode, Keys Front Side Back 142mm 155mm 60mm 30mm 45mm 60mm 05
Requirements Height & Width 10 mm 133 mm 10 mm Door Thickness & Gate Clearance 35mm 38mm - 50mm >110mm (60mm bolt tongue) or >120mm (70mm bolt tongue) 06
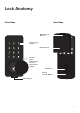
Lock Anatomy Outer Body Inner Body Battery Cover Release Touch Screen Keypad Battery Cover Keyhole Cover (Release pins to access physical key unlock) Thumbturn Privacy Lockout Button 9V Jumpstart 07
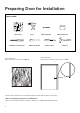
Preparing Door for Installation Items needed: Drill Sheet #2 Phillips Screw Driver Recommended Door and door frame material: Wood Drill 20mm Spade Bit 10mm Drill Bit 54mm Hole Saw 20mm Chisel Recommended Gap between door and door frame: < 3mm * Please ensure that there is an existing handle on your door for push - pull access. * Not for: metal gates, glass doors or sliding doors. If you are unsure if your door is suitable, contact us at: support@linnea-home.
How to use the Drill Sheet Drilling (Door) Fold here before drilling holes for side Make sure this is aligned to the centre of door edge Door edge Chiseling Put the bolt tongue in & chisel around the edge Depth Width: 2 - 3mm or until bolt assembly plate is flush against door * Mark the center of the holes and then drill for accuracy.
Prepare Lock For Installation Set Back Assembly for Left / Right Installation Right Installation L R Left Installation Set the toggle to ‘R’ for right-side installation. Set the toggle to ‘L’ for left-side installation. L Remove Battery Cover R Change Tailpiece (Optional) For door thickness > 50mm, change the default (60mm) tailpiece attached to the 80mm tailpiece.
Installation Instructions Measure If you are replacing your current deadbolt lock, industry standards are 60mm or 70mm backset. To determine which basket length you should use, so measure the distance (x) between the center of 54mm hole to door edge. 54mm Hole X Prepare bolt assembly based on the distance (x) Bolt ships with bolt assembly in 60mm position. If required, twist the bolt and pull to extend (simultaneously) to 70mm backset position (current drill dimensions are fitted for 60mm position).
Insert Bolt and Front Assembly into door edge The ‘+ ‘ hole on the backset should be in the middle of the hole. Screw Holder Screws Right Installation 25mm Secure the Front Assembly using the Back Plate To do this, place the Back Plate (ensuring the correct side placement).
Screw it to the Front Assembly using the three 40mm screws. d d d The cable should come out from the side Screws d 40mm Connect Wire Connector Connect the Wire Connector from the Front Assembly though the 54mm hole to the Back Assembly. Ensure that the wire is installed properly and securely.
Fit Back Assembly to the Door Tailpiece Ensure thumbturn position is turned to ‘unlock’ position.
6 Secure the Back Assembly Screws 05mm 22mm Insert 4 of AA Batteries Before closing the battery case lid.
Test Lock Place hand over your lock to activate touchpad and hold # to lock. Does your bolt unlock? Yes No Congrats! Your lock is correctly installed. Proceed to next steps. Does the bolt tongue slide out when you turn the thumbturn? Yes No Left-Right toggle incorrectly set Tailpiece and/or thumbturn incorrectly set Troubleshoot: Try Setting the left-right toggle on your back assembly to the correct side. (See Pg. 10) Still experiencing issues? Contact Linnea Support for more help.
Preparing the Door Frame Mark out where the bolt tongue locks then drill a corresponding hole on door frame. Chisel to fit the strike plate in as well. Ensure to align the lock to the door frame and mark it down. Door Frame Mark & Drill Hole Same height Secure strike plate housing and strike plate using 2 x 25mm wood screws.
Pairing Download TTLock app from App Store/Google Play CHECKLIST Lock has not been paired Register a new account or, The keypad stays awake during pairing Login with an existing account on app Turn on your phone’s Bluetooth and Internet connection Setup 1. Home > Add Lock > Lock 2. Touch the keypad on the Smart Deadbolt and tap Next in the app to reveal active locks in range 3. Select your device 4. A chime will notify you that your phone is connected 5.
Features Passcode / Bluetooth Unlock Bluetooth Master Key Master Passcode The Linnea Smart Deadbolt unlocks with Bluetooth via the app. The Linnea Smart Deadbolt unlocks with a permanent Master Passcode. Decoy Passcode Code User Passcode A total of 16 decoy digits including passcode can be entered to prevent the passcode from being exposed. The mobile app can generate user passcodes, with validity duration from One-Time, Permanent, or a Duration based on Date-time.
Unlocking To unlock the door TTLock App Bluetooth Basic Unlock Passcode / Decoy Passcode Home Main Door Thumbturn Physical Key Basic Issue access Logs Legend 20 Passcode Key in your passcode and press ‘#’ Bluetooth Guest Key Refer to lock tutorial Decoy Passcode Key in up to a total of 16 digits, including the passcode, followed by ‘#’ Physical Key Use the physical key to unlock the door Bluetooth Basic Unlock On your app, click on the Bluetooth Unlock button and tap on your lock Thumbturn Use
Locking To lock the door Timer Re-Lock ‘#’ Key Thumbturn Physical Key Legend ‘#’ Key Press and hold ‘#’ Physical Key Use the physical key to lock the door Timer Re-Lock Refer to Lock Tutorial - Step 7 Thumbturn Use thumbturn at the back of lock 21
Lock Tutorial 1 - on Deadbolt Keypad - on TTLock App Default factory Passcode In the factory mode (before pairing), the Passcode to unlock is * 1234567890 # 2 Setting Master Passcode Before proceeding, turn on your Bluetooth and ensure that you are within Bluetooth range of the lock. 1. Lock Management > Setting > Admin Passcode 2. If prompted, enter your account password and tap OK. 3. Set admin passcode and save (this is your Master Passcode).
Lock Tutorial 44 - on TTLock App - on Deadbolt Keypad Deleting Passcodes To delete one at a time, go to Lock Management > Passcodes > Long press on passcode > Delete To delete all passcodes at once, go to Lock Management > Passcodes > Options (upper right corner) > Reset Passcode > Reset > Enter account password > OK * Master passcode cannot be changed via this method; refer to step 2. * If at any time an error beep (4 consecutive beeps) is heard, restart the program from the beginning.
Lock Tutorial 7 - on TTLock App - on Deadbolt Keypad Enabling & Disabling Timer Re-Lock* To Enable * 2 1 # # # To Disable * 2 0 # # To Enable Lock Management > Setting > Auto Lock > Check the box next to Auto Lock > Set the time for the Auto Lock to engage (between 5 and 120 seconds) > OK To Disable Setting > Auto Lock > Uncheck the box next to Auto Lock * By default, Timer Re-lock is disabled.
Lock Tutorial 9 - on TTLock App - on Deadbolt Keypad Bluetooth Key Sharing Bluetooth sharing allows you to share a Bluetooth Key with other users for mobile access. It allows your guests to unlock the Linnea smart lock via Bluetooth.
Lock Behavior Sensor Re-lock Security Lockout Mode Activated by 5 consecutive invalid passcodes Press the Privacy Lockout button located below the thumb turn on the back of the lock till you hear a long beep Disable By Wait for 5 Minutes Bluetooth Unlock Physical Key Press Privacy Lockout Button Physical Key Thumbturn Behavior Keypad is flickering Keypad does not light up Unresponsive for 5 minutes Unresponsive until Privacy Lock Mode is disabled Duration 26 Privacy Lockout Mode
Troubleshoot Pairing is unsuccessful • Try with a different mobile device, using the same username and password • Update your phone’s operating system to the latest version • Restart the Bluetooth and internet connection on your mobile device • Restart TTLock app on your mobile device • Switch to a new set of batteries Lock is not working when battery level is not 100% • Do a Bluetooth Key unlock to refresh the battery level on the app • Battery level shown in the app may not be accurate • Use Alkaline bat
For questions, contact us at: 1 (800) 219-2366 help@linnea-home.