F-10XHD4CORE 10.1” TABLET PC ANDROID User Manual www.LINSAYdigital.
FCC Class B: Note: This equipment has been tested and found to comply with the limits for a Class B digital device, pursuant to part 15 of the FCC Rules. These limits are designed to provide reasonable protection against harmful interference in a residential installation. This equipment generates uses and can radiate radio frequency energy and, if not installed and used in accordance with the instructions, may cause harmful interference to radio communications.
SAFETY PRECAUTIONS Do not subject the device to severe impact or drop it from heights. Do not use the device in extreme hot or cold, dusty or damp conditions. Do not expose it to direct sunlight. Avoid using the device near strong magnetic fields. Normal functioning of the product may be disturbed by ESD. If so, simply reset and restart the device following the instruction manual. During file transmission, please handle with care and operate in a static-free environment.
• -The lightning flash with arrowhead symbol within an equilateral triangle is intended to alert the user to the presence of non-insulated “dangerous voltage” within the product’s enclosure that may be of sufficient magnitude to constitute a risk of electric shock. • -To reduce the risk of electric shock, do not remove the cover (or back) as there are no user-serviceable parts inside. Refer servicing to qualified personnel.
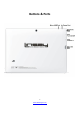
Buttons & Ports 5 www.LINSAYdigital.
LINSAY F-10XHD4CORE User’s Guide Contents Get started 9 Get around 9 Touch & type 10 Use the lock screen 10 Make yourself at home 11 Change the wallpaper 11 Arrange & work with apps 12 Use folders 12 Add widgets 13 Try some apps 13 Find People 14 Manage your Calendar 15 Use your Camera 15 Viewing Photos 16 Manage downloads 17 Tune performance 17 Optimize battery life 17 Optimize data usage 18 Optimize memory usage 20 Use the Apps screen 21 Enter & edit text 22 6 www.LINSAYdigital.
Use the keyboard 22 Basic editing 23 Tips & shortcuts 23 Connect to Wi-Fi networks 24 Connect to keyboards, mice, and other devices 27 Connect to a Windows computer via USB 28 Manage accounts 28 Add or remove accounts 28 Configure account sync options 30 Configure general sync settings 30 Change an account’s sync settings 31 Secure your tablet 31 Special Attention 32 Accessories Included: User Manual, AC Power Charger and USB Cable for data transfer. 7 www.LINSAYdigital.
Get Started Get around After you enter into the systems, at the bottom of the screen, you'll find three Navigation buttons. They're always available. No matter what you're doing with your LINSAY Tablet PC, you can always get back to the main Home screen or return to previous screens: Icon Name Description Back Open the previous screen you were working in, even if it was in a different app. Once you back up to the Home screen, you can’t go back any further in your history. Home Open Home.
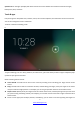
System icons on the right up display slide down to show the current wireless and network connection strength, battery level, time, and more. Touch & type Use your fingers to manipulate icons, buttons, menus, the onscreen keyboard, and other items on the touch screen. You can also change the screen's orientation. To select or activate something, touch it. To type something, such as a name, password, or search terms, just touch where you want to type. A keyboard pops up that lets you type into the field.
the screen at once and pinching them together (to zoom out) or spreading them apart (to zoom in). Rotate the screen: On most screens, the orientation of the screen rotates with your device as you turn it. You can change this Display setting. Related settings Settings > Device > Sound Settings > Device > Display 10 www.LINSAYdigital.
Use the lock screen To protect personal information, you can adjust your phone's lock settings: 1. From the Home or All Apps screen, touch the Settings icon 2. Scroll down and touch Security. 3. Touch Screen lock. 4. Touch the type of lock you'd like to use. After you set a lock here, a lock screen displays whenever your screen wakes up, requesting the pattern, PIN, or other specified key.
Related settings Settings > Device > Display > Wallpaper Arrange & work with apps Pre Installed Applications : Browser, Calculator, Calendar, Camera, Clock, Downloads, Email, Flash, Gallery, Gmail, Google, Music, OWL Player, Market Store, Settings, Sound Recorder, Super user and Voice Search. To see all your apps, touch the All Apps icon on any Home screen. The main All Apps screen opens. This is where you can see all your apps, including those downloaded from Android Market.
Open a folder: Touch it. The folder opens: Rename a folder: Touch its name. Move icons around your Home screens: Touch, hold, and slide. Tips To can see a smaller collection of frequently used apps, touch the Google Apps folder near the bottom of the screen. As with any folder, you can customize its contents. After you open an app, you can usually adjust its settings by choosing items from its Menu icon near the top or bottom of the screen . Add widgets Widgets are like windows into your apps.
But Gmail is not just about email. Your Gmail name and password signs you into to all Google apps and services, including Calendar; People, for keeping track of your contacts; Google Reader, for keeping up with your online reading; and many more. To launch Gmail, touch the Gmail icon on a Home or All Apps screen. The first time you launch Gmail, you're asked to sign in or create an account, if you didn't already do so when you first set up your device. Then Gmail opens to the Inbox.
No matter where you are within People, you can always get back to the main lists by touching the icon in the top left corner of the screen. Manage your Calendar The Calendar app lets you view and edit your schedule. When you first set up your Tablet, you configured it to use an existing Google Account (such as Gmail), or you created a new one. The first time you open the Calendar application on your Tablet, it displays any existing calendar events from that Google Account on the web.
You can now share the picture by touching the Gmail, Google+, Messenger, or other icons displayed along one side of the image. To view this picture and others in the Gallery app, touch the picture. Viewing Photos 1 Photos should be listed in thumbnail. You can slide your finger on the screen left or right to browse photos. 2 Tap a photo thumbnail to view the photo in full screen. 3 To display the previous/next picture, slide your finger on the screen horizontally.
Manage downloads Files, apps, and other items you download from Gmail, Email, Android Market, or in other ways are stored in your device's internal storage. You can use the Downloads app to view, reopen, or delete what you've downloaded. Some mobile networks restrict the size of the files you can download, to manage the demands on their networks or to help you avoid unexpected charges.
Personal > Location services. Don't leave the Maps or Navigation apps open on the screen when you're not using them. They use GPS (and thus more power) only when they're running. Turn down screen brightness and set a shorter Sleep timeout: Settings > Device > Display. If you don't need it, turn off automatic syncing for all apps: Settings > Personal > Accounts & sync.
the Menu icon , then Show Wi-Fi usage. Near the top of the screen, note the on-off switch for mobile data. The instructions that follow assume that this switch is turned on. If it's off, you won't be able to use mobile data at all and many features of your Tablet and apps won't work correctly. Just below the on-off switch, note the data usage cycle. Touch it to choose a different cycle. This date range is the period of time for which the graph displays data usage.
View or restrict data usage by app Some apps transfer data in the background; that is, when you're not actually using the app, it may download data for future reference. Restricting background data usage for individual apps can sometimes be a useful way to reduce your overall data usage. However, this is a drastic measure that may also affect the app's performance or cause it to malfunction.
Android also manages how apps use RAM. It may cache some things you've been using recently, for quicker access if you need them again, but it will erase the cache if it needs the RAM for new activities. You affect the way apps use internal storage directly and indirectly in many ways; for example, by: ● Installing or uninstalling apps. ● Downloading files in Browser, Gmail, and other apps. ● Creating files (for example, by taking pictures). ● Deleting downloaded files or files you created.
● Force stop button: Stops an app that is misbehaving. Stopping an app, process, or service may cause your device to stop working correctly. You may need to restart your device after doing this. ● Uninstall button: Deletes the app and all of its data and settings. ● Disable button: Prevents the app from running, but does not uninstall it. This option is available for some apps and services that can't be uninstalled.
Basic editing ● Move the insertion point: Touch where you want to type. The cursor blinks in the new position, and a green tab appears below it. Drag the tab to move the cursor. ● Select text: Touch & hold or double-tap within the text. The nearest word highlights, with a tab at each end of the selection. Drag the tabs to change the selection. The tab disappears after a few moments, to get out of your way. To make it reappear, touch the text again.
● Quickly access common punctuation and symbols: Touch & hold the key to the right of the space bar (period key). ● Type special characters: Touch & hold the Shift key while you touch a key with a small gray character in its corner to enter the gray character. Touch & hold any key to see alternative letters, symbols, or numbers, which you can then touch to type. ● Change input language or keyboard: Touch & hold the key to the left of the space bar (with ... In the lowerright corner), and then release it.
2 Touch Wireless & networks > Wi-Fi. 3 Slide the Wi-Fi switch to the On position. The device scans for available Wi-Fi networks and displays the names of those it finds. Secured networks are indicated with a Lock icon. If the device finds a network that you connected to previously, it connects to it. 4 Touch a network name to see more details or connect to it. If the network is secured, you're prompted to enter a password or other credentials. (Ask your network administrator for details.
Some network administrators require you to connect to internal or external network resources via a proxy server. By default, the Wi-Fi networks you add are not configured to connect via a proxy, but you can change that for each WiFi network you've added. Proxy settings are used by Browser but may not be used by other apps. 1 Touch & hold a network in the list of Wi-Fi networks you've added. 2 Touch Modify network in the dialog that opens. 3 Select Show advanced options.
Wi-Fi during sleep. The latter choice is likely to increase mobile data usage. You may want to revisit this setting if you receive a notification that you're approaching your specified mobile data limit. ● Wi-Fi frequency band: 2.4 GHz Band This screen also displays the following information: ● MAC address: The Media Access Control (MAC) address of your device when connected to a Wi-Fi network.
● Use the mouse to move the cursor. ● Clicking, pressing, and dragging with the mouse button is equivalent to touching, touching & holding, and dragging with your finger. ● Only one mouse button is supported. Other input devices You can other input devices to your phone. However, games and other apps must be designed to support any special features of an input device, such as dedicated buttons or other controls, to take full advantage of them.
2 Under Personal, touch Accounts & sync. Add an account To add some accounts, you may need to obtain details from system administrator about the service to which the account connects. For example, you may need to know the account's domain or server address. 1 Go to Settings > Personal > Accounts & sync. 2 Touch Add account. 3 Touch the kind of account to add. 4 Follow the onscreen steps to enter information about the account.
You can configure synchronization options for any of your apps. You can also configure what kinds of data you synchronize for each account. Some apps, such as Gmail and Calendar, have separate synchronization settings that provide more fine-grained control. In such cases, the settings you select at the account level are still valid. For some accounts, syncing is two-directional; changes that you make to the information on your device are made to the copy of that information on the web.
Change an account's sync settings 1 Go to Settings > Personal > Accounts & sync. 2 Touch the account whose sync settings you want to change. The Sync Settings screen opens, displaying a list of the kinds of information the account can sync. 3 Check or uncheck items as needed. Unchecking an option does not remove the information from your device; it simply stops it from being kept in sync with the version on the web.
Special attention: The power input is 5V/2A; please do not use other spec! TOLL FREE-1-855-LINSAY-HELP 32 www.LINSAYdigital.
Warranty Policy One-Year Limited Warranty on Parts and Labor LINSAY provides a "ONE-YEAR LIMITED WARRANTY" against manufacturing defects in materials and workmanship to the original purchaser of a new LINSAY purchased from an authorized LINSAY U.S., which begins on the date of purchase by the customer. Customer is responsible for maintaining proof of date of purchase and must make the registration of the product into of 30 days of the purchase on http://www.linsaydigital.com/registration.
If LINSAY receives, during the applicable warranty period, notice of a defect in any hardware product, which is covered by LINSAY' warranty, LINSAY shall either repair or replace the defective product at LINSAY' option. If LINSAY is unable to repair or replace, as applicable, a defective product which is covered by LINSAY' warranty, LINSAY shall within a reasonable time after being notified of the defect, refund the purchase price for the product.
transactions are facilitated. LINSAY does not warrant damage incurred to the LCD on any unit sold. Any manufacturer's defect is at the sole discretion and discernment of LINSAY repair technicians as the unit will need to be in possession of the return authorization number RAN technicians for a full and accurate evaluation to be made. How to Obtain Warranty Service To obtain warranty service, contact LINSAY Technical Support via email at TechnicalSupport@linsaydigital.com.
Parts and service labor that are LINSAY's responsibility under this limited warranty will be provided without charge. All other service is at the customer's expense. LINSAY reserves the right to charge the customer for any service call for anything not covered by this limited warranty. Before you ask for warranty service, please review your User Manual. You may avoid a service call and a service charge.
THERE ARE NO EXPRESS WARRANTIES OTHER THAN THOSE LISTED OR DESCRIBED ABOVE. ANY IMPLIED WARRANTIES, INCLUDING ANY IMPLIED WARRANTY OF MERCHANTABILITY AND FITNESS FOR A PARTICULAR PURPOSE, SHALL BE LIMITED IN DURATION TO THE PERIOD OF TIME SET FORTH ABOVE.
To ensure warranty service, keep the dated bill or sales receipt as evidence of the purchase date and location. This limited warranty applies only to original purchaser and is non-transferable. Warranty service conditions are subject to change. For the latest Warranty Terms and Conditions and additional information regarding LINSAY's Limited Product Warranty, please see complete details online at: www.LINSAYdigital.com 38 www.LINSAYdigital.
F-10XHD4CORE 10.1” TABLET PC ANDROID Manual del Usuario 39 www.LINSAYdigital.
PRECAUCIONES DE SEGURIDAD No someter el dispositivo a impacto severo o caer desde alturas. No utilice el dispositivo en condiciones extremas de calientes o frías, húmedas o polvorientas. No exponer a la luz directa del sol. Evite usar el dispositivo cerca de fuertes campos magnéticos. Funcionamiento normal del producto puede ser perturbado por ESD. Si es así, simplemente restablecer y reiniciar el dispositivo siguiendo el manual de instrucciones.
Explicación del símbolo de seguridad: • • -El relámpago con el símbolo de flecha dentro de un triángulo equilátero pretende alertar al usuario de la presencia de aislados no "voltaje peligroso" dentro de la caja del producto que puede ser de suficiente magnitud como para entrañar un riesgo de descarga eléctrica. • Para reducir el riesgo de descarga eléctrica, hacer no quitar la cubierta (o posterior) como allí no es contiene piezas útiles para el usuarios. Solicite ayuda a personal calificado.
auriculares suministrados. A fin de preservar su audiencia, se aconseja que utilice sólo los siguientes modelos de auriculares: los auriculares suministrados con el dispositivo, o cualquier otro auricular que respeten la normativa vigente. Otros tipos de auriculares pueden producir mayores niveles de volumen. A plena potencia, la escucha prolongada del hombre de a pie puede dañar el oído del usuario • Máximo voltaje de salida < = 150mv • No utilice mientras opera un vehículo motorizado.
Botones & Puertos 43 www.LINSAYdigital.
Empesando Después de introducir en los sistemas, en la parte inferior de la pantalla, encontrará tres botones de navegación. Siempre está disponible. No importa lo que haces con Tablet PC, siempre puede volver a la pantalla de inicio principal o volver a las pantallas anteriores: Icono Nombre Back Descripción Abra la pantalla anterior que estaban trabajando, aunque sea en una aplicación diferente. No una vez hasta la pantalla de inicio, puede volver más en su historia. Home Open Home.
Iconos del sistema sobre el derecho arriba deslice hacia abajo con su dedo y vera la conneccion inalámbrica actual y fuerza de conexión de red, nivel de batería, tiempo y más. Toque & tipiar Utilice los dedos para manipular los iconos, botones, menús, el teclado en pantalla y otros elementos de la pantalla táctil. También puede cambiar la orientación de la pantalla. Para seleccionar o activar algo, tocarlo.
derecha ver las otras pantallas de inicio. Pelliscar: En algunas aplicaciones (como mapas, explorador y Galería), puede acercar y alejar por colocar dos dedos en la pantalla a la vez y aprietan juntos (para alejar) o les difusión aparte (para acercar la imagen). Rotar el screen: En la mayoría de las pantallas, la orientación de la pantalla rota con el dispositivo como se convierten. Puede cambiar esta configuración de visualización.
Utilice la pantalla de bloqueo Para proteger la información personal, puede ajustar la configuración de bloqueo de su teléfono: 1. Desde la pantalla de inicio o todas las aplicaciones, pulse en el icono de configuración 2. Desplácese hacia abajo y pulse en seguridad. 3. Toque el candado en el Screen. 4. Toque el tipo de bloqueo que le gustaría usar. Después de establecer un bloqueo aquí, una pantalla de bloqueo muestra siempre la pantalla despierta, solicitando el patrón, PIN o clave especificado.
3. Para establecer el papel tapiz, toque "establecer el papel tapiz" en la imágenes de galería o establecer el papel tapiz. Settings Relacionados Settings > Device > Display > Wallpaper Organizar & trabajar con aplicaciones Aplicaciones ya Instaladas: Browser, Calculator, Calendar, Camera, Clock, Downloads, Email, Flash, Gallery, Gmail, Google, Music, OWL Player, Market Store, Settings, Sound Recorder, Super user and Voice Search.
Desde cualquier pantalla de inicio, puede Habrir un folder: Toque lo. Se habre el folder. Cambiar nombre a folder: Toque el nombre. Mover iconos en el Home screens: Toque, aguante, y corra. Tips Para ver una colección más pequeña de aplicaciones de usadas frecuente, toque la carpeta Google Apps cerca de la parte inferior de la pantalla. Como con cualquier carpeta, puede personalizar su contenido.
Pruebe unas apps Empezar Gmail Puede utilizar Gmail para leer y escribir correo electrónico desde cualquier explorador o dispositivo móvil. Todo su correo electrónico es siempre actualizados y disponibles sin importar donde comprobar desde. Pero Gmail no es sólo de correo electrónico.
La primera vez que inicie personas, se le pedirá que inicie sesión o cree una cuenta. A continuación la app se abre a la lista de contactos principal. Puede verlos en tres formas de las fichas en la parte superior de la pantalla: grupos, todos y Favoritos: Desde cualquiera de las vistas principales, puede Lea los detalles. Pulse un nombre para ver detalles de un contacto o grupo. Editar detalles.
Use your Camera La app de la cámara es una cámara de combinación y la videocámara. Puede ver fotos y vídeos que grabe con la cámara . Para tomar fotografías y vídeos, primero toque el icono de cámara Cuando se abre la cámara, puede Tomar una fotografía: toque el botón azul. Imagen de punto de vista más recientemente adoptado: toca la miniatura cerca el botón azul. Ahora puede compartir la imagen tocando el Gmail, Google +, Messenger o otros iconos que aparecen a lo largo de un lado de la imagen.
completa. 3 Para mostrar la imagen siguiente o anterior, deslice el dedo en la pantalla horizontalmente. 4 Para acercar o alejar la imagen, pellizca el dedo sobre la imagen. Display Menu Cuando está viendo la imagen, puede puntear en la pantalla o en el icono de menú para mostrar el menú Maneje downloads Archivos, aplicaciones y otros elementos de descarga de Gmail, correo electrónico, Android Market, o de otras maneras son almacenados en almacenamiento interno del dispositivo.
Tocar las partidas para las descargas anteriores a verlos. Elementos de verificación que desee compartir. A continuación, toque el icono de Share y elija un método de uso compartido de la lista. Compruebe los elementos que desee eliminar. A continuación, toque el icono de la Papelera En la parte inferior de la pantalla, toque a ordenar por tamaño o ordenar por fecha para alternar. .
Warning! Si dejas de algunas aplicaciones o servicios, es posible que el dispositivo no funcione correctamente. Estado de la batería (carga, descarga) y nivel (como un porcentaje de completamente cargada) se muestran en la parte superior de la pantalla. El gráfico de descarga muestra del nivel de batería con el tiempo ya te última cargado el dispositivo, y cuánto has sido funcionando con batería. Optimizar uso de data Para ajustar la configuración descrita aquí: 1. Pulse en el icono de configuración 2.
Setiar aviso uso de data Arrastre la línea naranja por su lado derecho hasta el nivel donde desee recibir una advertencia. Cuando el uso de datos alcanza este nivel, usted recibirá una notificación. Setiar limite de uso de data 1. Set mobile data limit. Aparece un diálogo que describe el límite que se está estableciendo. 2. Leer el mensaje. Si estás dispuesto a continuar, haga clic en Aceptar. La línea roja en la parte superior del gráfico activa, por lo que se puede arrastrar hacia arriba o hacia abajo.
3. Para ver más detalles de una aplicación, pulse en su nombre. 4. Para detener el uso de datos de fondo para esta aplicación, comprobar datos de fondo de restringir. 5. Leer el mensaje que aparece. Si estás dispuesto a continuar, haga clic en Aceptar. Opciones de uso de datos avanzada Dos otras opciones disponibles desde el icono de menú pueden tener efectos dramáticos, pero a veces pueden ser útiles: Itinerancia de datos puede resultar en cargos adicionales empinados.
● Creación de archivos (por ejemplo, por tomar fotografías). ● Eliminar archivos descargados o archivos creados. ● Copiar archivos entre el dispositivo y un ordenador mediante USB. Rara vez se necesita administrar la forma apps usan RAM. Pero se puede controlar el uso de memoria RAM de aplicaciones y detenerlos si arrepintiera. Utilice la pantalla de aplicaciones La pantalla de aplicaciones le permite ajustar varios aspectos de la forma que el dispositivo utiliza la memoria.
● Uninstall button: Elimina la app y todos sus datos y configuración. ● Disable button: Impide la ejecución de la aplicación, pero no desinstalarlo. Esta opción está disponible para algunas aplicaciones y servicios que no se puede desinstalar. ● Clear data button: Eliminar configuración de una aplicación y otros datos sin quitar la aplicación propia.
● Mover el punto de inserción: toque donde desee escribir. Parpadea el cursor en la nueva posición, y una ficha verde aparece debajo de ella. Arrastre la tabulación para mover el cursor. ● Seleccione texto: Touch & mantenga o puntee dos veces en el texto. Destaca la palabra más cercana, con una ficha en cada extremo de la selección. Arrastre las fichas para cambiar la selección. La ficha desaparece después de unos momentos, para salir de su camino. Para hacer que reaparezca, toque el texto nuevo.
● Acceder rápidamente a los signos de puntuación y símbolos comunes: Touch & mantenga la tecla a la derecha de la barra de espacio (período clave). ● Escriba caracteres especiales: Touch & mantenga la Shift key mientras le toque una clave con un pequeño personaje gris en su esquina para entrar en el personaje de color gris. Toque & presionada cualquier tecla para ver alternativas letras, símbolos o números, que puede luego tocas para escribir.
2 Toque Wireless & networks > Wi-Fi. 3 Deslice el conmutador de Wi-Fi a la posición On. El dispositivo explora las redes Wi-Fi disponibles y muestra los nombres de los que encuentra. Redes seguras se indican con un icono de candado. Si el dispositivo detecta una red que conectado previamente, se conecta a él. 4 Toque un nombre de red para ver más detalles o conectarse a ella. Si la red está protegida, se le pedirá que introduzca una contraseña u otras credenciales.
Algunos administradores de red requieren conectarse a recursos de la red interna o externa a través de un servidor proxy. De forma predeterminada, las redes Wi-Fi que agrega no están configuradas para conectarse a través de un proxy, pero puede cambiar para cada red Wi-Fi que haya agregado. Configuración de proxy es utilizados por el navegador, pero no podrá ser utilizada por otras aplicaciones. 1 Touch & espera una red en la lista de redes Wi-Fi que haya agregado.
permanecer conectado a Wi-Fi durante el sueño. La elección de este última es probable que aumente el uso de datos móviles. Puede que desee revisar esta configuración si recibe una notificación que está acercando su límite especificado los datos móviles. ● Wi-Fi frequency band: 2,4 GHz bandas de frecuencia Esta pantalla también muestra la siguiente información: ● MAC address: La dirección de Media Access Control (MAC) del dispositivo cuando esté conectado a una red Wi-Fi.
● Presione Tab o Shift-Tab para pasar de un campo a otro de una forma u otra pantalla con múltiples campos de texto. Ratón Cuando se conecte un ratón para Tablet PC y mueva el ratón, aparecerá un cursor en forma de flecha, como en un equipo: ● Utilice el ratón para mover el cursor. ● Clic pulsando y arrastrando con el botón del ratón son equivalente a tocar, tocar & celebrar y arrastrando con el dedo. ● Se admite un único botón. Other input devices Puede que otros dispositivos de entrada a tu teléfono.
Puede utilizar las cuentas de varias cuentas de Google y Microsoft Exchange ActiveSync en el dispositivo. También puede agregar otros tipos de cuentas, dependiendo de sus aplicaciones. Algunos puede agregar en la pantalla de sincronización & de cuentas, como se describe aquí. Otros que agregar utilizando una aplicación que funciona con los tipos de cuentas. Por ejemplo, puede agregar cuentas de correo IMAP y POP3 con la aplicación de correo electrónico.
2 Toque la cuenta a eliminar. Icono de menú touch 3 > eliminar cuenta. Topicos Relacionados Configurar las opciones de sincronización de cuenta ¿Por qué utilizar una cuenta de Google? Configurar las opciones de sincronización de cuenta Puede configurar las opciones de sincronización para cualquiera de sus aplicaciones. También puede configurar qué tipo de datos sincronizar para cada cuenta.
Si desactiva la sincronización automática, necesita sincronizar manualmente para recopilar mensajes, correo electrónico y otra información reciente y no recibir notificaciones cuando se producen actualizaciones. Por ejemplo, cuando esta opción está marcada, los cambios que realice en su aplicación las personas se realizan automáticamente a tus contactos de Google en la web. Si esta opción no está seleccionada, puede utilizar las herramientas de una aplicación para sincronizar datos manualmente.
Ajustar la configuración de bloqueo de Tablet PC: 1 Desde una pantalla de inicio o todas las aplicaciones, pulse en el icono Configuración. 2 Toque Personal > seguridad > bloqueo de pantalla. 3 Toque el tipo de bloqueo que desee y siga las instrucciones en pantalla.
Política de Garantía Garantía limitada de un año en piezas y mano de obra LINSAY ofrece una "garantía limitada de un año" contra defectos de fabricación en materiales y mano de obra para el comprador original de un Linsay nuevos comprados en una agencia o EE.UU. LINSAY, que comienza en la fecha de compra por el cliente. El cliente es responsable de mantener la prueba de la fecha de compra y debe hacer el registro del producto en los 30 días de la compra en http://www.linsaydigital.com/registration.
LINSAY podrá optar por reparar o sustituir el producto defectuoso a LINSAY opción. Si LINSAY no puede reparar o sustituir, según corresponda, un producto defectuoso que esté cubierto por la garantía de LINSAY, LINSAY en el plazo de un plazo razonable tras recibir la notificación del defecto, reembolsar el precio de compra del producto. LINSAY no tendrá obligación de reparar, reemplazar o reembolsar hasta que el cliente devuelva el producto defectuoso a LINSAY.
LINSAY no garantiza los daños ocasionados a la pantalla en cualquier unidad vendida. Cualquier defecto del fabricante es a la discreción y el discernimiento de los técnicos de reparación de LINSAY como la unidad deberá estar en posesión del número autorizacion retorno RAN técnicos para una evaluación completa y precisa a realizar. Cómo obtener servicio de garantía Para obtener servicio de garantía, póngase en contacto LINSAY soporte técnico por correo electrónico a TechnicalSupport@linsaydigital.com .
garantía limitada será proporcionado sin costo alguno. Todos los servicios de otros es a cargo del cliente. LINSAY se reserva el derecho a cobrar al cliente para cualquier llamada de servicio para cualquier cosa no cubiertos por esta garantía limitada. Antes de solicitar el servicio de garantía, por favor revise su manual del usuario. Usted puede evitar una llamada de servicio y un cargo por servicio.
PARTICULAR, ESTARÁ LIMITADA A LA DURACIÓN DEL PERIODO DE TIEMPO ESTABLECIDO ANTERIORMENTE. RESPONSABILIDAD TOTAL LINSAY EN CASO DE TODAS LAS PÉRDIDAS Y DAÑOS CAUSADOS POR CUALQUIER MOTIVO, INCLUYENDO LA NEGLIGENCIA DE LINSAY, perjuicio alegado, O PRODUCTOS DEFECTUOSOS, ya sean defectos TAL SON DESCUBIERTOS LATENTE O, EN NINGÚN CASO SUPERIOR AL PRECIO DE COMPRA DEL PRODUCTO.
recibo de compra como prueba de la fecha de compra y la ubicación. Esta garantía limitada se aplica solamente al comprador original y es intransferible. condiciones de servicio de garantía están sujetos a cambios. Para conocer las últimas condiciones de la garantía y la información adicional con respecto a LINSAY limitada de garantía del producto, por favor ver los detalles completos en línea en www.LINSAYdigital.com 75 www.LINSAYdigital.