
User Manual


10
9
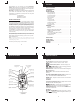
LCD Screen
BATTERY INSTALLATION
Figure 3 Figure 4
Getting Started Getting Started
Getting Started
Operation
11 1212
Changing CHANNELS
WARNING
DO NOT CHARGE THIS UNIT USING AN AC/DC ADAPTER WITH REGULAR
Adjusting Speaker Volume
Transmitting a Signal
While holding the button, speak into the unit using a normal tone
of voice.
TALK
Release the button when you have finished transmitting.TALK
Check the channel activity by pressing and holding the
button. You'll hear static if the channel is unoccupied. Don't
TRANSMIT if someone is talking on the channel. Press and hold the
button to TRANSMIT. The TX icon is displayed. Hold the unit
in a vertical position with the MICROPHONE 2 to 3 inches (5 to 7.5)
MONITOR
TALK
from the mouth.
1.
2.
3.
Changing CHANNELS
The FRS/GMRS has 22 available channels. To change channels:
Press the button to move to a higher channel.
Press the button to move to a lower channel.
The channel changes from 1 to 22, or from 22 to 1.
UP
DN
MONITOR
Press the button for normal monitoring.MONITOR
You can use the button feature to check for weaker signals in the current
channel.
MONITOR
1.
2.
MENU/LOCK Button (FUNCTION EDITING)
Press and hold the MODE button for 5 seconds to activate or deactivate the
BUTTON LOCK mode. The BUTTON LOCK icon is displayed on the LCD Screen.
Depress the MODE button momentarily;
Press the button briefly to enter into the FUNCTION EDIT modes in due
order: mode.HI/LOW
NOTE: In the current FUNCTION EDIT mode, press the button to return
to the NORMAL mode after making your selection. In the FUNCTION EDIT mode,
press the MODE button again to shift from the current option in each submenu
TALK
to the next option.
NOTE: Channel Change Operations are disabled during BUTTON LOCK
mode. Press and hold the MODE button again to deactivate BUTTON LOCK
mode.
AAA
AAA
AAA
AAA
Receiving a Signal
The unit is continuously in the RECEIVE mode when the unit is ON
and not transmitting. When you receive a signal on the current
channel, the RX icon is displayed. (See “LCD Screen” for details.)
Press the button to increase the volume.UP
Press the button to decrease the volume.DN
The speaker volume level is indicated by the number of bars displayed
in the upper right corner of the LCD.
Press and hold the button until it “beeps” for continuous
monitoring.
MONITOR
Turning the Unit ON
Turning the Unit On/Off
Press and hold the button. The unit will “beep” and the LCD
Screen will turn blank.
POWER
Press and hold the button. The unit will “beep” and thePOWER LCD
Screen will display then the current channel.2r5
The FRS/GMRS has a built in POWER SAVER feature for maximum battery
life. But when the FRS/GMRS is not being used, conserve battery power by
pressing the button to OFF. Remove the batteries if the unit will notPOWER
be used for a long period of time.
Press and release the MODE button, the current channel number
flashes on the LCD Screen.
While the channel number is flashing:
1.
2.
4. Reinstall the BATTERY COMPARTMENT COVER and return the BELT
2. Remove the BATTERY COMPARTMENT COVER from the BATTERY
COMPARTMENT. See Figure 3.
(batteries not included) following the polarities as shown in Figure 4.
3.
NOTE: In order for other people to receive your transmission, they must also be on
the same channel you are currently using. Refer to the section
for more information.
D
A
B
C
VX
SC
F.
SC- Displayed during the CHANNEL SCAN mode.
D. VX - Displays during the TALK mode.
H.
-
Displays the current BATTERY LEVEL charge.
G. - D
isplays when the LOCK mode is activated .
A. - CHANNEL NUMBER. Changes from 1 to 22 as selected14
By user.
E.
- Displays the current volume level.
B. - CTCSS code. Changes from 1 to 38 as selected by user.
C.
- TX icon. Displayed when transmitting signal..
E
FG
H