@ BELL SOUTH 2.4 GHz CORDLESS CALLER ID TELEPHONE WITH CALL WAITING 50 CHANNEL AUTO SCAN Model GH9454 OWNER'S MANUAL INSTALLATION AND OPERATING INSTRUCTIONS PLEASE READ THIS MANUAL CAREFULLY BEFORE USE. KEEP FOR YOUR REFERENCE. For installation information, please see "Be fling Started” instructions an page 10 or your separate Quick Start guide.
quarterdeck 15/00 11:21 9M Page 2 fae Congratulations on your selection of a quality Bell South Product. With proper care and adherence to the set-up and user instructions In this Owner's Manual, this unit wil provide you with years of troublesome service. Bell South is committed to providing quality products that fit your needs. We would fiche to have any comments or suggestions vou might have on this product. Vou may ma your torments to U.
war-cidhogrd BHS00 1121 PHM Page 3 * CALLER ID SYSTEM . Multi-Function Lars LCD Screen Shows the number you are dinging snd, with Geller 1D device {callable through subscription from your local telephone company], displays information about the caller before you answer fre call. | Name and Number Directory Stores up 1040 names and nursers ss that you can oaf them with & single key stoke. : Caller List Ava liable wily Caller 10) service. Stores up to 80 calls fo keep track of everyone who called.
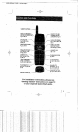
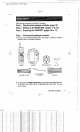
equilibrium ged BTU 11:45 PY Page 4 HANDSET ANTENNA — NEW CALUMET iba HANDSET VOLUME WAITING LED INDICATOR vo CONTROL SL MID, ~ Pg. 2123, 34° CN 2 LOW) SWITCH Pg. 19 TALK BUTTON Py. 18-20, 29-24, 30,8 LARGE LOD SCREEN By. 18, 1823, 25:27, 29, 32,3, SORROWFUL-DOWN SHIFT LEFT-RIGHT BUTTON BUTTON Py, 18, 4, R28, 30-34 NONOPERATIONAL BUTTON Fy, 19,23, zy 8 7 TEMPORARY ; 1+ DISTRIBUTIONAL TONE BUTTON i £3.99, 22,24,35, 28, Pg. 18, 28,24, 26, 78,28 5 # FUNCTIONAL ome MAL BUTTON Py. 22, TELEMETER KEYPAD Pg.
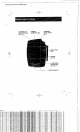
CUARK~CIG. aed S100 10:85 PM Page § TELEPHONE LINE COLLECTION JAD PIL . HN POWERING CONNECTION JACK TUNEFULNESS SELECT SWITCH Pg. 13 PAGE BUTTON p30 ANTENNA Pg. 15.
insidiousness S100 11:21 BW Page 10 Before you use your fans, you must set it up properly. Step 1. Checking the package contents. {page 10) Step 2. Setting up the BASE UNIT. (pages 11 to 15} Step 3. Preparing the HANDSET. {pages 16 to 17) Step 1. Checking the package contents, A. Make sure you receive the following items in the package, If anything ls missing or damaged, strum it to the place of purchase, = MOUNTING BRACKET BELT LP SHORT TELEPHONE LINE CORD TELEPHONE LINE CORE B.
quarkecidis.axg 8100 411 AM Page 11 Step 2. Setting up the BASE UNIT Roper set up reacquires the following: 1. Choose the best cation. 2 Connect the BASE UNIT. 3. Chase the DIALING mode, 4, Mounding the BASE UNIT. 1. Calls are transmitted between the BASE UNIT and the HANDSET using radio waves. The recommended location of the BASE UNIT for noise-free operation is: ge 4.