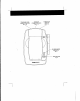
: | @ BELL SOUTH 900 MHz CORDLESS CALLER ID TELEPHONE WITH CALL WAITING 40 CHANNEL AUTO SCAN Model 9918 OWNER'S MANUAL INSTALLATION AND OPERATING INSTRUCTIONS PLEASE READ THIS MANUAL CAREFULLY BEFORE USE. KEEP FOR YOUR REFERENCE. For Getting Started Information, please see Installation Instructions on page 9 or your separate Quick Start guide.
Special Features proper care and by following the setup and user instructions In this manual, this unit will provide you with years of trouble free service. Bell South is committed to providing quality products that fit your needs. We would Like to have any comments or suggestions you might have on this product, You may mail your comments to: 1.8.
Special Features CALLER ID SYSTEM Multi-Function Large LCD Screen Shows the number you are dialing and, with Caller ID service (available through subscription from your local telephone company), displays information about the caller before you answer the call. Name and Number Directory Stores up to 40 names and numbers so that you can call them with a single key stroke. Caller List Ava liable with caller ID service. Stores up to 80 calls to keep track of everyone who called.
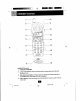
] LARGE LCD Newels SCREEN MESSAGE WAT Fg.5 \ INDICATOR Pg. 6, 17-18 DIRECTORY BUTTON VOLUME mongol Pg. 5.18. 2026 (ll. MED, L SWITCH TO EDITORIALIZE! Po 5A os SAVE BUTTON So ras Pg 6,16, 18, 18,2024 21.28, 2628 4+ DIAL BUTTON Se Roll ued Downy 23-24 BUTTON Pg. 6,17 28 TELEPHONE KEYPAD 10 DIAL BUTTON-— | | Pg.6, 19,2123, 23-24 25-59 7 DIAL DELETE/SCAN TONE BUTTON: BUTTON Pg. 6,13, 18, 21, 23-24 Foo, 520, 22:28, EDIT/FLASH BUTTON Fo. 6, 25-28 ~ Pg.
IMPORTANT SAFETY INSTRUCTIONS To reduce the risk of fire, electric shock and/or injury, always follow these basic safety precautions when using your cordless telephone equipment. 1. Read and understand all instructions. solipsism Follow all wakings and instructions marked on the telephone. Unplug this telephone from the wall outlet before cleaning or replacing the battery pack. Do not use liquid cleaners or aerosol cleaners. Use a damp cloth for cleaning. If necessary, use only a mild soap. .
F. If the telephone exhibits a distinct change in performance. 13. Avoid using a telephone (other than cordless type) during an electrical storm. There may be a remote risk of electric shock from lightning. 14. Do not use the telephone to report a gas leak in the vicinity of the leak. 15. Never install telephone wiring during a lightning storm. 16. Never install telephone jacks ir wet locations unless the jack is specifically designed for wet locations. 17.
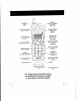
SYSTEM HANDSET Controls 1. HANDSET ANTENNA 2, Large LCD Screen: Shows call information, phone status prompts and directory items. 3. DIR. (Directory) Button: Press to access names and numbers stored in the DIRECTORY. (Ses page 20 fo 24 for details.) 4. TALK Button: Press to answer an incoming call or to place a call. Press to end a call.
9tdptpms 7 . PAUSE button to deal numbers which use an alternative long distance access code.) 14/4 Button: (1+) Press and hold down to place a long distance calls. (Automatically adds the number 1 at the beginning of the displayed telephone number.) . 10 Digit/o Button: Press and hold down to place a local call with Area Code. . 7 Digit TONE/* Button: (7 Digit) Press and hold down to place a focal call. (TONE) Press to temporarily change the dialing mode from Pulse to Tone for Rotary Service Users.
YX) eT Power-In Connection Jack . Telephone Line Connection Jack . Tone/Pulse Select Switch | Antenna: Raise or reposition for best reception. . IN USE/CHARGE Indicator: (IN USE) Lights up to indicate that the HANDSET is in TALK Mode or an extension phone'is in use, (CHARGE) Lights up when the HANDSET Is paced on the BASE UNIT for charging. 6. PAGE Button: Press to page the HANDSET. 7. Charge Terminals: For charging the HANDSET battery pack. For best performance, clean periodically with a damp cloth.
9018p1.pm3 0 Connecting Your Phone This section is a reference guide to the aspic functions and operations of your cordless telephone, For more detailed descriptions of the operations and features of this telephone, refer to the Contents on page 1. 1. Carefully remove your cordless telephone from its shipping carton, If theirs any visible damage, do not attempt to operate this equipment. Return lt to the place of purchase. 2. Check io be sure you have all items halt come with this cordless telephone system.
BASE UNIT © ANTENNA f TONE PULSE jee TELEPHONE. SWITCH CONNECTION JACK POWERS | SOURCE \{ | |_ 120vwaLL \| TELEPHONE | OUTLET WT SACK ADAPTER | 3. Insert the small plug on the end of the AC adapter into the POWER-IN connection jack at the back of the BASE UNIT. 4. Plug the AC adapter info a 120V AC wall outlet. a J USE ONLY WITH CLASS 2 POWER SPURGE 9V DC, 300mA. 5.
Press the {ERY button to confirm that you have a dial tone. If you do not gate dial tone, review steps 3 through ©. If you still have no dial tone, refer to the Problem Solving section on page 33. 10. Before initial use, charge the HANDSET for 12 hours. Your are now ready fo use your new Bell South Cordless Telephone. IMPORTANT in order to utilize the Caller 1D feature, you must subscribe to Caller ID towards your local phone company.
Desk Mounting Desk Mounting One of the special features of your telephone is the unique design of the MOUNTING BRACKET which can hold your phone at an angle of 30° when desk mounting. There are two positions to choose from: 1. NORMAL POSITION (Mounting Bracket not required) For normal position, as shown in Figure 1, place the BASE UNIT on any desired but suitable location.
y Wall Mounting Wall Mounting 1 You may chooses to put the BASE UNIT of your cordless telephone on wall. 1. With the back of the BASE UNIT facing up, connect the SHORT TELEPHONE LINE CORD 1o the telephone fine jack. 2. Insert the SHORT TELEPHONE LINE CORD through fhe hole of the MOUNTING BRACKET. 3. insert the hooks of the MOUNTING BRACKET (marked "WALL MOUNT) into the matching slots of the BASE UNIT (as shown below). Then slide the MOUNTING BRACKET into place as indicated by the arrow.
Cordless Telephone Operation Preparing for Use Before you can use your cordless telephone, you must charge the HANDSET for 12 hours. Failure fo do so will require recharging of the battery pack more often. 1. Place the HANDSET on the BASE UNIT for 12 hours. 2. After 12 hours, remove the HANDSET from the BASE UNIT. 3. Raise or reposition the BASE UNIT antenna for best reception. Before you can use your cordless telephone, you must charge the HANDSET for 12 hours.
| Receiving Calls 1. When the gone rings, lift the HANDSET and press the (TALKS button. The BASE UNIT IN USE LED indicator will light up. 2. Strasbourg conversation. 3. To end your conversation, either press the GEEKY button or place the HANDSET on tha BASE UNIT. If you place the HANDSET on the BASE UNIT charge cradle, you activate the automatic STANDBY feature. NOTE: The Call Timer will start to count once you press the EATER) button.
1. Press the §FURL) button, the Call Timer starts to count. The BASE UNIT IN USE LED indicator will light up. 2. Listen for a dial tone. 3. Dial the phone number. 4. When you finished with your call, press the | button again. The BASE UNIT IN USE LED indicator will turn off. 1. Dial the phone number. old down the 7-Digit GR or 10-Digit or 1+ Ge) button. The BASE UNIT IN USE LED indicator will light up. 3. When you have finished with your call, press the button again.
Caller ID System This telephone automatically displays incoming caller's name and telephone number together with the date and time of the call. It records up to 80 calls and stores the data in memory. IMPORTANT: You must subscribe fo the Caller ID service from your focal telephone company to utilize this feature. OR JR— “OUT OF AREA" will appear if the origin ail “UNKNOWN? will appear if the origin of Viewing Caller Information During Incoming Calls 1.
Call Waiting When you have subscribed for Call Waiting service from your focal telephone company, this telephone can indicate the name and number of the second caller while you are having a conversation, 1. When you are having a conversation, this telephone will automatically display the name and number of the second caller. 2. Pressured i) button to answer the second caller. The fi lots name and number will be displayed.
Placing a Call from the Caller List 1. Press the scroll down button to select from the latest record, or press the scroll up (4) button to select from the first record. 2. Press and hold down the 7-Digit BER button for local call, or the 10-Digit E55 button for local call with area cods, or the 1+ GEE button for long distance call. 3. To end your conversation, either press the Th [RK button or place the HANDSET on the BASE UNIT.
Caller ID System Operation Deleting All Records in the Caller List OEE 1. Press and hold down the LETTERER) button eee at the STANDBY Mode. Gii DELETE 2. The LCD screen will automatically return fo po STANDBY Mode. LOGO Bill wel Selective Deleting in the Caller List 1. Press ‘the scroll up or down (a or w) button to find the caller at STANDBY Mode. ~ 2. Press and hold down the (DELETE then the LCD screen will display the next | item in the directory. p 3. Press the Ei button to return to STANDBY Mode.
Saving therein Di recto. Press the {BIR} button. 2. Press the (ERI) button. 3. Use the TELEPHONE KEYPAD bunion (0~8) to enter the name, (see page 29 for detail) you can store up to 15 characters. 4. Press the scroll down (v) button once. 5. Enter the telephone number using the TELEPHONE KEYPAD button You can store up to 16 digits. 6. Press and hold down the SAGE] button. 7. Press the button to go back to STANDBY Mode.
i i HEE Caller ID System Operation Editing Name and Number in the Directory 1, Press the (BIRD button. 2. Press the scroll up or down (a or v) button to find the one you want to edit. LE HEN Rau | {609555 Press the 3 button to edit the name. EB cursor is blinking 4. Press the shift left or right {= or ») bunion fo move the cursor to the letter or number you want to change. To erase, press and hold down the (8 To add, use the TELEPHONE KEYPAD buttons (see page 20 for details.) 5.
2 . Press the scroll up or down (a or v) bunion to find the caller. e.g. H | ~ cursor is blinking 2] . Press the shift left or right (« or »} button to move the cursor to the number you want to change. To erase, press and hold down the SHRUBBERIES button. To add, use the TELEPHONE KEYPAD buttons, . Press and hold down the 7-Digit @5iR button for local call, or press and hold down the 10-Digit hE button for local call with area code, or press and hold down the 1+ button for long distance call.
1. Press the ER button. 2. Press the scroll up or down {a or v) button fo find the one you want to call. 3. Press and hold down the 7-Digit @ugs button for focal calf, or press and hold down the 10-Digit button for local call with area code, or press and hold down the 1+ button for Lang distance call. 4. To end your conversation, either press the button or place the HANDSET on the BASE UNIT. Deleting All Records in the Directory 1. Press the (BIR) button. 2.
Function Operation This unit contains the following special functions: A. LANGUAGE F. OUTNUMBER B. SILENT ON/OFF G. PBX ON/OFF C. TIME SET H. PAUSE TIME D. RINGER VOLUME I. WAITING E. CONTRAST To access, press the (WINES button at STANDBY Mode, then press the TELEPHONE KEYPAD (1~9) or the scroll up or down (a or ¥) buttons.
i G5 A. Language This telephone offers English, Spanish and French languages far your convenience. 1. Press the (HUE 2. Press the TELEPHONE KEYPAD #1 button. 3. Press the (EBL) button. 4. Press the scroll up or down (a or v) button to select the type of language you desire. English is the preset language. §. Press and hold down the (SAVE) button. 6. Press the {i 3 button to go back to STANDBY Mode. B.
90t6p1Z ome D. Ringer Volume This unit enables you to adjust the ringer volume from HI, MED and LOW as desired. 1. Press the (RUNG) button. 2. Press the TELEPHONE KEYPAD #4 button. 3. Press the (EDIT) button. 4 . Press the scroll up or down (a or v) button to adjust the ringer volume suitable for your convenience. (His the preset ringer volume.) 5, Press and hold down the {SAVE button. 6. Press the [FUN) button fo ga back to STANDBY Mode. E.
Caller ID System Operation G. PBX Mode This unit enables you to turn ON/OFF the PBX system depending on the telephone system you are using. 1. Press the [DUNG] button. 2. Press the TELEPHONE KEYPAD #7 button. 3. Press the {EDIT} bunion. 4. Press the scroll up or down {a or ¥) button. PBX MODE OFF set for direct fine access, The preset PBX Mode is OFF. PBX MODE ON When connected to a switchboard system. 5, Press and hold down the bunion. 6. Press the (FUNCTOR) button to go back to STANDBY Mode.
Caller ID System Operation Telephone Keypad Characters The telephone Keypad bunions (1 ~0) are used to enter the characters when entering names. Press the appropriate keypad button to get the following characters, as CHARACTERS 1 SPACE ABC 3 DEF 4 HMONG § JELLS 8 MOS 7 HDQRS 8 TUBE 8 WXY29 * 0 # For example, if you want to enter the character “C", press the "2" key, the first character displayed will be *A". Press the "2" key again to display *B”, and press again to display the fetter “C".
ET Security System Your cordless telephone uses a digital coding security system to prevent unauthorized use of your telephone line by another nearby cordless telephone. The system has its own identifying signal created by microcomputers in both the BASE UNIT and HANDSET. Security Code This telephone has an internal security code with 85,536 possible combinations.
Battery Type Use the following type and size of battery pack: Cordless Telephone Battery Pack 3.8V, 600mAh U.S. Electronics Inc. Ni-Cd Battery Pack: model B850 Ni-Cd This battery pack is available through: U.S. Electronics Service Center 105 Madison Avenue New York, NY 10016 1-800-828-5208 Recharging the Battery Pack The nickel cadmium (Ni-Cd) battery pack in the HANDSET can be recharged many times using the bull-in charger in the BASE UNIT.
Changing the Battery Pack Changing the Battery Pack The battery pack provides power for the HANDSET of your cordless telephone. To Replace the Battery Pack: 1, Remove the HANDSET battery compartment cover by sliding it down. 2. Pull out the battery connector and remove the battery pack. 3. Plug the new battery pack into the battery connector. 4, Slide the HANDSET battery compartment cover firmly into place in its closed position. 5. Before use, charge the new battery pack for 12 hairs.
He Problem Solving Section For your assistance, we have listed below a few common problems. Phone does not work, check the following: 1. BASE UNIT is plugged into power source. 2. HANDSET is charged. 3. TONE/PULSE switch is in the right position. 4. TELEPHONE LINE CORD is plugged into the telephone jack. Range of phone limited, check the following: 1. ANTENNA on BASE UNIT is raised. 2, BASE UNIT is centrally located in your residence. 3. BASE UNIT is not located near appliances.
| JL ERT] Excess static, check the following: 1. Check to see that the ANTENNA is not touching another metal object, Raise the ANTENNA. If after pressing the TALK button, you receive three beeps and no dial tone, check the following: 1. Reset the HANDSET by placing it on the BASE UNIT for 2 to 5 seconds. NOTE: if no telephones in the house are working, disconnect one set at a time to verify that none of the phones are causing the problem.
Be oes a RCA ied Technical Information This cordless telephone uses radio frequencies to allow mobility. There are certain difficulties in using radio frequencies with a cordless telephone. While these are normal, the following could affect the operation of your system. Noise Electrical pulse noise Is present in most homes at one time or another. This noise is most intense during electrical storms.
FCC Requirements Federal Communications Commission Requirements This equipment complies with Part 68 of FCC Rules. A label on the BASE UNIT of this equipment contains, among other information, the FCC Registration Number and the Ringer Equivalence Number (REN) for this equipment. You must, upon request, provide this information to your telephone company.
FCC Requirements Federal Communications Commission Requirements (continued) Note: This equipment has been tested and found to comply with the limits fora class B digital device, pursuant to Part 15 of the FCC Rules. These limits are designed to provide reasonable protection against harmful interference ina residential installation.
“Warranty Information Bell South Products One-Year Limited Warranty This limited warranty sets forth all Bell South Products responsibilities regarding your product. There are no other expressed or implied warranties from Bell South Products.
What to Do for Warranty Service During the first thirty (30) days, a defective products eligible for over-the-counter exchange at the retailer from whom it was purchased. After thirty (30) days, the defective product should be returned to the authorized service center. Please allow 2-3 weeks for the return of your telephone product. The shipping address of the authorized service center is: U.8.
9938p30 pm This page serves as a template for attachment of screws to the wall when mounting this telephone on the wall. 1. Gut out this page. 2. Use this template to determine the distance between screws when mounting this phone on the wall, “The two cross hairs identify where to attach the screws.
Lge LN Inordinate maximum life from the HANDSET patter pack, be sure to charge the HANDSET for 12 hours before initial use. IMPORTANT Placing your BASE UNIT near appliances such as televisions, refrigerators, radios, or microwave ovens may cause interference. IMPORTANT When you hear interference, press the SCAN eC H CRUEL IMPORTANT The AC ADAPTER must always be plugged into an electrical outlet. IMPORTANT To obtain the best reception, be sure to raise of reposition the BASE UNIT antenna.
Make certain you receive the best performance from your telephone. Read this manual first.