LC I LIPPERT COMPONENTS TENT CAMPER BIKE RACK ASSEMBLY AND INSTALLATION MANUAL
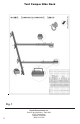
Tent Camper Bike Rack Fig. 1 2 Lippert Components, Inc. Service and Warranty - Plant #39 2703 College Ave.
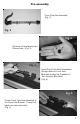
Pre-assembly Front Fork Axle Assembly. (Fig. 2) Fig. 2 Fig. 3 Remove nut and plastic ties. Discard ties. (Fig. 3) Fig. 4 Insert Front Fork Axle Assemblies through holes in Front Axle Brackets located on Crossbar of Tent Camper Bike Rack (Fig. 4) Fig. 5 Center Front Fork Axle Assembly in the Front Axle Bracket. Thread nut back onto axle assembly. (Fig.
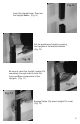
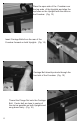
Installation Fig. 6 Fig. 7a - Roadside Place ROADSIDE Upright Base against the outside face of the “A” frame. Insert the “C” bolts into the holes on the Base Bracket. Align front of the Base Bracket with the rear of the Propane Tank Tray. (Fig. 6) Repeat procedure for CURBSIDE Upright Base. Front wall profile on some units may interfere with this mounting process. Correct A Front of Tent Camper Incorrect B Front of Tent Camper “A” Frame “A” Frame Fig. 8a B Fig. 8b A Fig.
Fig. 9 Insert the Upright Inner Tube into the Upright Bases. (Fig. 9) Set the preliminary height by pinning the Uprights in the desired location. (Fig. 10) Fig. 10 Be sure to insert the Upright Locking Pin completely through holes in both the Inner and Base components of the Uprights. (Fig. 11) Fig. 11 Fig. 12 Engage Safety Clip when Upright Pin is set. (Fig.
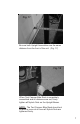
Place the open side of the Crossbar over the top ends of the Uprights and align the top holes on the Uprights with the slots on the Crossbar. (Fig. 13) Fig. 13 Insert Carriage Bolts from the rear of the Crossbar forward on both Uprights. (Fig. 14) Fig. 14 Carriage Bolt should protrude through the front slot of the Crossbar. (Fig. 15) Fig. 15 Fig. 16 Thread the Flange Nut onto the Carriage Bolt. Center bolt as close to center of the slot as possible on both Uprights and snug down firmly. (Fig.
Fig. 17 Be sure both Upright Assemblies are the same distance from the front of the unit. (Fig. 17) Fig. 18 When Tent Camper Bike Rack is completely assembled and all distances are set, firmly tighten all Nylock Nuts on the Upright Bases. NOTE: The Tent Camper Bike Rack should not be able to move at all once all Nylock Nuts are tightened firmly.
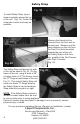
Safety Strap Fig. 19 To install Safety Strap, layout strap completely across the top of the unit. (Fig. 19) Center the strap side to side as closely as possible. Measure the bicycles to be mounted from the front axle to the rear axle. Measure out the same distance on the unit from the Front Fork Axle Assembly towards the rear of the unit. Set Safety Strap in that location, parallel to the Tent Camper bike Rack Crossbar. (Fig. 20) Fig. 20 The Safety Strap will layover the side of the unit as seen in Fig.