LectroCount LCR 600 LIQUID CONTROLS GROUP An IDEX Fluid & Metering Business Setup and Operation Operation: EM150-11
table of contentS IntroductIon Software License Agreement .............................3 LectroCount LCR 600 Overview .........................4 Instruments and Controls ...................................6 LectroCount LCR 600 Navigation ......................11 Security ..............................................................18 Point-of-Sale Activation ......................................20 Setup Setup Overview ..................................................22 General Setup ....................
SoftWare lIcenSe agreement Read this license carefully. You agree that by using the itemized software package, you have agreed to the software license terms and conditions. This agreement constitutes complete and entire agreement between you and Liquid Controls with respect to this product. license granted hereunder and require return of the Licensed Software if Licensee fails to comply with these license terms and conditions. 1.
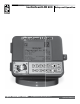
IntroductIon - lcr 600 overvIeW lectrocount lcr 600 overview general InformatIon This manual provides instructions for the initial setup, the calibration, and the operation of the LectroCount LCR 600. The Liquid Controls LectroCount LCR 600 is a microprocessor-based electronic meter register.
IntroductIon - lcr 600 InputS and outputS lectrocount lcr 600 Inputs and outputs The LCR 600 can communicate with a number of components on a Liquid Controls meter system. The following pages provide a brief description of the components, a drawing identifying these components on the meter system, and a list of the LCR 600 commands and fields that correspond to each component. Internal pulSer Typically, an internal pulser is mounted to the bottom of the LCR 600 housing.
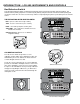
IntroductIon - lcr 600 InStrumentS and controlS red Selector Switch The LCR 600 red selector switch, located at the bottom left of the LectroCount LCR 600, has five positions. The selector switch’s primary purpose is to control everyday delivery and print functions. Functions include opening and closing the control valve in order to start and stop deliveries and prompting the printer to print delivery tickets and shift tickets.
IntroductIon - lcr 600 InStrumentS and controlS alphanumeric Keypad The alphanumeric keypad serves as a navigation and data entry tool for the LCR 600. The four larger buttons on the right side of the keypad are used primarily for navigating to fields on the display screen and navigating from one display screen to the next. The ten smaller buttons on the left side are used to enter numbers, characters, and text when changing the value of a field.
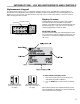
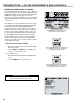
IntroductIon - lcr 600 InStrumentS and controlS lISt box WIndoWS Some LCR 600 fields only have a limited number of possible values. These fields use list box windows to display all of the possible values. To select a value in a list box: 1. Move the pointer to your desired value using the and buttons. 2. Press the EntEr button to accept the value.
IntroductIon - lcr 600 InStrumentS and controlS Text Buttons Navigation Buttons multItap functIonalIty While a field edit box is on the LCR 600 screen, the alphanumeric buttons and the down button can be used to enter characters in the field edit box. The character entered into the field edit box depends on the number of times the button is pressed successively, similar to text messaging on a cell phone.
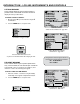
IntroductIon - lcr 600 InStrumentS and controlS navIgatIng from Screen to Screen The LCR 600 contains nine groups of screens: Delivery Setup, General Setup, System Setup, Calibration Setup, Diagnostics, Security, Setup POS, Advanced Features, and Machine Status. Once a group of screens is opened, you can rotate through the screens in the group using the Next/Previous Screen field at the bottom of the screen.
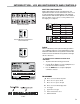
IntroductIon - lcr 600 navIgatIon delivery Screens detailed Pump & Print • aviation • Volume & Preset To navigate to the delivery screens: 1. Set the selector switch to RUN, and the delivery screen will appear and start a delivery. -or- While the selector switch is set to STOP, PRINT, or SHIFT PRINT navigate to the Configuration Menu. 2. Move the pointer to the Next/Previous Screen field and press the nExt or PrEv button.
IntroductIon - lcr 600 navIgatIon poS delivery Screens detailed POs • aviation • Volume & Preset To navigate to the POs delivery screens: 12 1. Set the selector switch to RUN, and the delivery screen will appear and start a delivery. -or- While the selector switch to STOP, PRINT, or SHIFT PRINT and navigate to the Configuration Menu. 2. Move the pointer to the Next/Previous Screen field and press the nExt or PrEv button.
IntroductIon - lcr 600 navIgatIon general Setup Screens System Setup Screens 13
IntroductIon - lcr 600 navIgatIon calibration Setup Screens diagnostics Screen 14
IntroductIon - lcr 600 navIgatIon Security Screen Setup poS Screens 15
IntroductIon - lcr 600 navIgatIon advanced features Screen machine Status Screen printer Status Screen 16
IntroductIon - lcr 600 navIgatIon delivery Status Screen delivery code Screen 17
IntroductIon - SecurIty levels of Security Many fields listed in the LCR 600 screens are accessible only while certain security levels are in place. The security levels provide the safeguards essential for Weights & Measures approval, and they give owners and operators a means of restricting drivers to certain functions. There are five levels of security on the LCR 600: Locked, Unlocked, Weights & Measures Calibration, Stop/Pause, and Factory.
IntroductIon - SecurIty SecurIty date Format: (LB) c-u The format in which the date will be displayed and printed. MM/DD/YY • DD/MM/YY c-u The date according to the selected date format. Enter two digits for the day or month, a backslash, two digits for the month or day, a backslash, and two digits for the year. date: (fE) Calibration #: Display only The number of times the calibration switch position has been used. c-u-l The owner/office password.
IntroductIon - poInt-of-Sale actIvatIon activating the lcr 600 point-of-sale (poS) If you ordered the LCR 600 with the POS upgrade, POS was activated in the Liquid Controls factory before shipment. However, the POS upgrade can also be added to a LCR 600 that was shipped without the POS upgrade. To activate the POs upgrade: 20 1. Navigate to the Advanced Features screen. 2. Call the Liquid Controls inside sales department at 800458-5262 and ask for part number SR600POS. 3.
lcr 600 Setup lcr 600 Setup overview Before using the LCR 600 to deliver fuel, it must be setup to fit its specific application requirements. a complete lcr 600 Setup Should 1. Configure the LCR 600 to all existing input and output components. 2. Calibrate the meter system for Weights and Measures approval. 3. Enter user information and preferences. 4. Enter all data needed to run the LCR 600 POS upgrade (optional).
general Setup c Determines the signal of the calibrated pulse output waveform. Some external components function on rising pulse edges, others on falling pulse edges. Refer to the technical manual of the specific component to determine requirements. Pulse Output edge: (LB) c Determines the frequency of the pulse output per unit of measure sent by the Auxiliary Output 3 on terminal 42 of the J12 terminal block. Common components include external counters and injection systems. The default value is 1.
SyStem Setup SyStem Setup 1 Meter Id: (fE) c The identification number of the meter the LCR 600 is mounted on. If the LCR 600 is installed in a multiple-meter system, it is important this number be unique. The number is printed on the calibration/diagnostic ticket. LC recommends entering the meter’s serial number to ensure identification. LCP Node Address: (fE) c-u Node address used by a host application, like the DMS i1000, to communicate with the LCR 600.
SyStem Setup c Determines if the printer is required to be online and ready to print in order to start a delivery. Most Weights & Measures governed truck applications require a ticket. Ticket Required: (LB) Yes deliveries disabled unless a ticket is in the printer, the previous delivery ticket is completed, and the printer is operational. No deliveries enabled without printer. Tickets will print if the printer is online and has paper.
SyStem Setup delivery Screens detaIled pump & prInt avIatIon delIvery Screen lISt box volume and preSet 26 detaIled poS
calIbratIon Setup preparing for calibration Before the LCR 600 is put into daily operation, the liquid(s) meant to be measured must be defined and proved. The Calibration Setup screens provide the means to do so. The LCR 600 can hold a total of 16 different calibrations. Calibrations must be defined according to type, and they can be named and coded for easy recognition.
calIbratIon Setup compensation types and parameters product vcf type parameter coefficient range ºcelsius/ tbase ºfahrenheit General Linear Linear 0 to 0.003 ºC General Linear Linear 0 to 0.005 API Table 24 Specific Gravity API Table 54 tmin thold Tmax 15 -90 N/A +100 ºF 60 -130 N/A +212 0.5 to 0.550 ºF 60 -50 -50 +140 Density kg/L 0.5 to 0.600 ºC 15 -46 -46 +60 API Table 54B Density kg/m3 653.0 to 1075.
calIbratIon Setup packing the hose If you are proving the meter with a hose and a nozzle, you will want to make sure the hose is packed before beginning the proving delivery. This will ensure the same shut off point at the beginning and end of the delivery. To pack the hose: 1. Turn the selector switch to RUN—do not open the hose nozzle. The display will reset and the solenoid will open the valve, packing the hose. 2. When the display has stopped incrementing, the hose is packed. 3.
calIbratIon Setup approximate k-Factors valueS are for provIng uSe only. not to be uSed aS actual K-factorS. lc meter Size Max Flow rate/Gallon revs / gallon pulses / gallon pulses / litre P 60 12.237 4894.8 1293.11 M/MA 5 60 4.079 1631.6 431.04 M/MA 7/10 150 5.555 2222.0 587.01 M/MA 15/25 300 2.058 823.2 217.47 M 30/40 450 0.742 296.8 78.41 M 60/80 800 0.398 159.2 42.06 MS-75 700 0.255 102.0 26.95 MS-120 1200 0.158 63.2 16.
calIbratIon Setup multi-point calibration proving - continued to prove a meter system to a product with multipoint calibration: 10. Repeat steps 4 through 10 using a new flow rate for the next Point #: until all the points between the lowest flow rate and the maximum flow rate are within 0.25% of each other. 11. Navigate to Calibration Setup 1. Move the pointer to Linearization Mode: and select Applied.
calIbratIon Setup calIbratIon Setup 1 Calibration #: (LB) c-u-l The active calibration of four possible calibrations (16 calibrations possible with POS upgrade). The fields shown on the Calibration Setup 1 screen represent the values of the Calibration # shown. Any edits made to the fields are attributed to the calibration # shown. c-u The code assigned to the active calibration. This code can be used to correspond with an office code.
calIbratIon Setup calIbratIon Setup 2 Calibration #: (LB) c-u-l The active calibration of four possible calibrations (16 calibrations possible with POS upgrade). The fields shown on the Calibration Setup 1 screen represent the values of the Calibration # shown. Any edits made to the fields are attributed to the Calibration # shown. c The type of temperature volume compensation applied to the active Calibration #.
calIbratIon Setup calIbratIon Setup 3 Calibration #: (LB) c-u-l The active calibration of four possible calibrations (16 calibrations possible with POS upgrade). The fields shown on the Calibration Setup 1 screen represent the values of the Calibration # shown. Any edits made to the fields are attributed to the Calibration # shown. c Disables and enables multi-point calibration. Linearization Mode: (LB) Setup disables multi-point calibration during normal deliveries.
poInt-of-Sale Setup point-of-Sale (poS) overview The LCR 600 POS upgrade enables the LCR 600 to deliver fuel and print delivery tickets with prices, taxes, and discounts. At the delivery site, drivers can add miscellaneous charges to the delivery total, make preset deliveries according to price, and print a priced delivery ticket. To do this, prices, discounts, taxes, and charges need to be loaded into the LCR 600. Once these are loaded, they can be combined into “products”.
poInt-of-Sale Setup Tax categories You can setup 16 different tax categories (or tax structures) in the LCR 600 POS. Each tax category has ten blank lines where you can enter taxes and build a tax structure. The LCR 600 will apply a tax as either a percent of the delivery total, a numerical quantity applied per unit delivered, or a percent tax on other taxes.
poInt-of-Sale Setup tax categorIeS Category #: (LB) c-u-l The active tax category number. Enter an unused number to create a new tax category or the number of an existing tax category to edit. Name: (fE) c-u The name or description of the selected tax category. Type: (Tax Type) (fE) c-u The type of tax to apply to the tax value. There are four options: Not Used typically used to erase an existing tax line item. Percent a percentage, the Tax Value, of the delivery subtotal added to the total.
poInt-of-Sale Setup caSh dIScountIng Category #: (LB) c-u-l The active cash discount category number. Enter an unused number to create a new cash discount or the number of an existing cash discount category to edit. Name: (fE) c-u The name or description of the selected cash discount category. discount: Display Only One of three available levels of cash discounts. c-u The maximum number of days after delivery in which the percent or per unit discount is valid.
poInt-of-Sale Setup volume dIScountIng Category #: (LB) c-u-l The active volume discount category number. Enter an unused number to create a new cash discount or an existing volume discount category number to edit. Name: (fE) c-u The name or description of the selected cash discount category. discount: Display Only One of three available levels of volume discounts. c-u The minimum volume necessary to receive the percent or per unit discount.
poInt-of-Sale Setup mISc chargeS Name: (fE) c-u The name or description of the selected cash discount category. (LB) c-u The tax category applied to the miscellaneous charge. Choices include tax categories 1 through 16, no tax, same tax as product. Tax Category: 1 through 16 • None • Same as Product c-u The price per unit of the miscellaneous charge. Unit Price: (fE) Setup poS (creating products) After the tax structures and discounts are entered, you can begin creating products.
poInt-of-Sale Setup Setup poS (creating products) 42
poInt-of-Sale Setup Setup poS Lock discount Categories?: (LB) c-u Allows or prevents access to the Volume discount: and Tax discount: fields in the POS Delivery Setup 1 screen. If NO is selected, the fields default to the values assigned to the product in Setup POS. Lock Price?: (LB) c-u Allows or prevents access to the Price: field in the POS Delivery Setup 1 screen. If NO is selected, the field defaults to the value assigned to the product in Setup POS.
operatIon - overvIeW/maKIng a delIvery operation overview After setting up the LCR 600 to your specifications, the selector switch faceplate must be fastened and sealed before the LCR 600 is ready for everyday use. While the faceplate is on, the calibration position is not accessible.
operatIon - delIvery ScreenS delivery Screens After switching the selector switch to RUN, one of four delivery screens will appear on the screen—Detailed Pump & Print, Volume and Preset, Aviation, and POS Delivery. Most fields in the delivery screens are display only. Without the LCR 600 POS upgrade, the only editable fields are the preset fields. With the POS upgrade, the POS Delivery screen contains editable fields that effect the pricing configuration printed on the delivery ticket.
operatIon - delIvery ScreenS delivery Screens (continued) poS delIvery Product #: (fE) c-u-l The active product number. Select the field to change the product for the next delivery. u-l-p Preset value according to gross volume. This field will be Net Preset when the active product is temperature compensated. See preset directions on pg. 46. Gross Preset: (fE) u-l-p Preset value according to gross volume. See preset directions below.
operatIon - preSet delIverIeS groSS, net, and prIce preSetS The LCR 600 will deliver gross and net presets. LCR 600s with the POS upgrade will deliver price presets as well. If the active calibration is not temperature compensated, the LCR 600 will only deliver gross volume presets. If the active calibration is temperature compensated, both gross and net presets can be delivered (depending on system settings).
operatIon - tIcKetS duplicate delivery tickets To print a duplicate delivery ticket: 1. Press RELEASE on the printer. Insert a blank delivery ticket. 2. Press FORWARD on the printer to engage the ticket. 3. Turn the LCR 600 selector switch to PRINT and then to STOP. 4. When the ticket finishes printing, press RELEASE on the printer. Remove the ticket. 5.
operatIon - delIvery Setup delIvery Setup 1 product & Calibration details C1 PT1 GAS 91 (fE) u-l Gasoline The calibration number, calibration code, calibration name and calibration type of the active calibration Calibration Code: (fE) u - l The code assigned to the active calibration. Often, this code corresponds with an office code. Calibration Name: (fE) u - l The text designation of the active calibration. u Provides four options for handling preset deliveries.
operatIon - delIvery Setup delIvery Setup 2 Calibration details - Display Only The calibration number, calibration code, calibration name and calibration type of the active calibration u Determines when to activate the Auxiliary 1 component. Common Auxiliary 1 components are pump controls, additive injectors, and alarms. The value of this field is unique to each product.
operatIon - delIvery Setup (poS) delIvery Setup 3 (continued) Clear Shift: (LB) u Resets active shift data. Net Totalizer: Display Only Net volume delivered by the LCR 600. Can only be reset in calibration position or with a clear all. Gross Quantity: Display Only Gross volume delivered by the LCR 600. Can only be reset in calibration position or with a clear all.
operatIon - delIvery Setup (poS) delIvery Setup 1 (poS) (continued) Auxiliary 2 Output: (LB) u - l Determines when to activate the Auxiliary 2 component. Common Auxiliary 2 components are pump controls, additive injectors, and alarms. The options include: Off On On during delivery Flow direction activates Auxiliary 2 according to the Flow Direction field on the System Setup 1 screen Toggle Flow Rate: (fE) u - l The flow rate value at which Auxiliary 1 activates in the Toggle Flow Rate: mode.
operatIon - delIvery Setup (poS) delIvery Setup 2 (poS) Delivery Setup screen for LCR 600’s with the POS upgrade Gross Quantity: Display Only The quantity according to gross volume. This field will be Net Quantity when the active product is temperature compensated. See preset directions on pg. 46. Calibration details - Display Only The calibration number, calibration code, calibration name, and calibration type of the active calibration.
dIagnoStIcS and troubleShootIng diagnostics and troubleshooting overview The LCR 600 provides tools for diagnosing and troubleshooting itself as well as other aspects of the meter system. The three main diagnostic tools are error messages, diagnostic and status screens, and diagnostic tickets. Error messages will pop up on the LCR 600 when the register can not continue its current function without an adjustment in the current settings.
dIagnoStIcS - error meSSageS NO FLOW STOP ERROR The no flow timer expired and terminated the delivery. This is not an error condition. See the Delivery Setup 1 to change the no flow timer. POWER FAIL ERROR The delivery ended due to a loss of input voltage. Check the power supply and wiring to the LCR 600. Check the inline fuse. See the troubleshooting section for more information (see page 65). PReSeT eRROR When accessing a preset field, a flash memory error was detected.
dIagnoStIcS dIagnoStIcS Gross Count: Display Only The gross volume of the active delivery. Flow Rate: Display Only The current flow rate of the active delivery. (LB) The unit of flow measurement. Unit of Measure: c Gallons • Litres • Cubic M • Lbs (pounds) • Kgs • Barrels • Other (LB) The time unit of the flow rate. Flow Rate Base: c Per Second • Per Minute • Per Hour Pulser Reversals: Display Only The number of pulser reversal occurrences.
dIagnoStIcS - machIne StatuS machIne StatuS Security: Display Only A description of the active security level. Idle • Unlocked Idle • Delivery Paused • Delivery Active • W&M Idle • Factory Idle Switch: Display Only The position of the selector switch. Run • Stop • Print • Shift Print • Calibrate State: Display Only The current processing activity of the LCR 600.
dIagnoStIcS - prInter StatuS prInter StatuS delivery Ticket? Display Only Has a delivery ticket been requested? Shift Ticket? Display Only Has a shift ticket been requested? diagnostic Ticket? Display Only Has a diagnostic ticket been requested? Pass-Through Print? Display Only Is text from the host in the LCR print buffer? Printer error? Display Only Has an error been detected with the printer? Printer Busy? Display Only Has the print processor began to print a ticket? 58
dIagnoStIcS - delIvery StatuS delIvery StatuS ROM Check Sum? Display Only Has a delivery not started due to the checksum of the LectroCount program code space failing? Temperature? Display Only Has the current delivery not started (or was terminated) due to an error with the temperature reading hardware? Watchdog? Display Only Was the processor reset due to a LectroCount watchdog time out error? VCF Setup? Display Only Was there an error setting up the volume compensation factor for the current product?
dIagnoStIcS - delIvery code delIvery code delivery Ticket? Display Only Is a delivery ticket is pending? A new delivery cannot be started until this field is cleared by successfully printing the last delivery ticket.
dIagnoStIcS - dIagnoStIc tIcKet diagnostic Tickets and error Message examples To print a diagnostic ticket: 1. Press RELEASE on the printer. Insert a blank delivery ticket. 2. Press FORWARD on the printer to engage the ticket. 3. Turn the LCR 600 selector switch to SHIFT PRINT for less than 2 seconds and turn the switch to PRINT. 4. When the ticket finishes printing, press RELEASE on the printer. Remove the ticket. 5.
troubleShootIng troubleshooting the lcr 600 The troubleshooting section of this manual covers the common problem situations. Call your local authorized Liquid Controls service provider or the Liquid Controls electronics service department if the troubleshooting section does not address the situation. When troubleshooting the Lcr 600 follow these guidelines: • Check for proper operating voltages before changing the circuit board.
troubleShootIng problem “power failure” appears diagnostic ticket or LCR 600 shuts down unexpectedly. Epson printer release light flashes. no power indicator lights to the Epson printer. “temperature Error” appears on diagnostic ticket or on the LCR 600. probable cauSe SolutIon 1. Power to LCR 600 interrupted during delivery. 1. Check accessory power cable for damage. Ensure that the power, common and ground wires (11, 12 and 13) on power connector J6 are secure. 2. Static discharge. 2.
troubleShootIng problem “pulser failure” appears on the diagnostic ticket or on the LCR 600 display. probable cauSe 1. Missing pulse counts. SolutIon 1. 2. Excessive reversals. Using a multimeter, measure the following DC voltages on terminal block J8, while J8 is connected to the circuit board. Use terminal 37 as ground reference. TERMINAL # J8 #32 Pulser faults generally occur in a high vibration environment. Liquid Controls is not responsible 2.
troubleShootIng problem valve will not open. probable cauSe 1. Solenoids are inactive or inoperative. 2. Foreign debris in system. SolutIon 1. Insert a delivery ticket into the Epson printer and start a delivery. 2. Move the selector switch from RUN to STOP and back to RUN. Listen for an audible clicking sound from the solenoids. 3. If there is an audible click from the solenoid (but still no flow), this may be an indication of a mechanical problem with the main valve or its associated components.
lcr 600 InputS and outputS lectrocount lcr 600 fields for Inputs/outputs Input/output component related Settings and fields Temperature Offset: Temperature Offset: System Setup 2 Compensation Type: Delivery Ticket - Shift Ticket Compensation Parameter: Delivery Ticket - Shift Ticket Base Temperature: Delivery Ticket - Shift Ticket Net Preset: Gross Preset: Price Preset: S1 SOLenOiD Calibration Setup 1 S1 Close: Delivery - Delivery Setup 1 Calibration Setup 1 S1 Close: S3 SOLenOiD No Related Field
lcr 600 InputS and outputS lectrocount lcr 600 fields for Inputs/outputs Input/output component related Settings and fields Product #: Delivery Ticket -Shift Ticket Code: (Product) Delivery Ticket -Shift Ticket Name: (Product) Delivery Ticket -Shift Ticket Net Totalizer: Shift Ticket Gross Totalizer: Shift Ticket Price/Unit: Printer The type(s) of ticket that prints the field value is indicated to the right of the field.
105 Albrecht Drive Lake Bluff, IL 60044-2242 1.800.458.5262 • 847.295.1050 Fax: 847.295.1057 www.lcmeter.com © 2010 Liquid Controls pub. no.