
User's Manual

The Lite-On Door Sensor (CHS-888) can be easily installed on a door,
window cabinet, garage door or anywhere that can be opened.
Before Installation
Activate Battery
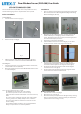
1. Press the release catch on top (g.1).
2. Remove the top case (g.2).
3. Pull the plastic tab o to activate the sensor (g. 3). The door
sensor will start to scan for the network and ash LED 3 times.
Pair & Register
1. Follow the instructions on your Touchstone Hub or Touchscreen,
to add new Door Sensor (CHS-888).
2. During the pairing mode, the status LED will ash until the sensor
is connected. (g. 4)
Notes: A scan is performed every 5 seconds.
The LED ashes 3 times when each scan is initiated.
The sensor sleeps between scans to conserve battery.
If after 20 scans a network is not found, the sensor enters into sleep
mode.
The sensor resumes scanning the next time a zone status change
occurs (e.g. fault, restore, tamper, tamper restore, test button
pressed, etc.) This allows user interaction to cause the sensor to
resume scanning.
If you still have problems to pair the sensor, you may follow the
factory reset procedure to reset to factory defaults.
Installation
1. There are four key parts inside the pack. Starting from left to right:
Door Sensor, Door Sensor Mounting Bracket, Magnet Mounting
Bracket and Magnet. (Photo 3)
2. Depending on the installation location, you may decide to use
double-sided tape or self-tapping screws to install the door
sensor. The tamper hole on the rear case (red circle in g. 6) must
be screwed in for tamper protection.
3. Test the door sensor before installation
4. If the installation locations are not level (g. 6), you can add a
bracket to the door sensor or the magnet to rectify this.
5. The sensor has an alignment mark on one side of the case
indicating where the magnetic switch is located. The magnet
should be mounted adjacent to the magnetic switch (g. 8)
6. The distance between the magnetic switch and the magnet
should be less than 1.25” (g. 8).
7. The movement of the magnet away from the magnetic switch
causes the zone to fault or sets o the alarm.
Battery replacement
1. Press the release catch on top (g. 1)
2. Remove the case cover (g. 2)
3. Remove the battery and replace with a CR2 type battery ensuring
that you orient the battery so that the positive pole matches the
positive mark on the case. (gs. 9 & 10)
Door Window Sensor (CHS-888) User Guide
g. 1
g. 3
g. 5 g. 6
g. 7 g. 8
g. 9 g. 10
g. 2
g. 4