
User Manual


Silitek Coorperation
Confidential
SM-2065 6 9
plugging.
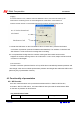
b. Run the bind AP on PC, it shall be under the WIN2000 or above, the screen will shown up the
“bind window” as following shown .in which will appear the “initial value” of the numbers of
wireless and sub channel. It means USB enumerated successfully and being ready for bind
c. Activate the bind button on the “bind window” above. At same time, press the bind button
on the back of presenter (Assume the batteries was installed). The numbers of “wireless” and
“Sub Channel” will be a various for scaning that is in binding.
d. It is completed the binding when the numbers scaning are fast to settle at some value.
Suppose the numbers scaning return to be “initial value” or over 10 sec,maybe it fail to bind and
we have to re-bind again.
*Auto-Connection:
The radio connection (wireless function on line) will be done automatically between presenter and
nano-dongle when we turn ON the product both presenter and dongle also enable the HID function
(Stoke any Key of presentation function).
4.2 Functionality of presentation
4.2.1 HID function
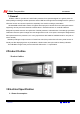
There are overall 9 buttons on the presenter that 6 buttons SW1~.SW6 for HID function,
one button SW7 for LCD control , one button SW8 for laser point and the other buttons SW9
on the back of presenter for bind function.
Key Code/Function Table:
No. Key name HID Usage ID / function
Bind button of AP
N
o. of wireless channel and
sub-channel