HP Smart Wi-Fi Display User Manual Revision 0.
FCC Compliance Statement..........................................................4 What’s in the Box......................................................................5 Getting Started .........................................................................6 Remote Control .........................................................................7 Description of Buttons ............................................8 General Navigation ............................................ 10 Rotating Pictures ....
Managing your www.hpframe.com Account ..............28 Online Services..................................................29 Recent Updates ..................................................33 Streaming Media from your PC to your HP Smart Wi-Fi Display ...........34 Enabling Windows Media Player 11 UPnP.................34 Connecting your HP Smart-WiFi Display to your Computer with the USB Cable ..................................................................................
FCC Compliance Statement Note: This equipment has been tested and found to comply with the limits for a Class B digital device, pursuant to Part 15 of the FCC Rules. These limits are designed to provide reasonable protection against harmful interference in a residential installation. This equipment generates, uses, and can radiate radio frequency energy and, if not installed and used in accordance with the instructions, may cause harmful interference to radio communications.
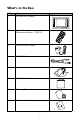
What’s in the Box Qty 1 Item HP Smart Wi-Fi Display Image 1 Remote Control (Replacement Battery = CR2025) 1 Universal Power Adapter 1 USB 2.
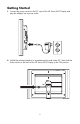
Getting Started 1. Connect the power cord into the DC input of the HP Smart Wi-Fi Display and plug the adapter into a power outlet. 2. Unfold the attached stand to its extended position and rotate 90°, then slide the Power switch on the back of the HP Smart Wi-Fi Display to the ON position.
Remote Control Before you start, pull the tab from the remote control to activate it. Note: If a replacement battery is required, purchase battery #CR2025.
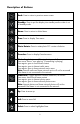
Description of Buttons Back: Press to return to previous menu screen. Standby: Press to put the display into standby mode or take it out of standby mode. Home: Press to return to Main Menu. Time: Press to display Time menu. Photo Rotate: Press to rotate photo 90° counter clockwise. Favorites: Press to display Favorites menu. Music: Toggles between different selections, as follows.
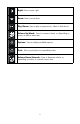
Right: Press to move right. Down: Press to move down. Play/Pause: Press to play or pause music, video or slide shows. Volume Up/Mark: Press to increase volume, or, depending on screen, to mark a menu item. Options: Press to display available options. Print: Press to print photo to compatible printer. Volume Down/Unmark: Press to decrease volume, or, depending on screen, to unmark a menu item.
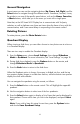
General Navigation In most cases you can use the navigation buttons (Up, Down, Left, Right) and the Select button to navigate through the different menus. Sometimes, however, it may be quicker to use one of the specific menu buttons, such as the Home, Favorites, or Music buttons, which take you to the menu you want with a single press. Note that, as the HP Smart Wi-Fi Display has to communicate with 3rd party websites, as well as hpframe.
Single Display By default, the HP Smart Wi-Fi Display will show photos in Single display mode, meaning that the slide show will display one photo at a time. If you have changed to Quadrant display and would now like to return to viewing one photo at a time, then you can return to Single display. There are two ways to enable Single display: 1. From the Setup menu, choose Local Settings, then change Slideshow Mode to Single. For more information, see “Local Settings” on page 18. 2.
Picture Frame Top View Slideshow Back Up Select Down Play/Pause Left Side Remote control holder 12
Right Side CF Card Slot MS/SD/MMC/xD Card Slot USB connector Mini-USB connector Power Input Headphone jack Back Stand Power switch 13
Initial Frame Setup The following instructions are shown using the remote control unit. Some of these functions can also be accessed via the control keys located on the back of the HP Smart Wi-Fi Display. Clock Info The date and time are automatically set when your HP Smart Wi-Fi Display connects to the Internet. The time zone, and daylight savings options are derived from the ZIP Code that you enter when setting up your www.hpframe.com account. You can also manually adjust the time.
Note: Alternatively, you can configure your HP Smart Wi-Fi Display using Windows Connect Now (WCN) technology. To do so, run the Wireless Network Configuration Wizard on your computer and insert the WCN USB flash disk into the HP Smart Wi-Fi Display once the wizard is complete. For more information on running the Wireless Network Configuration Wizard on your computer, see “Running the Wireless Network Configuration Wizard on your Computer (optional)” on page 16. 6.
Running the Wireless Network Configuration Wizard on your Computer (optional) As an alternative to manually entering Wi-Fi details into your HP Smart Wi-Fi Display, you can use the Wireless Network Configuration Wizard on your computer. Windows XP (Service Pack 2 or later) 1. On your computer, click Start > Control Panel 2. Double-click Wireless Network Setup Wizard. 3. The Wireless Network Setup Wizard begins. Click Next. 4.
Windows Vista 1. On your computer, click Start > Network. The Network folder opens. 2. Click Add a wireless device. The Add a wireless device to the Network screen is displayed. 3. Click I want to add a wireless device or computer that is not on the list, using a USB flash drive. 4. Click Add the device or computer using a USB flash drive. 5. From the list that appears, select your network name (SSID), then click Next. 6.
Local Settings The Local Settings menu lets you configure various settings on your HP Smart WiFi Display. From the Setup menu, navigate to Local Settings and press the Select button. The following options are displayed. Use the navigation buttons to highlight the option you wish to change, then use the Select button to change the setting. • Set Wake/Sleep/Alarm - Set the wake time, sleep time, or alarm. See “Setting Wake/Sleep/Alarm times” on page 21 for more information.
Description of Main Menu The Main Menu can be accessed by pressing the Home button on the remote control. To navigate through the menu, use the directional buttons on the remote control, then press the Select button to choose the highlighted item. The Main Menu has six main icons: Frame Content, Internet Content, Home Network, Favorites, Time, and Setup.
sites or gadgets like the weather forecast. Any time you change this list online, the Internet Content list will automatically update soon after. Navigate to the item you are interested in and then press the Select button. Home Network Home Network refers to the computers or home servers on the same network as your HP Smart Wi-Fi Display that are set up to share photos, music and video with your device.
Time The Time menu lists several time and date options. Automatically setting the date and time By default, when you connect to the Internet, your HP Smart Wi-Fi Display configures the time and date according to the ZIP Code that you entered when you set up your www.hpframe.com account. Manually setting the date and time To adjust the date or time manually, select Set Date/Time from the Clock menu. Use the navigation buttons and Select to change the values.
Viewing Photos Photo/Picture Slide Show Slide show modes Slide show mode will begin automatically a few seconds after the HP Smart Wi-Fi Display is powered on if an external memory card/USB flash drive is inserted. If more than one memory card or USB flash disk is inserted, then the contents of the most recently inserted one will be shown. There are two slide show modes, one with background music and the other without.
Printing a Photo You can print a photo to any PictBridge-compatible printer. First make sure that you have connected a PictBridge-compatible printer to your HP Smart Wi-Fi display using the supplied USB to mini-USB connector. The USB connector should be attached to the printer, and the mini-USB connector should be attached to your HP Smart Wi-Fi Display. Note: Make sure that USB Mode is set to Printer, according to the instructions in “Local Settings” on page 18.
Configuring Access to Online Content The HP Smart Wi-Fi Display can stream media from the Internet, including photos from various photo hosting sites, video from YouTube, music from Internet radio, the weather, or Tweets from Twitter. Setting Up your www.hpframe.com Account To view Internet content on your HP Smart Wi-Fi Display, you must first set up an account via the http://www.hpframe.com website, as follows: 1. On your computer, go to http://www.hpframe.com.
2. Click Set up your display now to proceed. You will now see the following screen: 3. Click to continue. 4. The following screen appears: 5. Fill in the required information and click to continue. Note: One item you will need to enter on this page is the Frame Authorization Code. This is displayed when you complete the Setup Wizard on your HP Smart Wi-Fi Display.
more details. If you have misplaced this code, then you can go to Setup > System Information to see it again. Also note that the authorization code changes over time, or if you go through the Setup Wizard again, so it is worth checking System Information to make sure that you have the latest code. 6. The following screen appears: 7. To send photos from your cell phone to your HP Smart Wi-Fi Display enter your cell phone number. If you do not wish to use this feature, leave it blank. 8.
9. Choose the online photo sharing services you use and would like to view on your HP Smart Wi-Fi Display. You can change this list after your www.hpframe.com account is set up. 10. Click to continue. Your www.hpframe.com account is now set up. Adding Another Frame to your www.hpframe.com Account You can set up more than one HP Smart Wi-Fi Display on the same www.hpframe.com account.
Managing your www.hpframe.com Account You can manage your www.hpframe.com account via a computer at any time by going to http://www.myframemanager.com and logging in using the user name and password you specified when setting up your www.hpframe.com account. Once logged in, you will see a screen similar to the following: In the upper portion of the screen, you will see which services you have already selected.
Online Services Music Skins To customize the look of the music player on your HP Smart Wi-Fi Display, click on Music Skins in your www.hpframe.com account. You will see various different styles available. Click add below the one you prefer and in a few moments the look of your HP Smart Wi-Fi Display’s music player will be updated. Note that you can only choose one skin at a time, but you can change it as often as you need.
3. To add a station, simply click add beside the station(s) you like. The station(s) will be added to the playlist on the right of the screen, and a few moments later the list of radio stations will be updated on your HP Smart Wi-Fi Display. Note: To listen to Internet radio on your HP Smart Wi-Fi Display navigate to Internet Content > Radio. Internet Video (YouTube) If you have an account with YouTube, you can stream videos to your HP Smart Wi-Fi Display, as follows: 1.
Allowing specific cell phones to send you pictures You can receive pictures from specific cell phones on your HP Smart Wi-Fi Display. To set up the SMS/MMS photo service, click the SMS/MMS Photos icon in your www.hpframe.com account, as shown below: You will then see the following screen: Enter the cell phone number of the cell phone you wish to have permission to send photos to your HP Smart Wi-Fi Display, choose the cell phone provider from the pull-down selection, and click Add.
Internet Gadgets You can add gadgets, such as the weather, to your HP Smart Wi-Fi Display. Weather Gadget To set up the weather gadget, click the Weather icon in your www.hpframe.com account, as shown below: You can enter up to three ZIP Codes and choose whether to display temperatures in Fahrenheit or Celcius. To view the Weather gadget on your HP Smart Wi-Fi Display, navigate to Internet Content > Gadgets > Weather.
Twitter If you have an account with Twitter, you can stream Tweets to your HP Smart Wi-Fi Display, as follows: 1. Ensure that you have added Twitter to your list of enabled services (see “Managing your www.hpframe.com Account” on page 28 for more information). 2. Once the Twitter service appears in your list of enabled services, click on its icon, which is shown below: 3. On the page which appears, log into your Twitter account and click Allow to allow access.
Streaming Media from your PC to your HP Smart Wi-Fi Display Your HP Smart Wi-Fi Display can play the media files (photos, music, and video) stored on your PC or network attached storage device. The HP Smart Wi-Fi Display uses the Universal Plug and Play (UPnP) A/V streaming protocol to automatically find your PCs and servers, and will coordinate the streaming process between your PC/server and the HP Smart Wi-Fi Display.
In Windows Media Player 11, select Tools from the menu bar and then select Options from the Tools menu. Note: If the menu bar is not visible, right-click on a blank area of the options menu and choose Tools, then Options from there. options menu Select the Library tab Select Configure Sharing Select the Library tab and then select Configure Sharing. If this is the first time that you have used this option, the following screen should be displayed when you select Configure Settings.
Click to place a checkmark next to Share my media, then click OK. You will now see the following screen. Note: If Windows Media Player has detected the HP Smart Wi-Fi Display, it may list it as an unknown device. Select Settings You may have to select the device and then click the Allow button on the screen Selecting Settings from the above screen will then open up the Default Settings for Windows Media Player 11. Selecting this box will enable Windows Media Player to share media with all new devices.
If you have multiple HP Smart Wi-Fi Display devices, you can enable Windows Media Player 11 to automatically share the music with all of them or you can enable it to share the music individually. If you select the Allow new devices... tab, the following message will be displayed. Click Yes. Your HP Smart Wi-Fi Display will now discover the photos in the Home Network menu.
Connecting your HP Smart-WiFi Display to your Computer with the USB Cable You can connect your HP Smart Wi-Fi Display to your computer with the mini-USB to USB cable, as follows. 1. Ensure that the HP Smart Wi-Fi Display is correctly configured for PC connection by going to Setup > Local Settings > USB Mode, and setting it to PC. For more information on this setting, see “Local Settings” on page 18. 2. Connect the mini-USB end of the cable to the mini-USB connector on the HP Smart Wi-Fi Display. 3.
Resetting the Frame You can reset your HP Smart Wi-Fi Display to factory default settings, as follows: 1. From the Main Menu, navigate to Setup and press the Select button. 2. Navigate to Factory Defaults and press the Select button. 3. You will be asked to confirm that you want to reset your HP Smart Wi-Fi Display. Select Yes. 4. The frame will reboot once it is reset. WARNING: Setting your HP Smart Wi-Fi Display to factory default settings will delete all media files on the internal memory.
Cleaning and Care Tips Please power off the HP Smart Wi-Fi Display before cleaning. DO NOT push on the screen too firmly. DO NOT spray or pour liquid cleaning agents directly on the screen or frame. DO NOT use ammonia, alcohol, or abrasive detergent cleaning agents. Cleaning the screen 1. Wipe screen with a clean, soft, lint-free cloth to remove dust and loose particles. 2.
charges when shipping the product to the service center. The service agent will provide you with an address and you will also be responsible for any shipping charges to the warranty service center. Once your product is received by this service center, a replacement unit will be shipped back to you typically within 5 business days. Email Support: Language Dutch Chinese English Français Deutsch Italiano Japanese Korean Portuguese Español Svenska Email Address hollands@hpodd.com simp.chinese@hpodd.com trad.
Specifications Panel Specification Size Aspect ratio Resolution Contrast ratio Power External Power Adapter Audio Internal speakers External headphone/speaker connector Connectivity USB Ports Storage/Media Internal memory Memory cards supported: CF – CompactFlash® MS – Memory Stick Pro™ MMC – MultiMedia Card SDTM – Secure Digital SDHC™ – High Capacity Secure Digital xD – xD Picture Card™ Memory cards slot 1 Memory cards slot 2 Media Files Supported: Video file formats Photo file formats Audio file formats U
Frequently Asked Questions Question How far away can I use the remote control? Why can’t I display some of my Photos? Answer 2.5 meters Some photo/image file formats are not supported. Please refer to the specifications. Some music file formats are not supported. Please refer to the specifications. Some video file formats are not supported. Please refer to the specifications. Yes, you can. With the photo file name highlighted, press the Options button on the remote, and choose Delete Photo.
Some .DB and .BAK files have appeared on the memory card I inserted into my HP Smart Wi-Fi Display that weren’t there previously. What are these? When you insert a memory card or USB flash drive into your HP Smart Wi-Fi Display, it will create database (.DB) files and backup database files (.BAK). These are nothing to be worried about and should not be deleted. However, if they are deleted by accident, don’t worry. The HP Smart Wi-Fi Display will simply recreate them next time.
Troubleshooting I can’t switch my HP Smart Wi-Fi Display on The power supply may not be correctly connected. Ensure that it is connected to a working power outlet, and that the other end is connected to the DC-in connector on the HP Smart Wi-Fi Display. The HP Smart Wi-Fi Display power switch might be in the off position. Ensure that this switch is in the on position.
My wireless network doesn’t appear on the list of available networks The wireless network access point may not be working correctly or may not be properly configured. Ensure that other devices can connect to the network to rule out this possibility. The signal from the wireless network may not be strong enough. Try moving the location of the access point or the HP Smart Wi-Fi Display for better signal reception. Your network’s SSID may not be broadcasting.
The frame sometimes has delays when responding to remote control buttons The HP Smart Wi-Fi Display has to communicate with 3rd party websites as well as hpframe.com. There are times when the frame is busy with this communication, and it can cause delays in responding to the remote control.
RF exposure warning · This equipment must be installed and operated in accordance with provided instructions and the antenna(s) used for this transmitter must be installed to provide a separation distance of at least 20 cm from all persons and must not be co-located or operating in conjunction with any other antenna or transmitter. End-users and installers must be provide with antenna installation instructions and transmitter operating conditions for satisfying RF exposure compliance.