
Installation Sheet


1
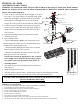
Mounting bracket
2
Mounting screws
Canopy
7
Retaining screw
6
Wire connections
Rod 4
Rod 3
Rod 2
Rod 1
3
Rods
4
Swivel
5
Nut & washer
11
Nuts securing the shade
8
G9 Bulbs 5x50W
10
Metal shade
Crystal C
Crystal E
Crystal G
9
Crystal
ITEM NO.: EL-10104
ASSEMBLY INSTRUCTIONS:
WARNING: TO AVOID THE RISK OF ELECTRICAL SHOCK, BE SURE TO TURN OFF MAIN POWER
PRIOR TO INSTALLATION. PLEASE READ THOROUGHLY. CAREFULLY UNPACK THIS LAMP AND
PLACE ON A SOFT SURFACE.
1. There are 8pcs of rods (3) with different length (16”L*4pcs +
10”L*2pcs + 6”L*2pcs). Before you install the lamp please
choose the rod length to determine height for your lamp.
Then feed the cord through the rods (3), swivel (4) &
canopy. All rods (3) may not be used based on ceiling height.
2. Connect the rods (3) together, then screw the rods (3) &
Swivel (4) onto canopy and secure with nut & washer (5)
using wrench (not included). Screw the rods to the other
side of fixture.
3. Fasten the mounting bracket (1) to junction box with
mounting screw (2).
4. Wire Connections (6):
--- Attach GROUND(or GREEN) wire from fixture to the
House Ground wire with a wire nut. (Or attach them to the
Crossbar with a green ground screw)
---Attach neutral(or WHITE) wire from fixture to neutral
Wire from power source with a wire nut.
---Attach live(or BLACK) wire from fixture to live wire
From power source with a wire nut.
NOTE: Never connect the ground wire to live or neutral
power supply wire.
If outlet box does not have ground
wire, please
connect the ground wire from fixture to
mounting bracket.
5. Attach the canopy to the mounting bracket (1) and secure
with screw (7).
6. Install bulb (8) into the socket.
7. Attach crystals (9) onto the fixture. Following the sequence on the diagram provided.
8. Place shade (10) on fixture surrounding the socket and secure with nut (11).
Important instructions pertaining to a risk of fire, electric shock or injury.
WARNING - Lit lamp is HOT:
1. To reduce the risk of FIRE, ELECTRIC SHOCK OR INJURY TO PERSONS,
turn off/unplug and allow to cool before replacing bulb.
2. Bulb gets HOT quickly! Touch only switch/plug when turning on.
3. Do not touch hot lens, guard, or enclosure.
4. Do not remain in light if skin feels warm.
5. Do not look directly at lit lamp.
6. Keep lamp away from materials that may burn.
7. Do not touch the bulb at any time. Use a soft cloth. Oil from skin may damage bulb.
8. Do not operate the unit with a missing or damaged guard, bulb containment barrier or UV light filter.
USE 10PCS 50W (MAXIMUM) HALOGEN G9 TYPE BULB. (BULBS INCLUDED)
TWO EXTRA BULBS INCLUDED.
14PCS
36PCS
44PCS