LED Volumetric Retrofit Installation Instructions For 2’x2’, and 2’x4’ LED Volumetric Retrofits (VR Series) PLEASE READ THESE INSTRUCTIONS BEFORE INSTALLATION
INTRODUCTION The LED Volumetric Retrofit fits in place of your existing troffer lens/diffuser providing an even surface of light and allowing you to upgrade to cost effective LED technology. The two piece design combines a frame and the lighting panel. The robust frame fits onto the ceiling grid and creates a stable insert. The LED Volumetric Retrofit is latched onto the frame and swung into final position. The LED lighting panel fits inside most existing troffers.
WHAT COMES IN THE BOX LED Volumetric Retrofit base product comes with following standard parts: Stationary Mounting Tabs (1) Mounting Frame Rotating Mounting Cams Cord with Mated Wago Connectors Green / Ground Wire Purple Grey Panel Hangers Seismic Safety Cable Driver (1) LED Volumetric Retrofit Rotating Panel Hooks Seismic Safety Cable LED Volumetric Retrofit Installation Instructions For 2’x2’, and 2’x4’ LED Volumetric Retrofits (VR Series) PLEASE READ THESE INSTRUCTIONS BEFORE INSTALLATION (1)
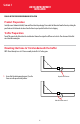
Section 1 LED VOLUMETRIC RETROFIT INSTALLATION READ ALL INSTRUCTIONS BEFORE BEGINNING INSTALLATION Product Preparation Carefully remove Volumetric Retrofit, Frame and Driver from the packaging. Disassemble the Volumetric from the frame by rotating the panel hooks on the Volumetric to release from the frame. Inspect product for defects due to shipping. Troffer Preparation Turn off the power to the fixture from the circuit breaker. Remove the original lens/diffuser and set aside.
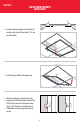
Section 1 LED VOLUMETRIC RETROFIT INSTALLATION 2. Locate the stationary mounting tabs on the frame (2). Insert these tabs, on top of the grid ceiling “T” rail, and beneath the troffer. 3. Push the frame up and flush on the opposite side. 4. Rotate the mounting cams on the frame (2) to the engaged position. The mounting cams should be flush to the T-rail grid cams and be resting on top of drop ceiling “T” grid. The frame is now installed.
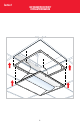
Section 1 LED VOLUMETRIC RETROFIT INSTALLATION Mounting the LED Volumetric Retrofit to the Mounting Frame: Cord with Mated Wago Connectors 5. Locate the two panel hanger slots on the installed frame. Panel Hangers 6. Locate the two panel hangers on the side edge of the Volumetric Retrofit (one shown) opposite the panel hooks. 7. Insert the panel hangers into the frame details, (anglein and center). This will allow the panel to hang freely, and facilitate electrical hook-ups.
Section 1 8. LED VOLUMETRIC RETROFIT INSTALLATION Attach the two provided seismic safety cables from the lamp to the troffer using self-tapping screws as needed. Screw tabs on other end of cables to inside of troffer. Note: The seismic safety cables come pre-attached to the lamp. Attach the other end to the troffer, not the frame. 9. From the incoming electrical line, insert stripped wires Cord with Mated Wago Connectors into the male disconnect. Connect ground wire (shown on page 3) to troffer.
Section 1 LED VOLUMETRIC RETROFIT INSTALLATION 12. Rotate the LED Volumetric Retrofit up so it is even with the ceiling. Rotate or engage the hooks (2) so that they engage the frame cross bars. Panel should be flush to ceiling. 13. Restore power. The LED Volumetric Retrofit installation is now complete. KEEP THIS MANUAL FOR FUTURE REFERENCE.
Section 1 LED VOLUMETRIC RETROFIT INSTALLATION DIAGRAM 9
NOTES 10
NOTES 11
Thank you for choosing 6969 W. 73rd Street Bedford Park, IL 60638 WWW.LITETRONICS.COM CustomerService@Litetronics.