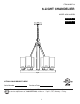
ITEM #1055719 6-LIGHT CHANDELIER MODEL #CH18-6BZW français p. 11 español p. 21 ATTACH YOUR RECEIPT HERE Serial Number Purchase Date E342246 Questions, problems, missing parts? Before returning to your retailer, call our customer service department at 1-800-527-1292, 8:30 a.m. - 5 p.m., CST, Monday - Friday.
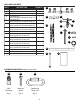
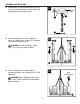
PACKAGE CONTENTS PART A B C D E F G H I J K L M N O DESCRIPTION QUANTITY Fixture 1 Canopy 1 Mounting Strap 1 Threaded Rod 1 (preassembled to Mounting Strap (C)) Threaded Ring 1 (preassembled to Threaded Rod (D)) Screw Collar Loop 1 (preassembled to Threaded Rod (D)) Hex Nut 2 (preassembled to Threaded Rod (D)) Chain 1 Column 1 (preassembled to Fixture (A)) Socket Ring 6 (preassembled to Fixture (A)) Small Metal Ring 1 (preassembled to Fixture (A)) Fixture Loop 1 (preassembled to Fixture (A)) Metal Band 1
SAFETY INFORMATION READ AND SAVE THESE INSTRUCTIONS. DANGER • For your protection and safety, carefully read and understand the information provided in this manual completely before attempting to assemble, install or operate this product. Failure to do so could lead to electrical shock, fire or other injuries that could be hazardous or even fatal. • DO NOT connect this fixture to an electrical system that does not provide a means for equipment grounding.
PREPARATION Before beginning assembly of product, make sure all parts are present. Compare parts with package contents list and hardware contents list. If any part is missing or damaged, do not attempt to assemble the product.
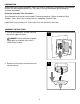
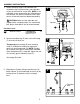
ASSEMBLY INSTRUCTIONS 3. Attach mounting strap (C) to outlet box (not included) using existing washers and outlet box screws or the machine screws (BB). NOTE: If the outlet box screws required for your outlet box are of a different size than the machine screws (BB), consult a licensed electrician before proceeding. 34 Outlet Box CAUTION: Make sure the outlet box can support 35 lbs. hanging weight. Use metal outlet box; plastic outlet boxes are not recommended.
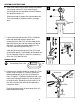
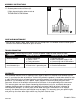
ASSEMBLY INSTRUCTIONS 6. Slide small metal ring (K) down wiring to threaded rod at top of column (I). Small metal ring (K) should slide over the threaded rod until it touches the top of the column (I). 64 L K Slide fixture loop (L) down wiring to threaded rod. Turn fixture loop (L) clockwise until it no longer turns. Threaded Rod I 7. Locate connecting chain links (CC) in hardware pack and open both of them.
ASSEMBLY INSTRUCTIONS 9a. Raise metal band (M) to fixture (A), making sure to align each tab on inside of metal band (M) with one of the spokes on the fixture (A). 9a 4 I A Tab M 9b. Secure metal band (M) with the three metal strap supports (N). Take one metal strap support (N) and attach to hook on the inside of the metal band (M). Then, align the metal strap support (N) with the hook at the top of the column (I) and attach. 9b 4 Hook N N Repeat for the other two metal strap supports (N).
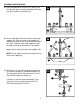
ASSEMBLY INSTRUCTIONS 11. Feed wiring up through hole at bottom of threaded rod (D). Gently push wiring until it comes through top of threaded rod (D). Pull all wiring until there is no extra slack left in the wires running through the chain (H). 11 Outlet Box Prepare wires from outlet box by stripping 3/4 in. of insulation from wire ends using wire strippers (not included). D Wiring H 12. Connect SMOOTH wire from fixture (A) to BLACK wire from outlet box using wire connector (AA).
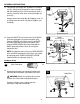
ASSEMBLY INSTRUCTIONS 14. Slide canopy (B) and threaded ring (E) up the chain (H) to the outlet box. Secure canopy (B) by tightening the threaded ring (E). 14 Outlet Box E B H I 15. Remove socket rings (J) from sockets of fixture (A). Attach glass shades (O) to sockets, securing with socket rings (J). 15 WARNING: Do not overtighten socket rings (J) as glass may crack or break. J J O O A 16. Install six 60-watt max. standard-base incandescent bulbs (not included) or CFL/LED equivalent.
ASSEMBLY INSTRUCTIONS 17. Restore power and test fixture (A). 17 If lights do not function, please refer to TROUBLESHOOTING below. A CARE AND MAINTENANCE • Shut off main power supply. Wipe fixture with soft, damp cloth. Use window cleaner to clean glass. Do not use an abrasive cleaner on glass or fixture. TROUBLESHOOTING WARNING: Before beginning work, shut off the power supply to avoid electrical shock. PROBLEM Bulb will not light. Fuse blows out or circuit breaker trips. POSSIBLE CAUSE 1.