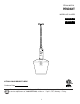
ITEM #1055722 PENDANT MODEL #CP19-1BZB Français p. 10 Español p. 19 ATTACH YOUR RECEIPT HERE Purchase Date Questions, problems, missing parts? Before returning to your retailer, call our customer service department at 1-800-527-1292, 8:30 a.m. - 5 p.m., CST, Monday - Friday.
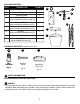
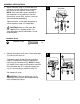
PACKAGE CONTENTS PART A DESCRIPTION Fixture QUANTITY 1 B Canopy 1 C Mounting Strap Threaded Rod (preassembled to mounting strap (C)) 1 E Threaded Ring (preassembled to threaded rod (D)) Screw Collar Loop (preassembled to threaded rod (D)) Hex Nut (preassembled to threaded rod (D)) 1 G C G D E 1 D F A F H 1 B 1 H Chain 1 I Glass Shade (preassembled to fixture (A)) 1 I HARDWARE CONTENTS (shown actual size) AA BB Wire Connector Machine Screw Qty. 3 Qty.
SAFETY INFORMATION • DO NOT connect this fixture to an electrical system that does not provide a means for equipment grounding. Never use a fixture in a two-wire system that is not grounded. Installing a fixture into an electrical system not having a proper grounding means could cause metal parts of the fixture to carry electrical currents if any of the fixture wires, wire connections or splices were to become broken, cut or loose during the mounting or normal operation of the fixture.
PREPARATION Before beginning assembly of product, make sure all parts are present. Compare parts with package contents list and hardware contents list. If any part is missing or damaged, do not attempt to install, operate or assemble the product.
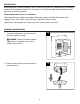
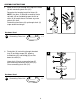
ASSEMBLY INSTRUCTIONS 3. Attach mounting strap (C) to outlet box (not included) using existing washers and outlet box screws or the machine screws (BB). NOTE: If the outlet box screws required for your outlet box are of a different size than the machine screws (BB), consult a licensed electrician before proceeding. 34 Outlet Box C Tighten machine screws (BB) completely to secure mounting strap (C) to outlet box. BB BB CAUTION: Make sure the outlet box can support 35 lbs. hanging weight.
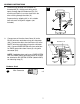
ASSEMBLY INSTRUCTIONS 5. Attach chain (H) to the loop at the top of the fixture (A) with connecting chain link (CC). Determine the hanging length for fixture (A). NOTE: Use pliers, a flathead screwdriver and a soft cloth (all not included) to open the link of chain (H) at length chosen. Remove any extra chain at this time. Feed wiring from fixture (A) up through chain (H) to pre-determined length. 5 H CC Wiring H A Hardware Used CC Connecting Chain Link x1 6.
ASSEMBLY INSTRUCTIONS 7. Feed wiring up through hole at bottom of threaded rod (D). Gently push wiring until it comes through top of threaded rod (D). Pull all wiring until there is no extra slack left in the wires running through the chain (H). 7 Prepare wire by stripping 3/4 in. of insulation from wire ends using wire strippers (not included). D H 8. 8 Connect one of the wires from fixture (A) to the BLACK wire from outlet box using wire connector (AA).
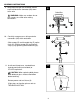
ASSEMBLY INSTRUCTIONS 9. Wrap electrical tape (not included) around each individual wire connector (AA) down to the wire. 9 Outlet Box WARNING: Make sure no bare wire or wire strands are visible after making connections. AA AA AA 10. Carefully arrange excess wiring and wire connectors (AA) within outlet box. 10 Outlet Box B Slide canopy (B) and threaded ring (E) up the chain (H). Secure canopy (B) to mounting strap (C) by tightening the threaded ring (E). E H A 11. Install one 60-watt max.
CARE AND MAINTENANCE • Shut off main power supply. Wipe fixture with soft, damp cloth. Use window cleaner to clean glass. Do not use an abrasive cleaner on glass or fixture. TROUBLESHOOTING WARNING: Before beginning work, shut off the power supply to avoid electrical shock. PROBLEM Bulb will not light. POSSIBLE CAUSE 1. Bulb is burned out. 2. Power is OFF. 3. Faulty connection. CORRECTIVE ACTION 1. Replace light bulb. 2. Make sure power supply is ON. 3. Check wiring and all connections.