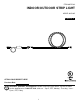
ITEM #0727912 INDOOR/OUTDOOR STRIP LIGHT MODEL #UCL8R Español p. 9 ATTACH YOUR RECEIPT HERE Purchase Date Questions, problems, missing parts? Before returning to your retailer, call our customer service department at 1-800-527-1292, 8:30 a.m. - 5 p.m., EST, Monday - Thursday, 8 a.m. 5 p.m., EST, Friday.
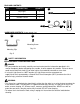
PACKAGE CONTENTS PART DESCRIPTION QUANTITY A Strip Light 1 B Power Cord 1 C Remote Control 1 A B C HARDWARE CONTENTS (shown actual size) AA BB Mounting Screw Mounting Clip Qty. 10 Qty. 5 SAFETY INFORMATION READ AND SAVE THESE INSTRUCTIONS. DANGER • For your protection and safety, carefully read and understand the information provided in this manual completely before attempting to assemble, install or operate this product.
SAFETY INFORMATION WARNING • To reduce the risk of fire and electric shock, use only the power supply adapter provided with the fixture. • DO NOT use an extension cord. • To reduce the risk of burns, fire, electric shock or injury to persons, unplug from outlet before attaching or removing parts.
SAFETY INFORMATION CAUTION • DO NOT USE THIS FIXTURE WITH A DIMMING CIRCUIT. If you presently have dimmer controls, you will need to remove them and replace them with regular electrical switches. If you have a three-way dimmer, you will have to replace it with a regular three-way switch. If you are unfamiliar with electrical installations, it is recommended you have a qualified electrician install your fixture. • As a safety precaution, unplug power cord when not in use.
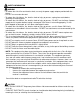
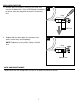
ASSEMBLY INSTRUCTIONS 2. Plug the male end of strip light (A) into female end on power cord (B). Slide plastic ring on power cord (B) over threads at male end of strip light (A). Securely tighten plastic ring. 2 A B Plastic Ring 3a. Determine the approximate location for the strip light (A). Temporarily place mounting clips (AA) against the mounting surface and mark the location of the screw holes using a pencil or marker (not included). 3a AA 3b.
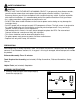
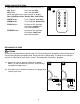
OPERATING INSTRUCTIONS 1. Operation buttons on panel of the remote control (C): ON button OFF button 1 turns strip light ON turns strip light OFF C ON OFF Select the button of the color you wish to display: Red, Light Blue, Green, Purple, Blue, and Yellow. WHITE button Turns strip light cool white WARM button Turns strip light warm white FLASH button All colors of the strip light will change quickly from one color to another.
REPLACING THE FUSE 2. Remove old fuse carefully. Gently pry the metal end nearest the blade with a very small flathead screwdriver to loosen, then turn plug over to remove. Discard old fuse. 2 Plug Old Fuse 3. Replace old fuse with spare fuse and close fuse access cover firmly and completely. 3 NOTE: Replace fuse only with a 5-Amp, 125-Volt fuse. Plug Spare Fuse CARE AND MAINTENANCE • Wipe fixture with soft, damp cloth. Do not use an abrasive cleaner on fixture. .
TROUBLESHOOTING WARNING: Before beginning work, shut off the power supply to avoid electrical shock. PROBLEM Light does not come on initially or no longer comes on. POSSIBLE CAUSE 1. Power is OFF. 2. Fixture is not plugged in. 3. LED component is not working properly. CORRECTIVE ACTION 1. Make sure power supply is ON. 2. Plug fixture into outlet. 3. Contact customer service.