
Instructions / Assembly

U999350, Rev B, 11/14/2016
BLT LED IMPORTANT SAFETY INSTRUCTIONS
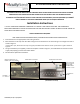
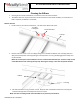
Figure 1: Built In T-Bar Clip
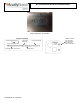
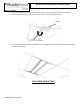
Figure 2: LATC Installation
(ORDERABLE OPTION)
1. Place the fixture in the appropriate T-Bar ceiling structure.
2. Bend the built in T-Bar clips over the T-Bar ceiling to secure the fixture to the T-Bar ceiling or use hanger wire hole as
shown in Figure 1.
If using LATC clips, attach the LATC clips using the provided screws after the fixture is placed in the grid as shown in
Figure 2.
3. Using a screwdriver (not supplied), remove access plate as shown in Figure 3, and make electrical connections from
supply and properly ground as local codes dictate.
4. Reinstall access plate with screwdriver.
THIS PRODUCT MUST BE INSTALLED IN ACCORDANCE WITH THE APPLICABLE INSTALLATION CODE BY A PERSON
FAMILIAR WITH THE CONSTRUCTION AND OPERATION OF THE PRODUCT AND THE HAZARDS INVOLVED
CE PRODUIT DOIT ÊTRE INSTALLÉ SELON LE CODE D’INSTALLATION PERTINENT, PAR UNE PERSONNE QUI CONNAÎT
BIEN LE PRODUIT ET SON FONCTIONNEMENT AINSI QUE LES RISQUES INHÉRENTS
Installation Instructions
**Caution: MAKE SURE LUMINAIRE IS MOUNTED TO A SECURE T-BAR CEILING STRUCTURE. USE APPROPRIATE
MOUNTING HARDWARE TO INSTALL FIXTURE RATED FOR YOUR APPLICATION. FAILURE TO MOUNT FIXTURE CORRECTLY
COULD RESULT IN SERIOUS INJURY.
ABOVE CEILING ACCESS REQUIRED
KEEP THESE INSTALLATION INSTRUCTIONS / CONSERVEZ CES INSTRUCTIONS D'INSTALLATION
HANGER WIRE ATTACH POINT
STANDARD 1 ½”
T-BAR
ONCE FIXTURE IS IN
GRID, ATTACH LATC
CLIPS (4) USING
PROVIDED SCREWS
(maximum 17 in-lbs)
BEND OUT HOOK 90 DEG. TO
ENGAGE T-BAR ALL (4) CORNERS
HANGER WIRE ATTACH POINT
STANDARD
1 ½” T-BAR