
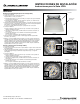
Instructions / Assembly

SENSOR PROGRAMMING
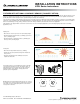
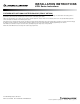
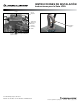
Programming is accomplished via the push button on the front face of the sensor, next to the lens (See figure 14).
The programming sequence is as follows:
1. The user presses the push button a number of times that specifies the function to be
programmed. For example, to program function 4 (Minimum On Time) the push button
should be pressed 4 times. Each time the button is pressed, a green LED flashes inside
the sensor lens.
2. The sensor gives feedback by blinking the LED a number of times that denotes the current
setting for the function being programmed. The feedback is repeated 3 times. Any new
setting has to be entered before the third feedback is displayed. If no new setting is entered
the sensor resumes operation with the current setting after the third feedback is given.
3. The user presses the push button a number of times that specifies the new setting for the
function (see table A on page 5 for all possible settings).
4. The sensor gives feedback by blinking the LED a number of times that represents the new
setting for the function. This feedback is repeated 3 times, and at the end of the third time
the sensor starts operating with the new settings. A short blink will be noticeable at the end
of the sensor feedback, just before it starts operating under the new setting.
The sensor can be programmed for:
Function 2 - Occupancy Time Delay: This function sets the length of time the fixture stays
ON (or on High Light Output) after the last time it sensed occupancy.
Function 4 - Minimum On time: This is a safety feature to extend the life of certain light sources.
It prevents the fixture from turning On and Off repeatedly in a short time frame, possibly damaging
some types of lamps. It is normally not needed for LED light sources.
Function 9 – Restore Factory Defaults: Used to revert back to factory settings
(shaded in grey in table A).
Function 11 – Dimming Range: This function sets the dim level the fixture will go to when the
Occupancy Time Delay (Function 2) expires.
Function 12 – Switch Mode: When enabled, this function allows the user to activate the sensor
relay by pressing the push button on the sensor. It can be used for manually controlling the
operation of the fixture when testing the wiring.
Function 15 – Dim to Off Occupancy Time Delay: After the Occupancy Time Delay
(Function 2) has expired, this function specifies the amount of time the lights are held in the
dimmed state before turning the fixture off completely.
Figure 14
Screwdriver Slot LED Location
Programming
Button
Screwdriver Slot
INSTALLATION INSTRUCTIONS
JCBL Series Instructions
©2016 Acuity Brands Lighting, Inc. Rev 4/16 P4130 pg 5 of 7
One Lithonia Way, Conyers, GA 30012
Phone: 800-315-4963 Fax: 770-929-8789 www.lithonia.com