
Installation Guide

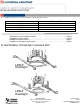


LDN 6” – 7” hole
LDN 4” – 4-3/4” hole
Cut ceiling opening slightly larger than the
outside diameter on the mounting frame.
4” Ceiling opening: 4-3/4” (12.1cm). 6”
Ceiling opening: 7” (17.8cm)
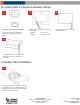
C) Lay-in Panel T-bar Ceiling Installation
CJ5201053 Rev E
Page 3
© Acuity Brands Lighting, Inc. 2016
All Rights Reserved.
B) Important Safety Information - For Your Protection, Read Carefully
Warning: Risk of fire. Do not install insulation within 3 inches of fixture sides or wiring compartment, nor above fixture in such a manner
as to entrap heat.
Electric current can cause painful shock or serious injury unless handled properly. For your safety, always remember the following:
• Turn off the supply power.
• Ground the fixture to avoid potential electrical shocks.
• Do not handle an energized fixture or energize any fixture with wet hands, when standing on a wet or damp surface, or in
water.
1
2
Adjust channel bars to the correct spacing
between T-bar. See Page 5 for procedure
for non-accessible ceiling installation.
3
Assemble the channel bars to each side of the
of the mounting frame with the included
hardware. Leave the hardware loose to adjust
the position of the frame in the ceiling.
Lithonia Lighting
1400 Lester Road Conyers Georgia 30012
P 800 315 4935 F 770 860 3129
www.Lithonia.com
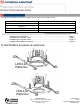
4
6
5
Alternate bar hangers used for EL/ELR:
Attach the adjustable brackets to the fixture
using the hardware provided. Wing nuts
should face inward for adjustment through
the ceiling.
Place (2) hanger bars together so that the
formed tabs engage the slots to form one
long rigid hanger bar. Aligning the ”V”
cutouts in the hanger bar will set the
spacing for a 24” ceiling.
4
Secure channel bars to T-bar by means of a
fastener (wire ties, screws, etc.)