
Installation Guide

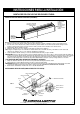

INSTALLATION
INSTRUCTIONS
LITHONIA TRACK LINE VOLTAGE FIXTURES
DOWNLIGHTING
& TRACK
SYSTEMS
ONE LITHONIA WAY,
CONYERS,
GEORGIA 30012,
TELEPHONE 770-922-9000,
FAX
770-860-3106
www.lithonia.com
IN CANADA: 1100 50TH AVE., LACHINE, QUEBEC H8T
2V3
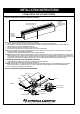
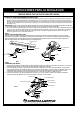
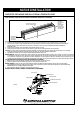
STEP 4:
INSTALLATION AND REMOVAL OF TRACK HEAD (REFER TO Fig.5)
1. Push the top portion of the head adapter into the slot of the track section.
2. Pull down the adapter’s locking tab.
3. Turn “Ground indicator” tab towards the ground groove on track to align ground tab with ground conductor.
4. Adapter can move to any position along the track section. Lighting fixture will adjust to any position.
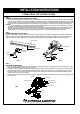
INSTALLATION
REMOVAL
1. Pull down the adapter’s locking tab.
2. At the same time, rotate the adapter 90 degrees and remove from track.
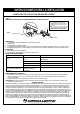
TROUBLE SHOOTING:
PRODUCT MAINTENANCE:
1. To clean the fixture, first disconnect power to the fixture by turning off the circuit breaker or by removing the fuse at the fuse box.
2. Use a dry or slightly dampened clean cloth (use clean water, never use a solvent) to wipe the interior and exterior surfaces of
the fixture.
3. Allow the fixture to dry completely before power is restored.
CAUTION:
Do not use chemical solvents or harsh abrasives to clean fixture as damage to the fixture or various components may occur
remedying the fixture inoperable.
LIMITED WARRANTY
The manufacturer warrants this lighting fixture to be free from defects in materials and workmanship for a period of five (5) years from date
of purchase. This warranty applies only to the original consumer purchaser and only to products used in normal use and service. If this
product is found to be defective, the manufacturer’s only obligation, and your exclusive remedy, is the repair or replacement of the product
at the manufacturer’s discretion, provided that the product has not been damaged through misuse, abuse, modifications,accident, alterations,
neglect or mishandling. This warranty shall not apply to any product that is found to have been improperly installed,set-up, or used in any way
not in accordance with the instructions supplied with the product. This warranty shall not apply to a failure of the product as a result of an
accident,misuse, abuse, negligence, alteration, or faulty installation, or any other failure not relation to faulty material or workmanship. This
warranty shall not apply to the finish on any portion of the product, such as surface and/or weathering, as this is considered normal wear and
tear. The manufacturer does not warrant and specially disclaims any warranty, whether express or implied, of fitness for a particular purpose,
other than the warranty contained herein.the manufacturer specifically disclaims any liability and shall not be liable for any consequential or
incidental loss or damage, including but not limited to any labor/expense costs involved in the replacement or repair of said product.
TRACK
GROUND GROOVE
GROUND INDICATOR
FIG. 5
NOTICE:
1. CONNECTOR IS DESIGNED TO LOCK INTO
TRACK SECTION BY TURNING CONNECTOR
IN ONE DIRECTION ONLY.
2. TURN “GROUND INDICATOR” TAB TOWARDS
THE GROUND GROOVE ON TRACK TO ALIGN
GROUND TAB WITH GROUND CONDUCTOR.
Problem:
Light Bulb or LED module will not
illuminate.
Possible Cause:
1. Light bulb or LED module is
burned out.
Corrective Action:
1. Replace light bulb or track fixture with
integrated LED module.
2. Power is off. 2. Make sure power supply is on.
3. Faulty wire connection
3. Check wiring.
4. Faulty switch
4. Test or replace switch
Crossed wires or power wire is
grounding out.
Check wire connections
Fuse blows or circuit breaker
trips when light bulb is
illuminated.