
Installation Sheet


INSTALLATION
INSTRUCTIONS
LITHONIA TRACK LINE VOLTAGE FIXTURES
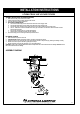
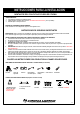
ASSEMBLY INSTRUCTIONS (AS SHOWN IN DIAGRAM):
DOWNLIGHTING
& TRACK
SYSTEMS
ONE LITHONIA WAY,
CONYERS,
GEORGIA 30012,
TELEPHONE 770-922-9000,
FAX
770-860-3106
www.lithonia.com
IN CANADA: 1100 50TH AVE., LACHINE, QUEBEC H8T
2V3
1. Make sure the main power to the circuit is OFF.
2. Install mounting bracket to existing outlet box with screws.
3. Pull wires
through mounting bracket hole.
4. ELECTRICAL CONNECTIONS:
a. Connect the white wire(s) from the fixture to the white wire of the supply circuit.
b. Connect the black wire(s) from the fixture to the black wire of the supply circuit.
c. Connect the green colored (or bare copper) wire to the grounding conductor of the supply circuit.
d. Use U.L. Listed wire connectors suitable for the size, type and number of conductors. No loos
e strands or loose
wires should be present.
e. Secure wire connectors with U.L. Listed electrical tape.
f. Carefully tuck connected wires back into the outlet box.
5. Secure the canopy to the mounting bracket with provided screws.
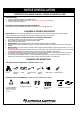
RELAMPING THE BULB
1. Make sure that the power is turned off.
2.
THE BULB IS HOT!
Make sure that the bulb is cool before re-lamping the fixture.
3. Attach the suction cup to the bulb, and secure the bulb to the socket on lamp housing by twisting and locking correctly.
4. Detach the suction cup from the bulb by pulling the small pin.
5. Restore electricity and check the ope
ration of your new lighting fixture.
CAUTION:
Refer to the re-lamping label located near the lamp holder for recommended maximum wattage.
DO NOT
exceed
the recommended maximum wattage.
ASSEMBLY DIAGRAM
A
B
C
D
E
3/10