
Installation Guide


U0842 11/1/11 Page 4 of 4
LED IMPORTANT SAFETY INSTRUCTIONS
MNSL LED Striplight
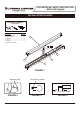
1. Remove fixture components and parts pack(s).
Check that all parts are included. See Fig. 1.
Note: Turn off power at circuit breaker box!
*** Wireway cover with LED Lamp ***
2. Remove Wireway Cover (2) by lifting upward on ex-
posed edges of part. Start in the middle and work
outward.
3. Remove the parts pack and place it in a convenient
location during installation.
4. Determine appropriate knockout for removal in
relationship to incoming power supply. (Knockouts are
located on each end and back of the fixture.)
To remove knockouts:
Place standard screwdriver on edge of circle (on opposite
side from retaining tabs) and gently strike with hammer.
Grip edge with pliers and flex back and forth until removed.
See Fig. 2.
5. If using romex strain relief bushing, install the
bushing into the open hole.
6. Insert house power supply cable through open hole
or strain relief bushing.
7. Position the Fixture Housing (1) against the mount-
ing surface and with a pencil, mark the screw hole
locations to be located at the narrow section of the key-
holes. See Fig. 3.
8. Using a drill with a 1/16" drill bit
9. Partially install the Mounting Screws.
, make two small
pilot holes at the marked screw hole locations. If drill bit
does not encounter a stud or wood surface, use toggle
bolts or suitable fastener depending on
structural
conditions. If drill bit does encounter wood surface, use
#10 wood screw.
Position the
Fixture Housing against the mounting surface with the
screw heads through the keyhole mounting holes.
Slide the fixture until the screw heads are through the
narrow section of the key holes. Finish tightening the
screws to secure the fixture against the mounting
surface.
WIRING AND FIXTURE OPERATION CAUTION:
Connect fixture to supply wires rated for at least
90°C (194°F).
Do not use fixture on dimming circuits.
10. Cut supply cable to desired length. Strip black
and white wire leads with wire strippers to expose
3/8"-7/16" of bare metal. See Fig. 4.
11. Using Wirenuts (3) provided, connect supply
(house) wires to fixture wires - white to white, black
to black, and green to green or bare copper ground
wire.
12. Bundle wires in tight grouping to be out of the
way and reinstall Wireway Cover.
STEP-BY-STEP