
Cut Sheet


Lithonia Lighting
Downlighting
One Lithonia Way / Conyers, GA 30012
800-315-4935 / www.lithonia.com
INSTALLATION INSTRUCTIONS
Part No. CJ5200907 Rev. A
©2010 Acuity Brands Lighting, Inc., 04/10
Page 2 of 4
Torsion
Springs
Socket Adapter
Separate to install
Attach green wire
Green wire
Green wire
Copper Wire
Figure 1
Figure 2
Torsion
Springs
Socket Adapter
Separate to install
Attach green wire
Green wire
Green wire
Copper Wire
Figure 1
Figure 2
TSA6
Figure 3
Screws
Hooks
TSA6
Figure 3
Screws
Hooks
Reality
Prior to installing the fixture, disconnect ALL power supplies to the
unit. This unit may be installed in TYPE IC installations.
Installation
:
The Reality module can be installed as either a retrofit into your
existing can or as new installation.
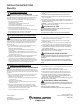
Retrofit Installation (figure 1):
1. Remove the existing lamp and reflector, and discard them, leaving
the socket hanging freely by the wires.
2. Remove the socket adaptor from the top of the module and screw it
securely into the existing socket.
3. Remove one of the screws from the existing can, and place the ring
terminal from the green wire under it.
4. Plug your new module into the socket adaptor and tuck the wires
into the hole in the fixture top cover. Snap the socket into the cut-out
on the fixture top cover.
5. Squeeze both torsion springs and seat them in the existing
brackets inside the rough-in section. Release the springs and push
your new fixture up flush with the ceiling.
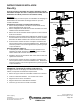
New Installation (figure 2):
1. Your new installation module does not
ship with a socket adapter.
Plug the module directly into the cable inside the rough in section.
2. Strip the green wire and wire nut it to the supplied copper wire.
3. Squeeze both torsion springs and seat them in the existing
brackets inside the rough-in section. Release the springs and push
your new fixture up flush with the ceiling.
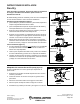
Torsion Spring Adapter (TSA6) (figure 3):
If you are retrofitting an existing can, you may require the TSA6
option.
1. Remove the (3) screws around the perimeter of your existing can
and keep them.
2. Insert the TSA6 into the can. Note the hooks face upward.
3. Line up the slots with the threaded holes.
4. Align the bottom of the TSA6 flush with the can.
5. Drive the (3) screws through the TSA6 and back into the can.