
Installation Guide

Installation Instructions
TWH-LED
Part Number: RJ521353 Rev A
Revision Date: 11-19-12
Lithonia Lighting Outdoor • One Lithonia Way • Conyers, Georgia 30012
Phone: 800-279-8041 • Fax: 770.918.1209 •
www.lithonia.com
© 2011 Acuity Brands Lighting, Inc. All rights reserved. 11/12
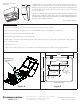
Condulet Tee mounting:
1. Loosen the 2 captive screws in the front housing and remove front cover
from fi xture.
2. Remove electrical splice compartment cover. Keep (2) 10-24 screws for
reinstallation. See Figure A.
3. Remove top conduit cover disc. See Figure C.
4. Mount fi xture using dimensions shown in Figure B. Thread conduit into
fi xture.
5. Make supply connections. Reinstall electrical splice compartment cover
with (2) 10-24 screws removed in step 2, making sure no wires are pinched.
6. Replace front cover.
7. Tighten the 2 captive screws. Do not over tighten. Over tightening will
cause stripping and void all warranties.
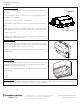
VG - Vandal Guard:
1. Position polycarbonate vandal guard over prismatic glass lens. Each side
of the vandal guard should have an attachment screw that matches up with a
mounting hole predrilled in the fi xture front housing.
2. Thread each attachment screw into the appropriate mounting hole and
tighten securely.
WG - Wire Guard:
1. Position wire guard over prismatic glass lens. Each side of the wire guard
should have an attachment screw that matches up with a mounting hole
predrilled in the fi xture front housing.
2. Thread each attachment screw into the appropriate mounting hole and
tighten securely.
Troubleshooting: If this fi xture fails to operate properly, check to make sure: • The fi xture is wired correctly. • The fi xture is
grounded correctly. • The line voltage at the fi xture is correct. If all these variables have been checked and the fi xture still
does not operate as specifi ed, contact your local Lithonia Lighting distributor.
Figure C
Conduit cover disc